

TIG welding, or Gas Tungsten Arc Welding, is renowned for its precision and quality. While it’s often perceived as difficult, understanding the core principles and practicing consistently can make it achievable. This guide breaks down the learning curve, offering insights into what makes TIG welding challenging and providing a roadmap to mastering this valuable skill. You can learn to TIG weld, it just takes patience and dedicated effort.
TIG welding. The name itself conjures images of intricate metalwork, clean welds, and a level of mastery reserved for the most skilled fabricators. But for many aspiring welders, a big question looms: “Is TIG welding hard?” The short answer is, yes, it can be challenging, especially when you’re first starting out. However, “hard” doesn’t mean impossible. It simply means that TIG welding demands a higher level of focus, coordination, and understanding than some other welding processes.
This guide is designed to demystify TIG welding and help you understand what makes it challenging, what skills you need to develop, and how you can effectively learn and master this precise welding technique. Whether you’re a complete beginner or have some welding experience, we’ll break down the process, offer practical tips, and help you build the confidence to tackle TIG welding.
Key Takeaways
- Mastering the Foot Pedal: Precise control over amperage using a foot pedal is a foundational skill that requires significant practice to develop smooth and consistent heat input.
- Torch and Filler Rod Coordination: Simultaneously manipulating the TIG torch and filler rod with different hands demands excellent dexterity and hand-eye coordination.
- Understanding Filler Metal Application: Knowing when and how much filler metal to add is crucial for creating strong, aesthetically pleasing welds.
- Arc Control is Paramount: Maintaining a consistent arc length and angle is vital for proper fusion and preventing tungsten contamination.
- Material and Gas Knowledge: Different metals and shielding gases require specific settings and techniques, adding layers of complexity to TIG welding.
- Patience and Practice are Non-Negotiable: TIG welding has a steeper learning curve than other methods, but consistent practice is the key to overcoming challenges and achieving proficiency.
- Quality Over Speed: TIG welding prioritizes control and precision, meaning it’s a slower process than MIG welding, but the resulting weld quality is often superior.
Understanding TIG Welding: More Than Just Heat
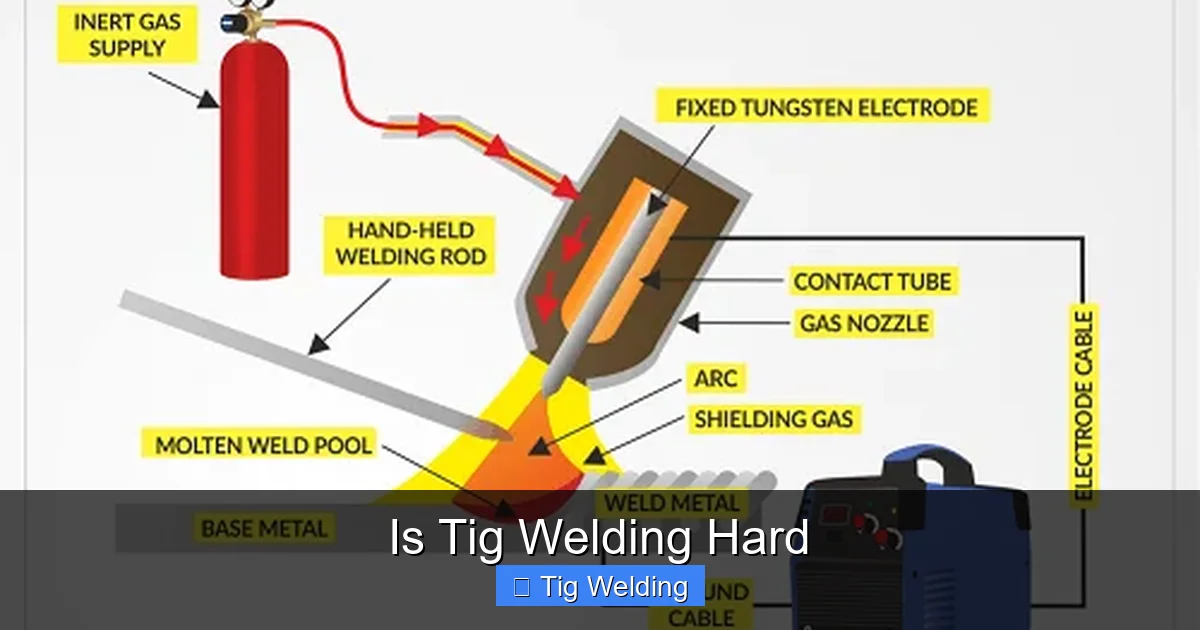
TIG stands for Tungsten Inert Gas. It’s also known as Gas Tungsten Arc Welding (GTAW). Unlike other welding methods that use a consumable electrode, TIG welding uses a non-consumable tungsten electrode to create the arc. An inert shielding gas, typically argon, protects the weld puddle from atmospheric contamination. If you need to add filler metal, you do so with a separate rod, held in your other hand.
This fundamental difference is what gives TIG welding its incredible precision and control, but it’s also the source of its perceived difficulty. You’re essentially managing multiple elements simultaneously: the arc, the heat, the filler rod, and the shielding gas.
What Makes TIG Welding Seem Hard?
Let’s break down the core elements that contribute to the learning curve in TIG welding.
The Dexterity Dance: Torch and Filler Rod
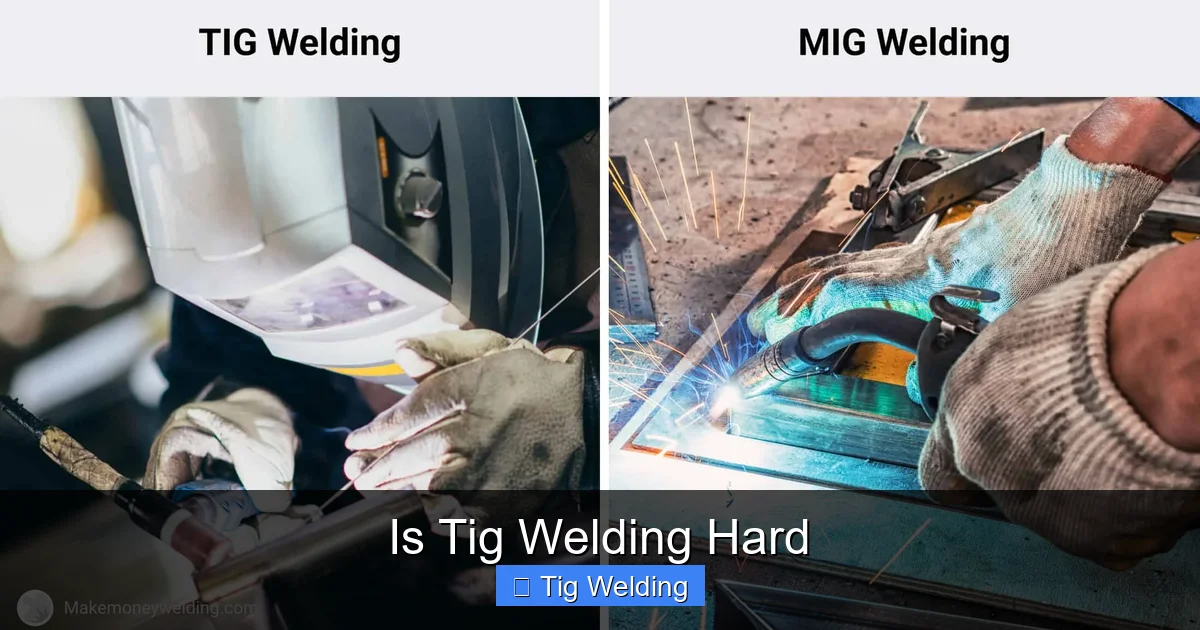
This is often the biggest hurdle for newcomers. In MIG welding, the wire feeds automatically. In stick welding, you hold one electrode. With TIG, you have a torch in one hand and a filler rod in the other.
Mastering the TIG Torch Grip
The way you hold the TIG torch is crucial. It’s not a death grip. You want a relaxed grip, allowing for fine motor control. Think of it like holding a pencil for detailed drawing. This allows you to adjust the torch angle precisely.
Coordinating the Filler Rod
This is where the dexterity comes in. You need to feed the filler rod into the molten puddle at the right time and in the right amount. Too much, and you’ll flood the weld. Too little, and you won’t get proper fusion. This requires significant practice to develop a consistent rhythm.
Practical Tip: Practice holding the torch and filler rod together *without* welding. Get a feel for the independent movement of each hand. Try “drawing” circles or lines on a scrap piece of metal with the filler rod, focusing on a smooth, consistent feed.
The Amperage Control Conundrum
TIG welding offers unparalleled control over heat input. This is typically achieved through a foot pedal that controls the amperage.
Understanding the Foot Pedal
The foot pedal is your throttle. A slight press sends a surge of amperage, while a firmer press increases it. To make a good weld, you need to smoothly increase the amperage to establish the puddle, hold it steady, and then gradually decrease it as you finish the bead.
Achieving Smooth Amperage Transitions
This is where many beginners struggle. They tend to stomp on the pedal, creating a jagged, uneven weld, or they lift off too abruptly, causing crater cracks. Developing a smooth, nuanced control of the foot pedal takes time and repetition.
Practical Tip: Before welding on actual metal, practice with the pedal on a surface. Get a feel for the different pressure points and how they affect the imagined heat. When you start welding, focus on making small, deliberate movements with your foot. Aim for consistency.
Arc Control: The Heartbeat of the Weld
Maintaining a consistent arc length and torch angle is absolutely vital for a clean, strong TIG weld.
The Importance of Arc Length
The distance between the tungsten electrode and the workpiece is critical. Too close, and you risk melting the tungsten into the weld puddle, contaminating it and creating a weak spot. Too far, and the arc becomes unstable, leading to poor penetration and a wider, flatter bead.
Maintaining a Consistent Torch Angle
The angle at which you hold the TIG torch affects the penetration and the appearance of the weld. Typically, you’ll hold the torch at a slight angle, pointing in the direction of travel. Consistency here ensures a uniform weld.
Practical Tip: Imagine you are holding a pencil and drawing a line. Try to keep the tip of the pencil (the tungsten) at a consistent distance from the paper (the workpiece). Focus on keeping the torch body at a steady angle as you move along the joint.
Filler Metal Application: When and How Much?
Adding filler metal is a separate action from creating the arc, and it requires its own set of skills.
The Art of Dipping
You dip the filler rod into the molten puddle, melt a small portion, and then pull it back out. This action needs to be timed perfectly with the movement of the torch and the addition of heat. Too fast, and you’ll create a mess. Too slow, and you won’t get enough filler.
Matching Filler to the Base Metal
Different metals require different types of filler rods. Using the wrong filler can result in a weak or brittle weld. Understanding metallurgy and selecting the appropriate filler material is a key part of TIG welding.
Practical Tip: Start with a consistent rhythm of dipping. Dip, melt, pull back. Then move the torch forward. Repeat. Don’t try to feed the rod continuously at first. Focus on the distinct action of dipping and melting.
Material and Gas: The Variables
TIG welding is versatile, but this versatility comes with complexity. Different metals and different shielding gases require different settings and techniques.
Understanding Base Metals
Aluminum, stainless steel, mild steel, and exotic alloys all behave differently under the TIG arc. Aluminum, for example, requires AC (alternating current) to clean the oxide layer, while steel typically uses DC (direct current). Each has its own optimal settings for amperage, travel speed, and gas flow.
Choosing the Right Shielding Gas
While argon is the most common, other gases or mixtures can be used for specific applications. Pure argon is great for aluminum and stainless steel. For steel, a blend with helium can provide better penetration. Understanding these nuances is part of mastering TIG welding.
**Practical Tip:** When you’re starting out, focus on one material and one gas. Mild steel with pure argon is an excellent starting point. Once you’re comfortable with that, gradually experiment with other materials and gas combinations.
The Learning Curve: A Realistic Expectation
Is TIG welding hard? For many, yes. It’s a skill that requires a significant investment of time and practice. You won’t be producing perfect, dime-stacked welds overnight.
Initial Frustration is Normal
Expect to make mistakes. You’ll encounter issues like:
- Puddling Problems: Inconsistent puddle formation due to unsteady amperage or arc length.
- Contamination: Accidentally touching the tungsten to the workpiece or having dirt on your base metal or filler rod.
- Uneven Bead Appearance: Welds that look lumpy, wide, or have inconsistent ripples.
- Lack of Fusion: The weld doesn’t penetrate properly, leaving a weak joint.
- Burn-Through: Especially on thinner materials, you might accidentally melt too much metal.
The Reward of Persistence
However, the reward for persistence is immense. TIG welding produces some of the cleanest, strongest, and most aesthetically pleasing welds possible. It’s the process of choice for industries where quality is paramount, like aerospace, automotive, and custom fabrication.
How to Get Started and Improve Your TIG Skills
So, how do you conquer the perceived difficulty of TIG welding? It’s all about a structured approach and consistent effort.
Step 1: Invest in the Right Equipment
You don’t need the most expensive professional setup to start, but having functional equipment is essential.
Choosing a TIG Welder
For beginners, a DC-only TIG welder is a great starting point if you plan to focus on steel. If you want to weld aluminum early on, you’ll need an AC/DC capable machine. Look for machines with features like adjustable amperage, gas flow control, and perhaps a pulse function (though this is more advanced).
Essential Accessories
- TIG Torch: Usually comes with the welder, but make sure it’s the right amperage rating.
- Tungsten Electrodes: Different types (e.g., pure, ceriated, lanthanated) are used for different applications. Start with a common type like 2% thoriated or lanthanated for DC welding.
- Filler Rods: Get the correct type and diameter for your base metal.
- Shielding Gas: A tank of pure argon is a must for starting.
- Flowmeter: To accurately control the gas flow rate.
- Safety Gear: A welding helmet with an auto-darkening lens is crucial. Leather gloves, a fire-resistant jacket or apron, and sturdy footwear are also necessary.
- Clamps and Magnets: To hold your workpieces together securely.
Step 2: Learn the Fundamentals and Safety
Before you strike an arc, understand the basics.
Understand Your Machine Settings
Read your welder’s manual. Learn what each dial and setting does. Pay attention to amperage ranges, gas flow rates (typically 15-25 CFH for argon), and any other adjustable features.
Safety First, Always
- Always wear appropriate personal protective equipment (PPE).
- Ensure good ventilation to avoid inhaling welding fumes.
- Be aware of fire hazards and keep a fire extinguisher nearby.
- Never look directly at the welding arc without a proper helmet.
Step 3: Practice, Practice, Practice
This is the most critical step. There’s no shortcut to building muscle memory and coordination.
Start with Basic Exercises
- Arc Initiation: Practice just starting and stopping the arc smoothly.
- Straight Bead Practice: Clamp two pieces of scrap metal together and practice running straight beads along the joint. Focus on consistent arc length, torch angle, and travel speed.
- Dime Stacking: This is the goal for many TIG welders – creating a weld with evenly spaced ripples that look like overlapping dimes. This requires perfect coordination of amperage, travel speed, and filler rod dips.
Gradually Increase Complexity
Once you can run a decent straight bead, move on to more challenging tasks:
- Butt Welds: Joining two pieces of metal edge-to-edge.
- Lap Welds: Joining two pieces where one overlaps the other.
- Fillet Welds: Joining two pieces at a 90-degree angle.
- Different Joint Types: Corner joints, edge joints.
- Different Material Thicknesses: Start with thicker material (e.g., 1/8″ or 3/16″ steel) and gradually work your way down to thinner materials.
Step 4: Seek Guidance and Feedback
You don’t have to go it alone.
Take a TIG Welding Course
The fastest way to learn is often through structured instruction. Community colleges, technical schools, and private welding schools offer TIG welding courses. An instructor can provide immediate feedback and correct bad habits before they become ingrained.
Watch Online Tutorials
YouTube is a treasure trove of TIG welding content. Watch experienced welders demonstrate techniques. Pay attention to their torch grip, filler rod manipulation, and foot pedal control.
Find a Mentor
If you know an experienced TIG welder, ask if they’re willing to offer guidance. Even a few hours of personalized advice can be invaluable.
Troubleshooting Common TIG Welding Issues
Here are some common problems and how to fix them:
Problem: Tungsten contamination in the weld
Cause: Tungsten touched the weld puddle or arc, or arc length was too great.
Visual guide about Is Tig Welding Hard
Image source: customfabricators.net
Visual guide about Is Tig Welding Hard
Image source: makemoneywelding.com
Visual guide about Is Tig Welding Hard
Image source: electronicshub.org
Solution: Keep a consistent, short arc length. Grind your tungsten to a sharp point (for DC). If contamination occurs, stop welding, grind out the contaminated area, and restart.
Problem: Inconsistent weld bead appearance (jagged ripples, wide bead)
Cause: Uneven travel speed, inconsistent amperage, or poor filler rod control.
Solution: Focus on a smooth, steady pace. Practice coordinating your foot pedal and filler rod dips with your torch movement.
Problem: Lack of fusion (weld looks weak and doesn’t penetrate)
Cause: Not enough heat (amperage too low), too fast travel speed, or improper joint preparation.
Solution: Increase amperage slightly. Slow down your travel speed. Ensure the joint is clean and free of rust, paint, or mill scale.
Problem: Burn-through on thin metal
Cause: Too much amperage, too slow travel speed, or holding the arc too long in one spot.
Solution: Reduce amperage. Increase travel speed. Practice stitch welding (short, intermittent welds) on very thin material.
Conclusion: Is TIG Welding Hard? Yes, But It’s Worth It.
So, to circle back to our initial question: is TIG welding hard? The answer is a resounding yes, it can be. It demands a level of coordination, fine motor control, and patience that can be daunting at first. The simultaneous management of the torch, filler rod, and foot pedal presents a significant learning curve.
However, it’s crucial to remember that “hard” is a relative term. With the right approach, dedicated practice, and a willingness to learn, TIG welding is an achievable skill. The precision, quality, and aesthetic appeal of TIG welds are unmatched, making it an incredibly rewarding process to master.
Don’t let the perceived difficulty deter you. Break down the process into manageable steps. Focus on one skill at a time. Seek out good instruction and feedback. Most importantly, be patient with yourself. Every skilled TIG welder started right where you are – fumbling with a torch, trying to get the amperage just right. With persistence, you too can achieve mastery and unlock the potential of this remarkable welding technique.