

Understanding TIG welding amps to metal thickness is essential for achieving high-quality welds. This guide provides a comprehensive chart and tips to help you choose the right amperage for different metals and thicknesses. Whether you’re a beginner or an experienced welder, mastering this knowledge ensures safety, efficiency, and professional results in your TIG welding projects.
Key Takeaways
- Proper amperage selection: Ensures strong welds and prevents burn-through or weak joints.
- Metal thickness matters: Thinner metals require lower amps; thicker metals need higher amps.
- Material type influences amperage: Different metals, like aluminum or steel, have distinct welding amp requirements.
- Consult a TIG welding amps to metal thickness chart: A visual guide simplifies choosing the right settings.
- Adjustments are key: Always fine-tune amperage based on weld position and electrode type.
- Safety first: Using correct amps reduces risks of weld defects and accidents.
Quick Answers to Common Questions
Question 1?
What is the ideal amperage for welding 1/8″ steel with TIG?
Typically, 60-90 amps is suitable for 1/8″ steel, depending on the weld position and electrode size.
Question 2?
Can I use the same amperage settings for aluminum as for steel?
No, aluminum generally requires higher amperage due to its thermal conductivity and melting point. Use the chart as a guide for aluminum-specific settings.
Question 3?
How does electrode size affect amperage choice?
Smaller electrodes handle lower amperage; larger electrodes require higher amps. Always match electrode size with recommended current ranges.
Question 4?
What happens if I use too much amperage on thin metal?
It can cause burn-through, warping, or holes in the metal, ruining your project and wasting materials.
Question 5?
How important is adjusting amperage during welding?
Very important. Fine-tuning allows for better control, penetration, and finish quality, especially on different positions and materials.
📑 Table of Contents
Introduction
When it comes to TIG (Tungsten Inert Gas) welding, choosing the right amperage is crucial. It affects the quality, strength, and appearance of your welds. But how do you know what amperage to use for different metal thicknesses? That’s where a TIG welding amps to metal thickness chart becomes your best friend.
Using the correct amperage not only ensures a strong weld but also helps prevent problems like burn-through, porosity, or weak joints. Whether you’re working on thin sheet metal or thick structural steel, understanding the relationship between amperage and metal thickness is fundamental. In this article, we’ll explore a comprehensive TIG welding amps to metal thickness chart, provide practical tips, and guide you through selecting the perfect settings for your projects.
Understanding TIG Welding and Amperage
What is TIG Welding?
TIG welding, also known as Gas Tungsten Arc Welding (GTAW), uses a non-consumable tungsten electrode to produce precise, high-quality welds. It’s favored for its control, aesthetic finish, and ability to weld thin materials. TIG welding requires skill but offers excellent results for a variety of metals.
Visual guide about Tig Welding Amps to Metal Thickness Chart
Image source: weldingproperty.com
The Role of Amperage in TIG Welding
Amperage, or current, controls the heat generated during welding. Too low, and the weld might be weak or incomplete; too high, and you risk burning through the metal or causing warping. Finding the perfect amperage balance is key to achieving strong, clean welds. It varies depending on metal type, thickness, and welding technique.
Why a TIG Welding Amps to Metal Thickness Chart Matters
A TIG welding amps to metal thickness chart offers a quick visual reference to determine the recommended amperage range for different metal thicknesses. It simplifies decision-making, especially for beginners, and helps experienced welders save time. Proper amperage selection ensures optimal heat input, reduces defects, and improves overall weld quality.
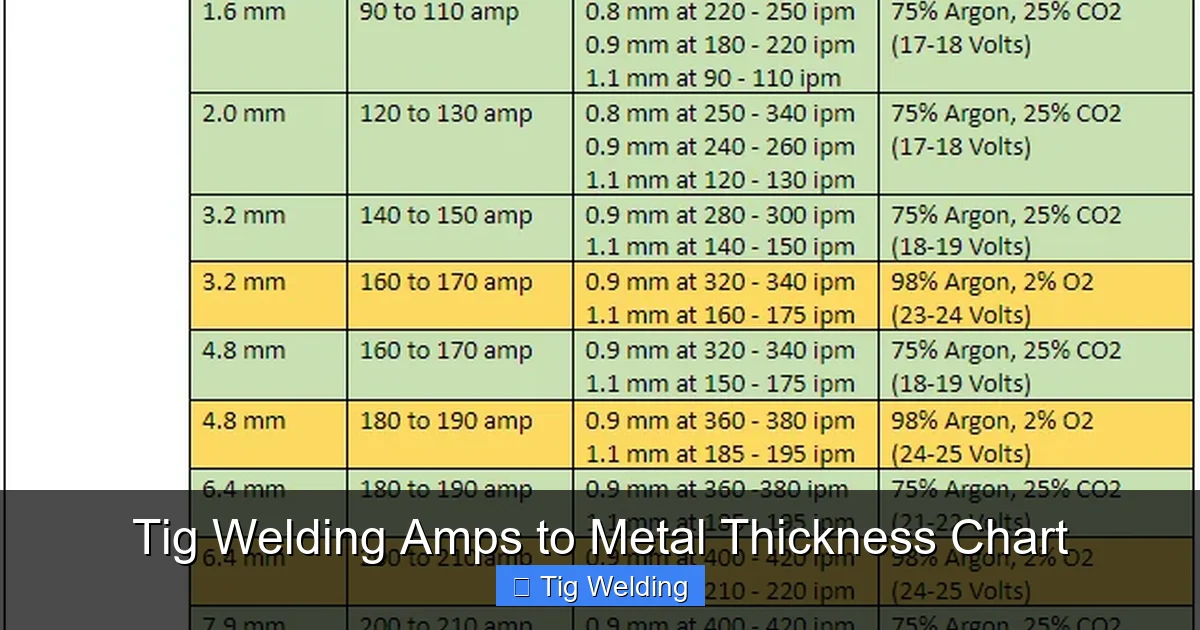
Visual guide about Tig Welding Amps to Metal Thickness Chart
Image source: weldingmastermind.com
Let’s dive into the details of how to interpret and use such a chart effectively.
Standard TIG Welding Amps to Metal Thickness Chart
General Guidelines for Common Metals
- Steel: 1/16″ (1.6mm) to 1/8″ (3.2mm): 40-90 amps
- Stainless Steel: 1/16″ (1.6mm) to 1/8″ (3.2mm): 40-100 amps
- Aluminum: 1/16″ (1.6mm) to 1/4″ (6.4mm): 50-150 amps
- Brass and Copper: 1/16″ (1.6mm) to 1/8″ (3.2mm): 40-80 amps
Sample Amperage Chart for Metal Thickness
| Metal Type | Thickness | Recommended Amperage |
|---|---|---|
| Steel | 1/16″ (1.6mm) | 40-60 amps |
| Steel | 1/8″ (3.2mm) | 60-90 amps |
| Aluminum | 1/16″ (1.6mm) | 50-70 amps |
| Aluminum | 1/4″ (6.4mm) | 100-150 amps |
| Stainless Steel | 1/8″ (3.2mm) | 70-100 amps |
Practical Tips for Using the Chart Effectively
Start Low and Adjust
Always begin with the lower end of the recommended amperage range. If the weld is not penetrating or is too cold, gradually increase. Conversely, if you notice burn-through or excessive spatter, reduce the amperage.
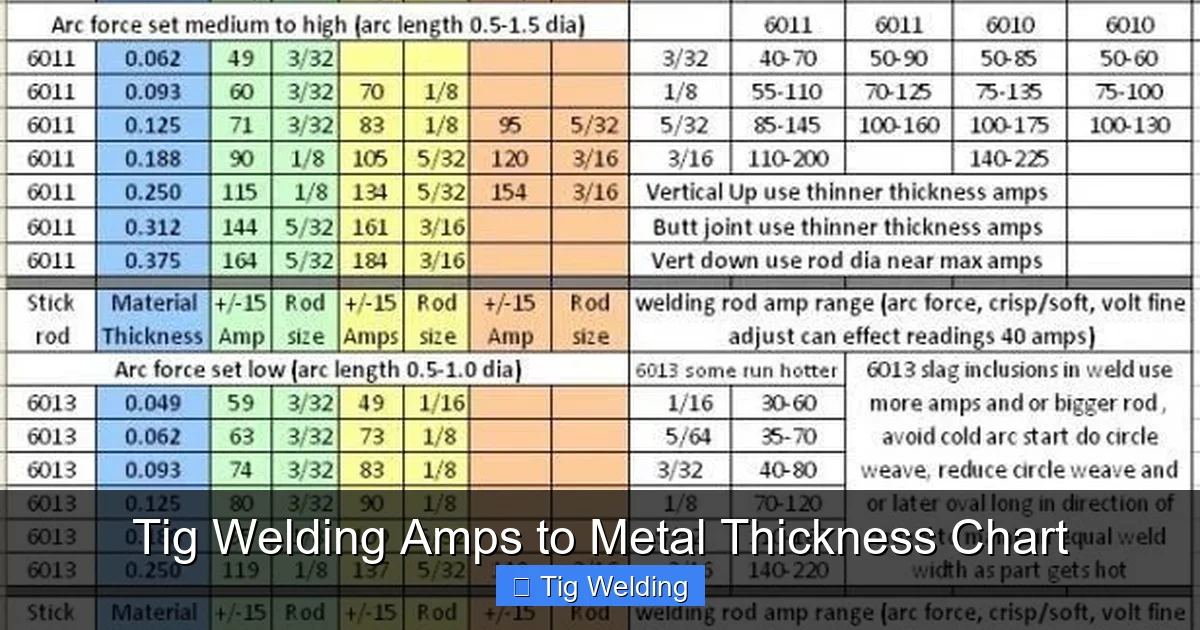
Visual guide about Tig Welding Amps to Metal Thickness Chart
Image source: i.pinimg.com
Consider Electrode Size
The size of your tungsten electrode influences the amperage you should use. For example, a 1/16″ electrode typically handles up to 70 amps, while a 3/32″ can handle up to 150 amps.
Welding Position and Speed
Vertical or overhead welding may require adjustments to amperage. Slow, controlled movement allows for better heat control, especially on thin materials.
Material Composition and Quality
Higher-quality metals or specific alloys might require slightly different settings. Always consult the manufacturer’s recommendations when available.
Common Mistakes to Avoid
- Using too high amps on thin metals: Leads to burn-through and warping.
- Using too low amps on thick metals: Causes weak welds and poor penetration.
- Not adjusting amperage based on welding position: Can result in inconsistent welds.
- Ignoring electrode size guidelines: Can cause electrode overheating or poor arc stability.
Conclusion
Mastering the relationship between TIG welding amps and metal thickness is essential for producing high-quality welds. A reliable TIG welding amps to metal thickness chart simplifies this process, guiding you to select the right settings quickly and accurately. Remember, always start with conservative settings, fine-tune as needed, and prioritize safety. With practice and proper knowledge, you’ll be welding like a pro in no time!
Additional Resources
For further reading, check out manufacturer manuals, online welding forums, and professional tutorials. Investing in a good welding chart or guide can make all the difference in your projects.
Frequently Asked Questions
What is the best way to determine the right amperage for TIG welding?
The best way is to use a TIG welding amps to metal thickness chart as a starting point. Adjust based on your weld test results, material, and specific project needs.
Can I weld multiple metal types with the same amperage?
While possible, it’s not recommended. Different metals have unique properties. Always refer to specific guidelines or charts for each material.
How does welding position affect amperage selection?
Welding in vertical or overhead positions may require slightly higher amperage for proper penetration and control. Adjust accordingly based on your experience.
Is it safe to weld at higher amps than recommended?
Not usually. Excessive amperage can cause hazards like burn-through, spatter, and accidents. Stick to recommended settings and prioritize safety.
What role does filler material play in amperage selection?
Filler material can influence heat input; thicker or harder fillers may require adjustments to amperage. Always follow manufacturer recommendations.
How can I improve my TIG welding skills for better amperage control?
Practice, observation, and using the right equipment help. Start with basic settings, perform test welds, and refine your technique based on results.