

Mastering aluminum TIG welding settings is essential for high-quality welds. This comprehensive chart provides key parameters like amperage, voltage, and filler rod info, helping you achieve professional results with confidence. Whether you’re a beginner or an experienced welder, understanding the right settings can make a big difference in your projects.
Key Takeaways
- Proper amperage is crucial: Different aluminum thicknesses require specific current levels for optimal penetration and weld quality.
- Voltage adjustments matter: Maintaining the correct voltage ensures stable arcs and prevents burn-through or weak welds.
- Filler rod selection: Use the right filler rod type and diameter for your aluminum alloy and application to ensure strong, clean welds.
- Shielding gas settings: Pure argon or argon blends are recommended, with flow rates around 15-20 CFM for effective shielding.
- Technique tips: Consistent torch angle, steady hand, and appropriate travel speed are vital for quality welds.
- Adjusting settings based on conditions: Factors like material thickness, position, and equipment type influence optimal settings, so always tailor your approach.
Quick Answers to Common Questions
Question 1?
What is the ideal amperage for welding 1/8 inch aluminum with TIG?
Typically, around 80-125 amps is suitable for 1/8 inch aluminum, depending on the exact conditions and desired penetration.
Question 2?
What shielding gas should I use for aluminum TIG welding?
Pure argon (99.99%) is standard, with flow rates around 15-20 CFM to ensure proper shielding and weld quality.
Question 3?
Which filler rod is best for aluminum TIG welding?
4043 and 5356 are the most common. 4043 is easier to weld, while 5356 offers higher strength for demanding applications.
Question 4?
How does material thickness affect TIG welding settings?
Thinner materials require lower amperage and careful heat control, while thicker materials need higher amperage and sometimes preheating for better penetration.
Question 5?
Can I weld aluminum in different positions with the same settings?
Adjustments may be necessary based on position; vertical or overhead welds often need slightly different settings for optimal results.
📑 Table of Contents
- Introduction to Aluminum TIG Welding Settings
- Understanding the Basics of Aluminum TIG Welding
- Key Aluminum TIG Welding Parameters
- Practical Aluminum TIG Welding Settings Chart
- Tips for Achieving Perfect Aluminum TIG Welds
- Adjusting Settings for Different Conditions
- Conclusion: Your Path to Perfect Aluminum TIG Welds
Introduction to Aluminum TIG Welding Settings
Aluminum TIG welding is a popular choice for fabricators, hobbyists, and professionals alike. Its ability to produce clean, precise, and high-quality welds makes it ideal for automotive, aerospace, marine, and artistic projects. But to get those perfect welds, understanding the right welding settings is essential.
Unlike steel, aluminum presents unique challenges — it’s highly conductive, has a high thermal expansion rate, and forms a tough oxide layer on its surface. These factors mean that setting your TIG welder correctly is crucial for success. In this article, we’ll provide a comprehensive aluminum TIG welding settings chart, along with practical tips and insights to help you weld like a pro.
Understanding the Basics of Aluminum TIG Welding
What is TIG Welding?
TIG (Tungsten Inert Gas) welding, also known as GTAW (Gas Tungsten Arc Welding), involves using a non-consumable tungsten electrode to produce the weld. Filler rod can be added manually to build up the weld, and a shielding gas (usually argon) protects the weld pool from contamination.
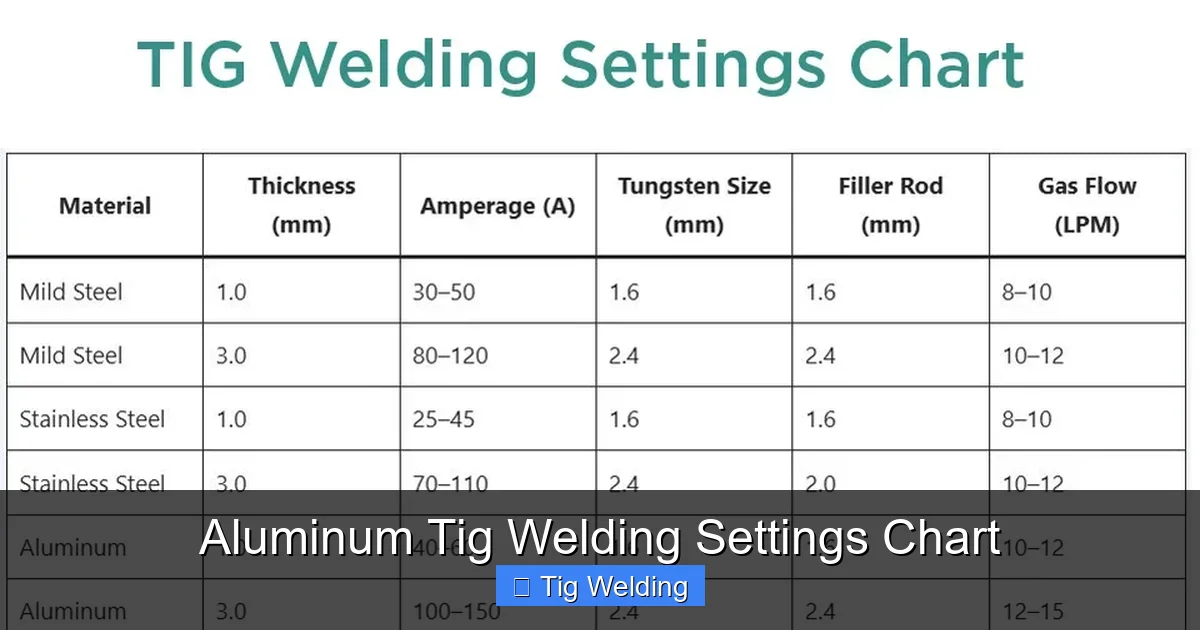
Visual guide about Aluminum Tig Welding Settings Chart
Image source: weldingproperty.com
Why Choose TIG for Aluminum?
TIG welding provides superior control, resulting in cleaner and more precise welds. It’s ideal for thin materials and detailed work, making it a favorite for aluminum where heat control and cleanliness are vital.
Key Aluminum TIG Welding Parameters
Amperage (Current)
Amperage determines the heat input and penetration. For aluminum, the general rule is about 1-2 amps per 0.001 inch of material thickness. For example, welding 1/8 inch (0.125 inches) thick aluminum typically requires around 80-125 amps.
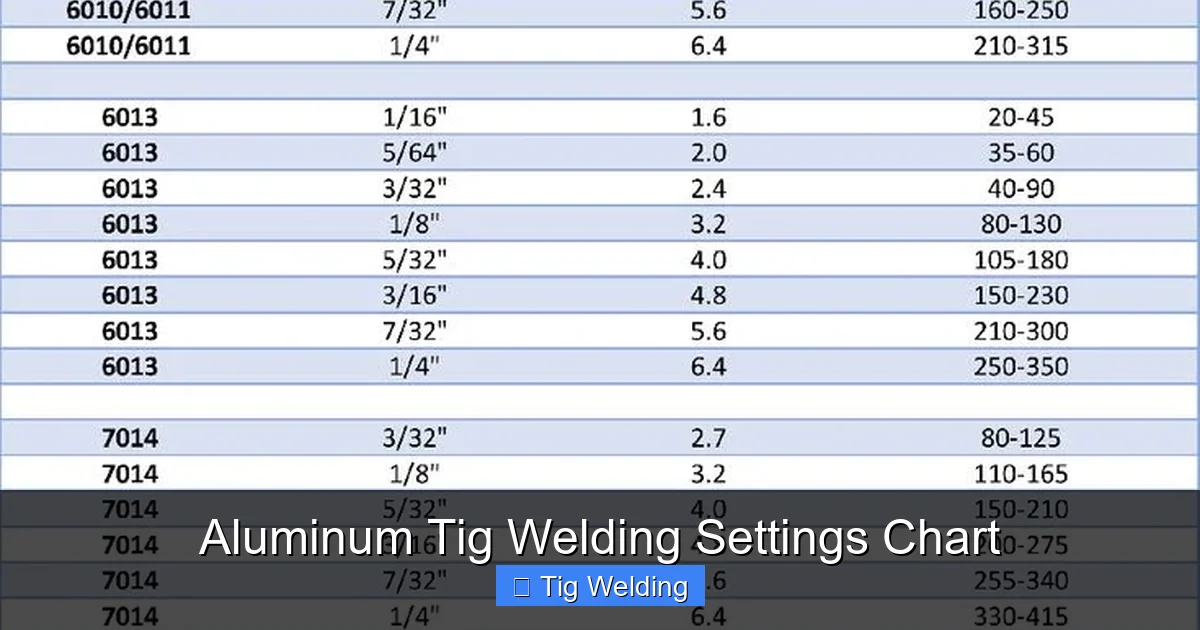
Visual guide about Aluminum Tig Welding Settings Chart
Image source: i.pinimg.com
Starting with the right amperage prevents burn-through on thin sheets and ensures adequate penetration on thicker pieces. Always adjust based on the specific project and material condition.
Voltage
Voltage in TIG welding controls arc stability. For aluminum, a voltage range of 15-20 volts is common. Maintaining a stable arc ensures a clean weld with minimal porosity and oxidation.
Adjust the voltage if you notice the arc is wandering or inconsistent. A steady arc results in better bead appearance and weld strength.
Filler Rod Selection
Choosing the right filler rod is critical. Common aluminum filler rods include 4043 and 5356 alloys. 4043 is more fluid and easier to weld, suitable for most applications. 5356 offers higher strength but requires more skill to weld properly.
Match the filler rod diameter to the thickness of your material. For thin sheets, use 0.030-0.040 inches; for thicker material, 0.062 inches or more may be appropriate.
Shielding Gas Settings
Pure argon (99.99%) is standard, with flow rates around 15-20 CFM to prevent contamination. Some welders prefer argon-helium blends for increased heat input and better penetration on thicker aluminum.
Ensure your gas flow is steady and free of leaks for the best shielding and weld quality.
Practical Aluminum TIG Welding Settings Chart
- Material Thickness: 1/16 inch (1.6 mm) — Amperage: 40-60 A, Voltage: 15-17 V, Filler: 0.030″ 4043
- Material Thickness: 1/8 inch (3.2 mm) — Amperage: 80-125 A, Voltage: 16-18 V, Filler: 0.040″ 4043 or 5356
- Material Thickness: 3/16 inch (4.8 mm) — Amperage: 125-150 A, Voltage: 17-19 V, Filler: 0.062″ 5356
- Thin sheets (less than 1/16 inch) — Use lower amperage (40-60 A), minimize heat input, and work quickly to avoid warping.
- Thicker materials (over 1/4 inch) — Use higher amperage (150+ A), increase travel speed, and consider preheating for better results.
Tips for Achieving Perfect Aluminum TIG Welds
Preparation is Key
Always clean the aluminum surface thoroughly. Use a stainless steel wire brush or chemical cleaner to remove oxidation and contaminants. Clean metal results in better arc stability and weld quality.
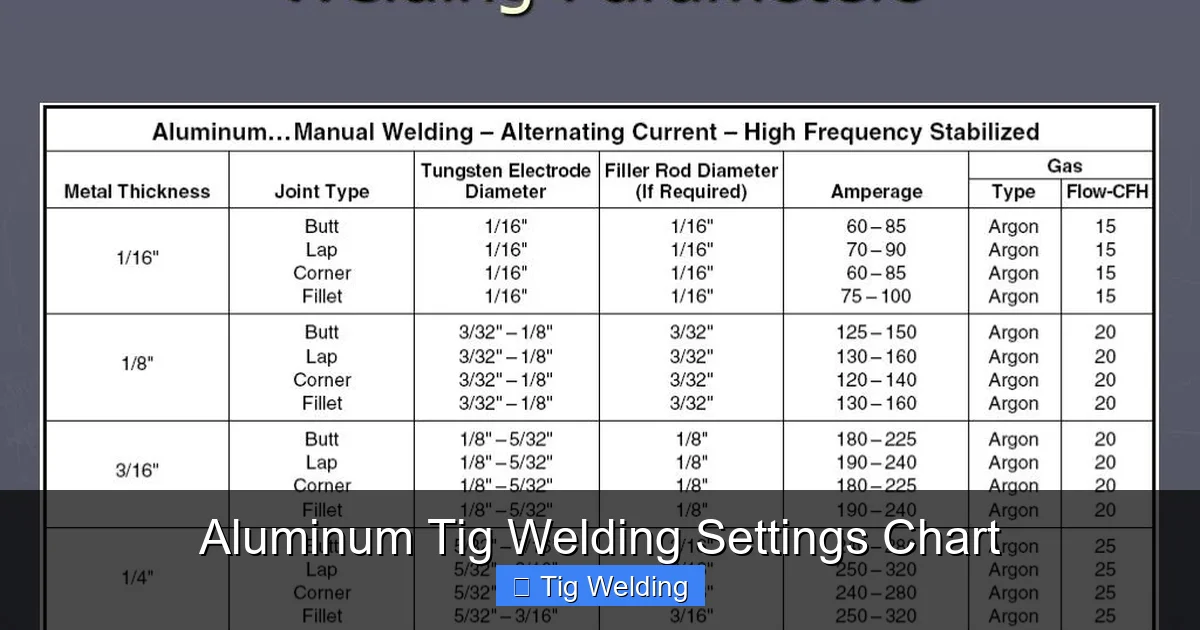
Visual guide about Aluminum Tig Welding Settings Chart
Image source: image2.slideserve.com
Control Your Heat Input
Too much heat causes warping and burn-through. Too little results in poor penetration. Adjust amperage based on material thickness and always monitor your weld pool.
Maintain Proper Technique
Keep the torch at a 70-80 degree angle, and use a steady hand. Use a consistent travel speed—too slow can cause excessive heat, too fast can lead to weak welds.
Practice a weaving or circular motion if needed to fill gaps or contour the weld bead.
Use Proper Filler Rod and Shielding Gas
Match the filler rod to the alloy and thickness. Use a steady flow of pure argon for shielding. Ensure no drafts interfere with shielding gas coverage.
Adjusting Settings for Different Conditions
Conditions like material condition, welding position, and equipment influence your settings. For example, welding in a vertical or overhead position may require slight adjustments to amperage and travel speed.
Always perform test welds on scrap pieces to dial in your settings before working on the actual project.
Conclusion: Your Path to Perfect Aluminum TIG Welds
Mastering aluminum TIG welding settings can dramatically improve your results. With the right combination of amperage, voltage, filler selection, and technique, you can achieve clean, strong, and professional-looking welds every time. Remember, practice and preparation are key. Use this welding settings chart as your guide, and don’t be afraid to tweak parameters based on your specific project and conditions. Happy welding!
Frequently Asked Questions
What is the best way to prepare aluminum before TIG welding?
Clean the surface thoroughly with a stainless steel wire brush or chemical cleaner to remove oxidation and contaminants, ensuring a stable arc and strong welds.
How do I adjust my settings for different aluminum alloys?
Different alloys may require slight adjustments in amperage and filler rod type. Always refer to manufacturer recommendations and perform test welds to find the best settings.
Why is my aluminum weld porous or weak?
Porosity often results from insufficient shielding gas coverage or surface contamination. Ensure proper cleaning and steady shielding gas flow for best results.
What equipment do I need for aluminum TIG welding?
You’ll need a TIG welder capable of high-frequency start, a pure argon gas supply, appropriate tungsten electrodes, and compatible filler rods for aluminum.
How do I prevent warping when TIG welding aluminum?
Control heat input by adjusting amperage, use proper travel speed, and consider preheating thicker materials to minimize distortion.
Is it possible to weld aluminum without filler rod?
Yes, but only for certain joints and thin materials. Filler rod provides strength and fills gaps, so most aluminum TIG welds benefit from using filler material.