

This TIG welding guide provides a thorough introduction to Gas Tungsten Arc Welding (GTAW). You’ll learn everything from understanding your TIG welder and essential safety gear to mastering the intricate art of filler rod manipulation and torch control. Achieve precise, beautiful welds on a variety of metals with our expert tips and step-by-step instructions.
TIG Welding Guide
Welcome to the ultimate TIG welding guide! TIG welding, also known as Gas Tungsten Arc Welding (GTAW), is a process renowned for its precision, cleanliness, and the ability to create aesthetically pleasing welds. It’s a favorite among professionals and hobbyists alike, especially when working with thin materials or exotic metals. Whether you’re a complete beginner or looking to refine your skills, this guide will walk you through everything you need to know to get started and excel in TIG welding.
In this comprehensive guide, we’ll cover:
- Understanding your TIG welder
- Essential safety precautions
- Setting up your TIG welding machine
- Mastering fundamental TIG welding techniques
- Welding different materials
- Troubleshooting common TIG welding problems
By the end, you’ll have a solid foundation to confidently tackle your TIG welding projects.
Key Takeaways
- Understand Your TIG Welder: Familiarize yourself with AC/DC settings, amperage control, gas flow rates, and high-frequency start for effective TIG welding.
- Master Basic Techniques: Learn proper torch grip, arc length control, and consistent filler rod feeding to create strong and aesthetically pleasing TIG welds.
- Safety First: Always prioritize safety with appropriate personal protective equipment (PPE) including a welding helmet, gloves, and protective clothing to prevent burns and eye damage.
- Material Specifics: Different metals like steel, stainless steel, and aluminum require unique TIG welding parameters and filler materials.
- Practice Makes Perfect: Consistent practice is crucial for developing the fine motor skills and muscle memory needed for high-quality TIG welding.
- Troubleshoot Common Issues: Learn to identify and fix problems like porosity, undercut, and tungsten contamination for cleaner and stronger welds.
Understanding Your TIG Welder
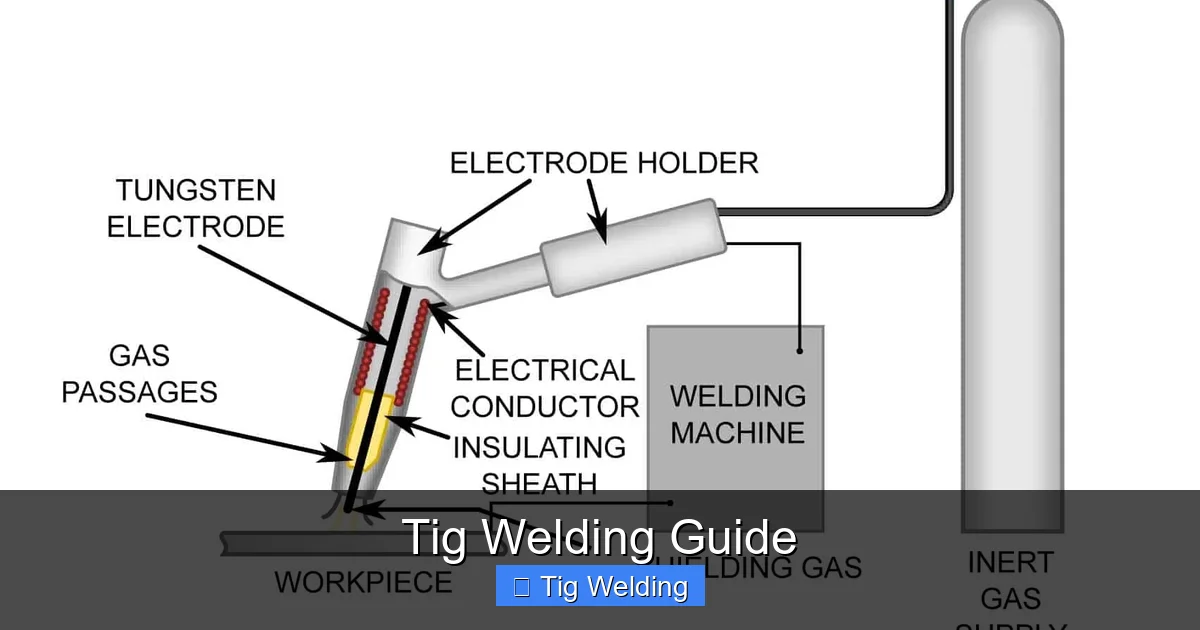
Before you strike an arc, it’s crucial to understand the basic components and functions of your TIG welder. Modern TIG machines offer a range of controls that allow for precise adjustments, leading to superior weld quality.
Key Components of a TIG Welder
- Power Source: This is the heart of your TIG welder, providing the necessary electrical current. It usually has controls for amperage, voltage, and sometimes pulse settings.
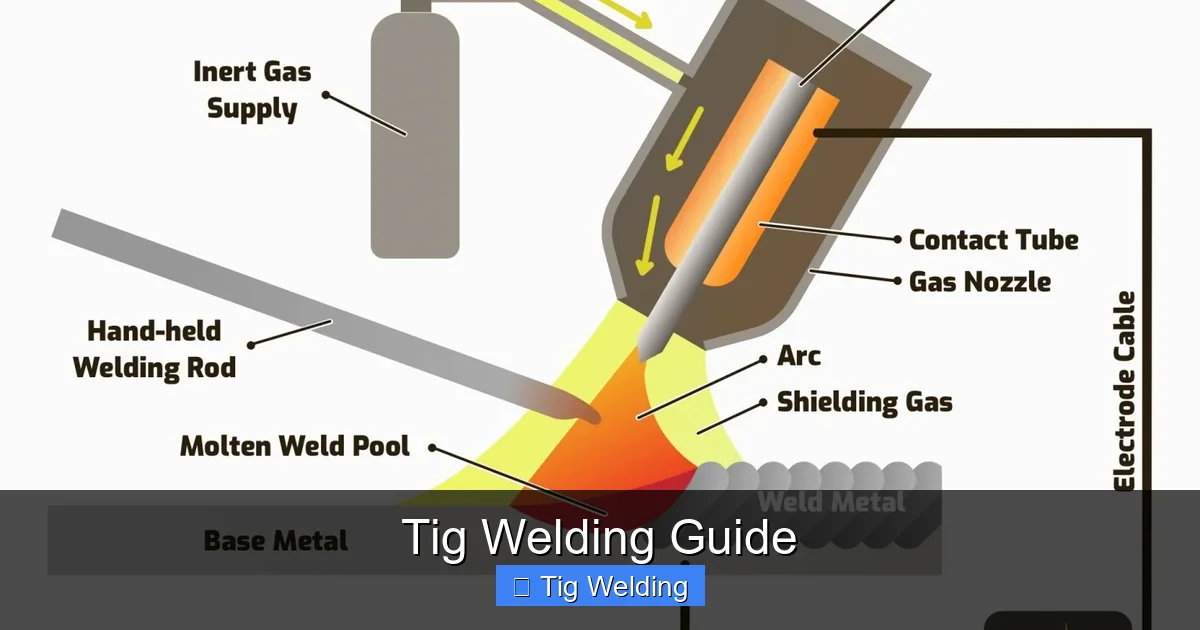
- TIG Torch: This is where the magic happens. It holds the tungsten electrode, directs shielding gas, and often has a trigger to start and stop the welding process.
- Tungsten Electrode: A non-consumable electrode made of tungsten or a tungsten alloy. It carries the welding current and creates the arc.
- Shielding Gas System: Typically uses Argon gas, which protects the molten weld pool from atmospheric contamination. A regulator and flowmeter control the gas flow rate.
- Ground Clamp: Connects the welding machine to your workpiece, completing the electrical circuit.
- Filler Material: A rod or wire added to the weld joint to fill the gap and build up the weld bead.
AC vs. DC Welding
Your TIG welder will likely have settings for AC (Alternating Current) and DC (Direct Current). Understanding when to use each is vital:
- DCEN (Direct Current Electrode Negative): This is the most common setting for welding steel, stainless steel, and nickel alloys. It provides good penetration and a stable arc.
- DCEP (Direct Current Electrode Positive): Less common for TIG, but used in specific applications.
- AC (Alternating Current): Primarily used for welding aluminum and magnesium. AC offers a cleaning action that breaks up the oxide layer on these metals, allowing for a cleaner weld.
Essential Safety Precautions
TIG welding involves high heat, electricity, and potentially harmful fumes. Safety should always be your top priority. Never compromise on protective gear.
Visual guide about Tig Welding Guide
Image source: weldguru.com
Personal Protective Equipment (PPE)
- Welding Helmet: This is non-negotiable. A good auto-darkening helmet protects your eyes and face from the intense UV and infrared radiation of the welding arc, as well as sparks and spatter. Ensure it has the correct shade rating.
- Welding Gloves: Made from leather or other heat-resistant materials, these protect your hands from heat, sparks, and sharp edges.
- Welding Jacket or Apron: Protects your skin and clothing from sparks, spatter, and radiant heat. Natural fibers like cotton or leather are recommended; synthetics can melt.
- Safety Glasses: Wear these under your welding helmet for an extra layer of protection, especially when grinding or preparing materials.
- Respirator (if necessary): When welding certain metals or in poorly ventilated areas, fumes can be harmful. Consult your material safety data sheets (MSDS) and consider a respirator.
- Closed-toe Shoes: Protect your feet from dropped objects and sparks.
Work Area Safety
- Ventilation: Ensure good ventilation in your workspace to dissipate welding fumes. If working in a confined space, consider forced ventilation.
- Fire Hazards: Remove all flammable materials from your welding area. Have a fire extinguisher rated for Class A, B, and C fires readily accessible.
- Electrical Safety: Ensure your welding machine is properly grounded and that all cords are in good condition. Keep the work area dry to avoid electrical shock hazards.
Setting Up Your TIG Welding Machine
Proper setup is key to achieving good TIG welds. This involves adjusting amperage, gas flow, and ensuring all connections are secure.
Visual guide about Tig Welding Guide
Image source: hobartbrothers.com
Step 1: Connect the Gas Cylinder and Regulator
Attach the regulator to your Argon gas cylinder. Ensure the connection is tight. Connect the shielding gas hose from the regulator to your TIG welder’s gas inlet.
Step 2: Connect the Ground Clamp
Securely attach the ground clamp to a clean, bare metal surface on your workpiece. A good ground connection is essential for a stable arc. Avoid clamping onto painted or rusted surfaces.
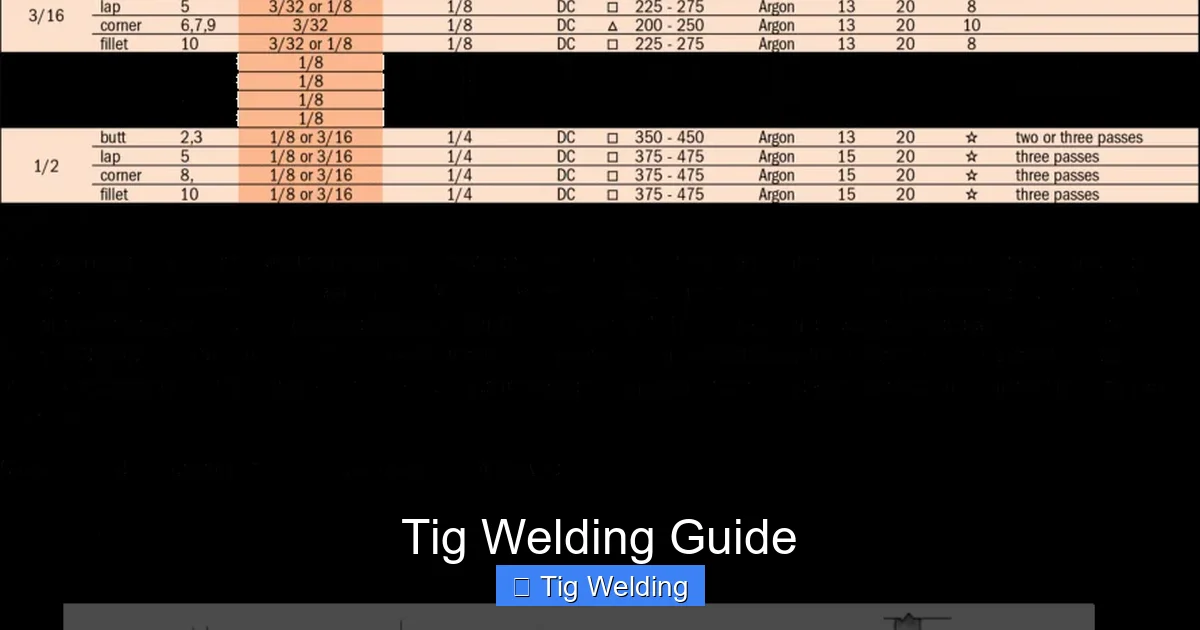
Step 3: Set Amperage
The amperage setting controls the heat of your weld. This is highly dependent on the material thickness and type you are welding.
- Thin Materials (e.g., 1/16″ steel): Start with lower amperage, perhaps 30-60 amps.
- Medium Materials (e.g., 1/8″ steel): Aim for 60-100 amps.
- Thicker Materials (e.g., 1/4″ steel): You’ll need higher amperage, potentially 100-200+ amps.
Always refer to welding charts or start with a lower setting and increase gradually until you achieve the desired puddle formation.
Step 3: Set Gas Flow Rate
The shielding gas flow rate protects the weld from atmospheric contamination. A typical flow rate for Argon is 10-25 cubic feet per hour (CFH) or 15-25 liters per minute (LPM). Start with a moderate setting (around 15-20 CFH) and adjust as needed. Too little gas will result in porosity, while too much can disrupt the arc.
Step 4: Select Torch and Tungsten
The type of tungsten you use depends on the welding current (AC or DC) and the material. Common tungsten types include:
- Pure Tungsten (Green band): For AC welding of aluminum and magnesium.
- 2% Thoriated Tungsten (Red band): Versatile, good for DC welding of steel and stainless steel, also usable for AC.
- 2% Ceriated Tungsten (Grey band): Good for low-amperage DC welding and AC, offering a stable arc.
The tungsten should be sharpened to a fine point for DC welding and ground to a blunt tip or ball for AC welding.
Mastering Fundamental TIG Welding Techniques
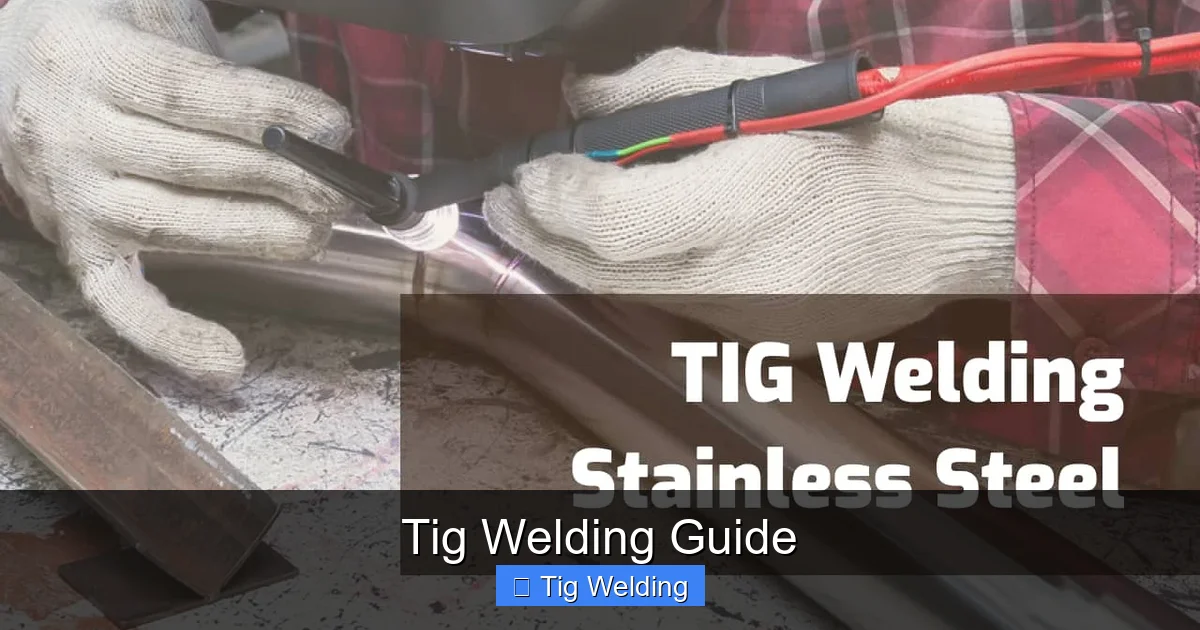
TIG welding requires a delicate balance of torch control, hand movement, and filler rod feeding. It’s often described as a two-handed operation, with one hand controlling the torch and the other feeding the filler rod.
Visual guide about Tig Welding Guide
Image source: weldguru.com
Step 1: Proper Torch Grip
Hold the TIG torch like you would a pencil, but with a relaxed grip. Your index finger should be on the torch body for stability and control. The aim is to maintain a consistent torch angle and distance from the workpiece.
Step 2: Arc Length Control
The arc length is the distance between the tungsten electrode and the workpiece. For most TIG welding, maintain a short arc, typically about the diameter of the tungsten electrode. A short arc provides a focused, intense heat input and a stable arc. Too long an arc will be unstable, wide, and can lead to spatter and poor penetration.
Step 3: Torch Angle and Travel Speed
Maintain a consistent torch angle, usually around 10-15 degrees, leading into the direction of travel. This helps direct the shielding gas effectively over the molten puddle. Your travel speed will determine the bead width and penetration. A consistent, steady travel speed is crucial. If you move too fast, you’ll have insufficient penetration and a narrow bead. Too slow, and you risk excessive heat input, undercut, and a wide, flat bead.
Step 4: Filler Rod Manipulation
This is where TIG welding truly shines in its finesse. The filler rod is added to the leading edge of the molten puddle. The technique involves:
- Dipping: Quickly dip the filler rod into the front of the puddle, melt a small amount, and then withdraw it.
- Spacing: Maintain consistent spacing between dips.
- Angle: Keep the filler rod at a shallow angle to the workpiece.
Practice dipping the rod consistently without touching the tungsten electrode. The goal is to create a smooth, uniform bead without excessive build-up.
Step 5: Starting and Stopping the Arc
Modern TIG welders often have a high-frequency (HF) start, which initiates the arc without physically touching the tungsten to the workpiece. This prevents tungsten contamination. Simply bring the torch close to the workpiece and press the trigger. To stop the arc, release the trigger. Some machines offer a post-flow setting for the shielding gas, which continues to flow for a few seconds after the arc stops, protecting the cooling weld.
Welding Different Materials
While the fundamental TIG welding techniques remain similar, different materials require specific settings and considerations.
Steel and Stainless Steel
- Current: Use DCEN (DC Electrode Negative).
- Tungsten: Typically 2% Thoriated (red band) or 2% Ceriated (grey band).
- Filler Rod: Match the filler rod to the base metal. For mild steel, use ER70S-2 or ER70S-6. For stainless steel, use a corresponding stainless steel filler rod (e.g., 308L for 304 stainless).
- Shielding Gas: Pure Argon is standard.
- Technique: Focus on achieving good penetration and a clean bead. Stainless steel can be more prone to heat distortion, so manage your heat input carefully.
Aluminum
- Current: Use AC (Alternating Current).
- Tungsten: Pure Tungsten (green band) is ideal for AC, as it forms a balled tip that spreads the arc.
- Filler Rod: Use an aluminum filler rod matching the alloy (e.g., 4043 or 5356).
- Shielding Gas: Pure Argon.
- Technique: Aluminum has a high thermal conductivity, meaning it dissipates heat quickly. You’ll generally need higher amperage than for steel of the same thickness. The AC balance setting on your welder can affect cleaning action and penetration.
Troubleshooting Common TIG Welding Problems
Even with practice, you might encounter issues. Here’s how to address common TIG welding problems:
Porosity
Cause: Insufficient shielding gas, contamination of filler rod or base metal, dirty tungsten, or poor airflow.
Solution: Ensure correct gas flow rate, clean your base metal thoroughly, use clean filler rod, and make sure your tungsten is clean and properly sharpened. Avoid drafts in your welding area.
Undercut
Cause: Too much amperage, too fast travel speed, or excessive heat input.
Solution: Reduce amperage, slow down your travel speed, and ensure you are adding filler rod at the correct rate to fill the puddle.
Tungsten Inclusions
Cause: Touching the tungsten to the molten puddle or filler rod, or arc starting without HF.
Solution: Maintain a consistent arc length and avoid touching the tungsten. Use HF start. If contamination occurs, stop welding and remove the inclusion before continuing.
Inconsistent Puddle
Cause: Unstable arc, inconsistent filler rod feeding, or fluctuating travel speed.
Solution: Focus on smooth torch movement, consistent arc length, and steady filler rod dips. Practice maintaining a uniform rhythm.
Conclusion
TIG welding is a skill that develops with practice and patience. By understanding your equipment, prioritizing safety, and consistently applying the techniques outlined in this guide, you’ll be well on your way to producing professional-quality welds. Remember to start with simpler projects and gradually move to more complex ones. The beauty of TIG welding lies in its precision and control, allowing you to create strong, clean, and aesthetically pleasing joints. Keep practicing, stay curious, and enjoy the rewarding process of TIG welding!
