

This guide provides a detailed look at the essential settings for TIG welding aluminum. You’ll learn how to select the right amperage, gas flow, tungsten type, and filler metal for various aluminum alloys. With practical tips and troubleshooting advice, you’ll be able to achieve strong, clean, and aesthetically pleasing aluminum welds. This guide is your go-to resource for successful TIG aluminum welding.
Settings for Tig Welding Aluminum
TIG welding aluminum is a rewarding skill that opens up a world of possibilities for fabrication, repair, and artistic creation. However, aluminum presents unique challenges compared to steel. Its low melting point, high thermal conductivity, and the presence of a tough oxide layer demand specific settings and techniques. This comprehensive guide will walk you through everything you need to know to achieve strong, clean, and beautiful TIG welds on aluminum.
You’ll learn about the critical machine settings, the importance of gas, tungsten, and filler metal selection, and the step-by-step process for successful aluminum TIG welding. We’ll also cover common issues and how to overcome them, so you can tackle your aluminum projects with confidence.
Key Takeaways
- Proper Amperage is Crucial: The correct amperage setting directly impacts heat input, penetration, and the risk of burn-through or incomplete fusion when TIG welding aluminum.
- AC Balance is Key for Cleaning: Adjusting the AC balance on your TIG welder controls the cleaning action of the arc, which is vital for breaking down the tenacious oxide layer on aluminum.
- Argon is the Standard Gas: Pure argon is the most common shielding gas for TIG welding aluminum, providing excellent arc stability and cleaning action.
- Tungsten Selection Matters: Pure tungsten or zirconium-enhanced tungsten are generally preferred for AC aluminum welding due to their excellent arc stability and resistance to balling.
- Filler Metal Matching is Important: Always use a filler metal that is compatible with the aluminum alloy being welded to ensure optimal strength and corrosion resistance.
- Pre-cleaning is Non-Negotiable: Thoroughly cleaning the aluminum surface is the most critical step to prevent contamination and achieve strong, porosity-free welds.
- Practice Makes Perfect: Aluminum can be challenging. Consistent practice with your TIG welding settings and technique will lead to improved results.
Understanding Aluminum’s Challenges
Before diving into settings, it’s essential to understand why aluminum welding requires a different approach. Aluminum:
- Has a significantly lower melting point than steel. This means it melts much faster, making burn-through a constant concern.
- Conducts heat very efficiently. Heat quickly dissipates away from the weld puddle, making it harder to maintain the molten state needed for fusion.
- Forms a tenacious oxide layer (aluminum oxide) at room temperature. This oxide has a much higher melting point than the aluminum itself (around 3700°F vs. 1220°F). If not removed, it can prevent proper fusion and lead to porosity.
- Is prone to contamination. Even small amounts of dirt, oil, or grease can cause significant weld defects.
Addressing these challenges is the primary goal when setting up your TIG welder for aluminum.
Essential TIG Welder Settings for Aluminum
Your TIG welder has several key settings that directly influence the quality of your aluminum welds. Let’s break them down:

Visual guide about Settings for Tig Welding Aluminum
Image source: vietmfg.com
Amperage
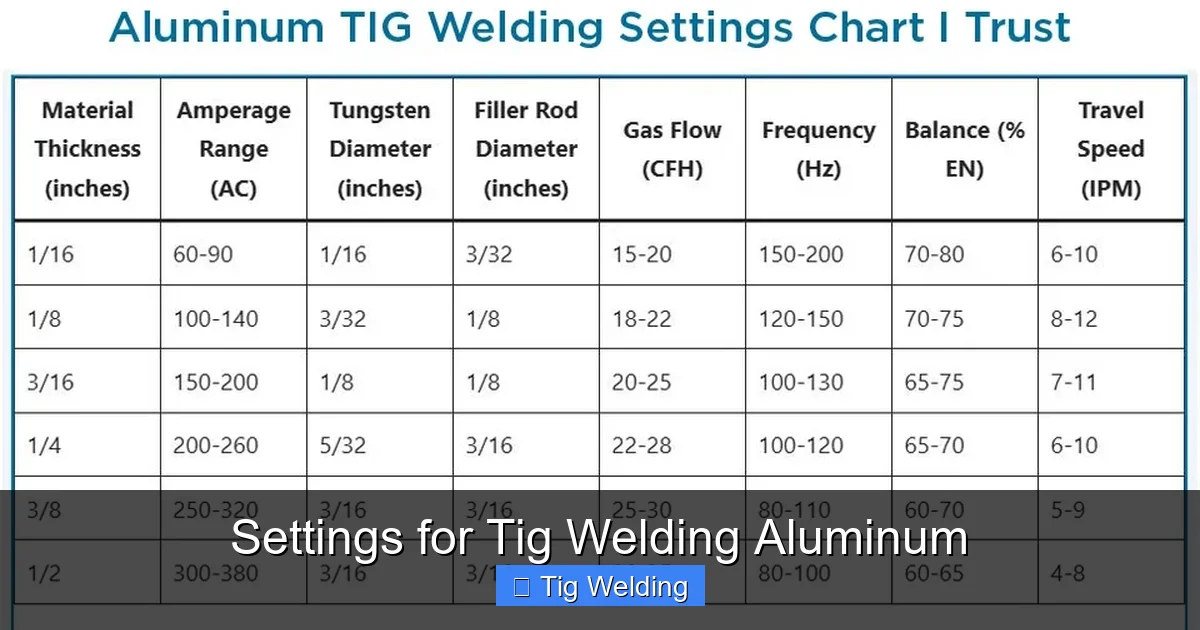
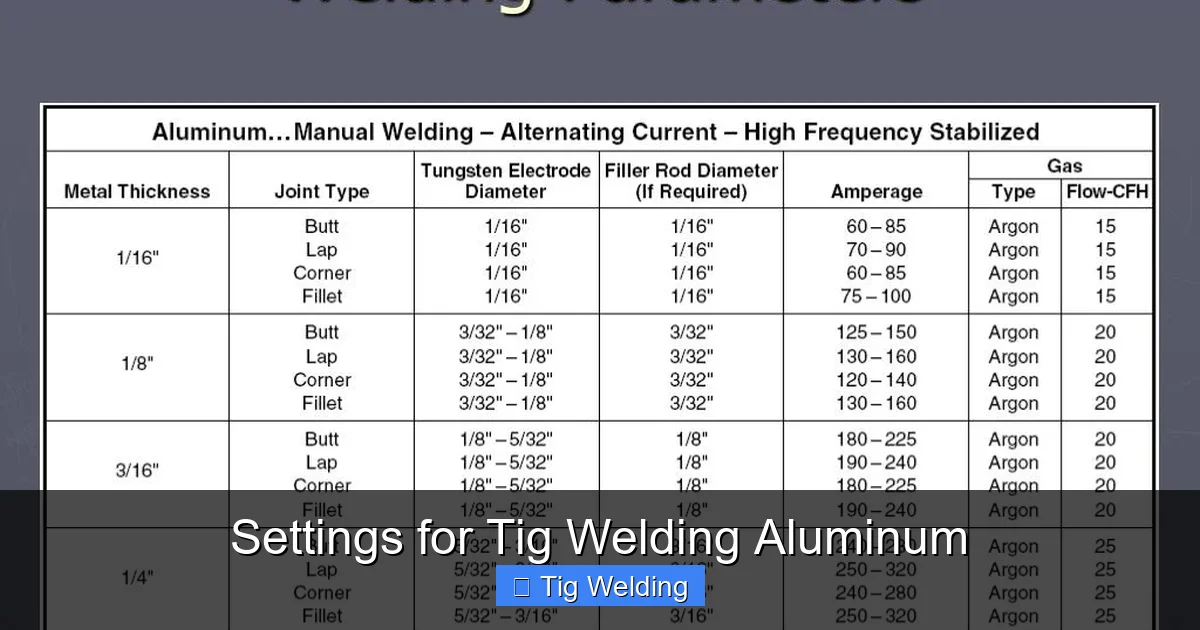
Amperage, or current, is perhaps the most critical setting. It controls the heat input into the base metal. Too low, and you won’t achieve fusion. Too high, and you’ll burn through. For TIG welding aluminum, you’ll almost always be using AC (Alternating Current).
Visual guide about Settings for Tig Welding Aluminum
Image source: image2.slideserve.com
Determining the Right Amperage:
- Material Thickness: This is the primary driver. Thicker materials require more amperage.
- Joint Type: Butt joints and corner joints may need slightly different amperage than lap or fillet welds.
- Your Travel Speed: If you move faster, you might need slightly more amperage to compensate for less dwell time.
- Machine Capabilities: Different welders have varying output capabilities.
General Amperage Guidelines (for AC welding):
- Thin sheet metal (e.g., 0.035″ / 0.9mm): 40-70 amps
- 1/8″ (3.2mm) material: 75-120 amps
- 1/4″ (6.4mm) material: 150-200 amps
- 3/8″ (9.5mm) and thicker: 200+ amps (often requiring multiple passes or higher amperage machines)
Tip: Start at the lower end of the recommended range and gradually increase until you achieve a nice, fluid puddle with good penetration. Use a welding calculator or reference chart if available for your specific machine and material thickness. Many experienced welders develop a feel for the right amperage by listening to the arc and observing the puddle.
AC Balance (Cleaning vs. Penetration)
When welding aluminum with AC, the current alternates between positive and negative polarity. The AC balance setting controls the ratio of time spent in each half of the cycle. This significantly impacts the “cleaning action” on the aluminum surface and the depth of penetration.

Visual guide about Settings for Tig Welding Aluminum
Image source: i.pinimg.com
- More Cleaning (Negative Balance): A higher percentage of the electrode-negative (EN) portion of the cycle (e.g., 70% EN) provides more aggressive cleaning action. This is crucial for breaking down the oxide layer. However, too much can lead to overheating of the tungsten electrode and a wider, less focused arc.
- More Penetration (Positive Balance): A higher percentage of the electrode-positive (EP) portion of the cycle (e.g., 50% EN, which is a 50/50 split) provides deeper penetration but less cleaning action.
Typical Settings for Aluminum:
For most aluminum TIG welding, you’ll want a good balance between cleaning and penetration. A setting of around 30% to 40% Electrode Positive (EP), which translates to 60% to 70% Electrode Negative (EN), is a good starting point for many applications.
Tip: If you’re seeing a dull, grey oxide layer that isn’t melting away easily, increase your cleaning action (move towards higher EN). If you’re getting good cleaning but lack penetration, decrease the EN slightly (move towards higher EP). Be mindful of tungsten overheating; if your tungsten balling up excessively or glowing too bright, you may need to reduce EP or amperage.
AC Frequency
AC frequency controls the speed at which the current alternates. It affects the arc cone shape and the direction of the arc.
- Lower Frequencies (e.g., 30-60 Hz): Produce a wider, more rounded arc. This can provide good penetration but may result in a less precise weld bead.
- Higher Frequencies (e.g., 100-200 Hz): Narrow the arc, making it more focused and controllable. This results in a tighter bead, better control on out-of-position welds, and can improve puddle fluidity.
Typical Settings for Aluminum:
For aluminum, a frequency of 60 Hz to 150 Hz is commonly used. Many welders find settings between 80-120 Hz offer a good blend of focused arc and puddle control. Very high frequencies can sometimes make the arc unstable on certain aluminum alloys.
Tip: Experiment with frequency to find what feels best for your technique and the specific joint. Higher frequencies can help “push” the puddle, which is useful for out-of-position welding.
Pulse Settings (Optional but Highly Recommended)
While not strictly a “setting” in the same way as amperage, using pulse settings when TIG welding aluminum can dramatically improve results, especially on thinner materials or for achieving a visually appealing bead.
Pulse welding alternates between a high peak current (for melting) and a low background current (for cooling). This helps control heat input, reduces distortion, and can create that stacked-dime appearance.
- Peak Amperage: Set this high enough to melt the material effectively.
- Background Amperage: Typically set at 30% to 60% of the peak amperage. This allows the puddle to cool slightly.
- Pulse Frequency (Pulses Per Second – PPS): Controls how often the current switches.
- Low PPS (e.g., 0.5-2 Hz): Creates distinct “pulses” or dimes in the weld bead. Good for cosmetic appearance and teaching control.
- Medium PPS (e.g., 5-15 Hz): Offers a good balance of puddle control and bead appearance.
- High PPS (e.g., 50-250 Hz): Provides a very focused arc and improved puddle fluidity, acting almost like a DC square wave but with AC’s cleaning. This can be excellent for speed and control.
- Pulse Time (Duty Cycle): The percentage of time spent at peak amperage. Typically 50% is a good starting point, meaning it spends equal time at peak and background.
Tip: For beginners, starting with a low PPS (1-2 Hz) is great for developing puddle control and achieving a consistent look. As you gain experience, you can move to higher frequencies for faster welding and better puddle management.
Gas Settings (Shielding Gas Flow Rate)
Shielding gas protects the molten weld puddle from atmospheric contamination (oxygen and nitrogen), which can cause porosity and weak welds. For aluminum, pure argon is the standard and most effective shielding gas.
Flow Rate:
The correct flow rate depends on several factors:
- Nozzle Size: Larger nozzles require higher flow rates.
- Amperage: Higher amperage means a larger weld puddle, which needs more gas coverage.
- Drafts/Wind: If welding outdoors or in a breezy environment, you’ll need a higher flow rate or wind shielding.
- Torch Height: Keeping the nozzle an appropriate distance from the workpiece is crucial.
General Guidelines for Pure Argon:
- Small Nozzle (e.g., #6, 3/8″): 15-25 CFH (Cubic Feet per Hour)
- Medium Nozzle (e.g., #8, 1/2″): 20-30 CFH
- Large Nozzle (e.g., #10, 5/8″): 25-35 CFH
Tip: A good rule of thumb is to listen for a steady “hissing” sound from the torch. You can also use a gas flow meter. Too low a flow will result in poor shielding and porosity. Too high a flow can cause turbulence in the gas stream, drawing in air and contaminating the weld. Check your flow rate with the arc running and the shielding gas flowing over the puddle. You should see a smooth, consistent gas shroud.
Tungsten Electrode Selection
The type and condition of your tungsten electrode are critical for a stable AC arc on aluminum.
Recommended Tungsten for AC Aluminum:
- Pure Tungsten (Green Band): This was the traditional choice for AC aluminum welding. It creates a balled tip and a wide, stable arc. However, it can shed more easily than newer types.
- Zirconiated Tungsten (Brown Band): Zirconium-oxide added to pure tungsten helps stabilize the arc and reduce contamination. It holds a balled tip well and is a very good choice for AC aluminum.
- Lanthanated Tungsten (Blue or Gold Band – 1.5% or 2%): While excellent for DC, some welders use them for AC. They tend to hold a sharper point longer than pure tungsten, which can be useful for precise work. However, they can ball up more readily and are more prone to contamination compared to pure or zirconiated when used with AC.
Tip: For general AC aluminum welding, **2% Zirconiated or Pure Tungsten** are excellent choices. Always grind your tungsten to a point for DC or a balled tip for AC. For AC aluminum, you want to grind the tungsten to a blunt, ball-like shape. You can achieve this by running AC at a high amperage for a few seconds on scrap material, or by grinding it to a blunt point and letting the AC current round it off during use. A balled tip provides a more stable, wider arc, which is ideal for aluminum’s high thermal conductivity.
Tungsten Diameter:
Match your tungsten diameter to your amperage range:
- 1/16″ (1.6mm): Up to 75 amps
- 3/32″ (2.4mm): 75-150 amps
- 1/8″ (3.2mm): 150+ amps
Filler Metal Selection
Choosing the correct filler metal is crucial for achieving strong, crack-resistant welds. Always match the filler alloy to the base aluminum alloy being welded.
Common Aluminum Alloys and Recommended Filler Metals:
- 1xxx Series (Pure Aluminum, e.g., 1100): Use 1100 filler rod.
- 3xxx Series (Manganese alloys, e.g., 3003): Use 4043 or 1100 filler rod. 4043 is common and offers good ductility.
- 5xxx Series (Magnesium alloys, e.g., 5052, 5083): This is where it gets critical. 4043 is generally NOT recommended due to potential for weld cracking. Use 5356 (higher magnesium content, brighter, stronger, more ductile) or 5556 (even higher magnesium for higher strength applications).
- 6xxx Series (Magnesium-Silicon alloys, e.g., 6061, 6063): 4043 is the most common and recommended filler rod. It has good strength and corrosion resistance and flows well. 5356 can also be used but may result in a slightly different appearance.
- 7xxx Series (Zinc alloys): These are often difficult to weld and can be prone to cracking. Consult specific welding procedures for these alloys; specialized filler metals may be required.
Tip: If you’re unsure of the aluminum alloy, a simple test is to use 4043. If it welds well and you get a good result, it’s likely a 6xxx or 3xxx series. If you encounter issues or are welding high-magnesium alloys like 5xxx, switch to 5356. Always check your material specifications. For food-grade applications or where appearance is paramount, 5356 is often preferred over 4043 due to its brighter finish.
The Welding Process: Step-by-Step
Now that you understand the settings, let’s walk through the actual welding process.
1. Surface Preparation (The Most Important Step!)
This cannot be stressed enough. Contamination is the enemy of aluminum welding.
Steps:
- Degrease: Thoroughly clean the aluminum surface with a dedicated aluminum cleaner or a strong degreaser and a clean rag. Ensure all oil, grease, and dirt are removed.
- Remove Oxide Layer: Use a stainless steel wire brush that has NEVER been used on steel or other metals. Dedicate one brush solely for aluminum. Brush in one direction. This removes the oxide layer right before welding.
- Avoid Handling: Once cleaned, avoid touching the weld area with bare hands. Use clean gloves.
Tip: If you’re welding cast aluminum or have heavy oxidation, you might need to lightly grind the surface, but always follow up with degreasing and brushing. For structural welds, consider chemical etching for maximum cleanliness, though this is less common in general fabrication.
2. Set Up Your TIG Welder
Based on the discussions above:
- Set your amperage.
- Set your AC balance (e.g., 65-70% EN).
- Set your AC frequency (e.g., 80-120 Hz).
- If using pulse, set your peak amperage, background amperage, PPS, and pulse time.
- Set your Argon gas flow rate (e.g., 25 CFH).
- Ensure you have the correct type and diameter of tungsten electrode installed.
- Select the appropriate filler metal rod.
3. Establish the Arc
There are two common methods for starting an arc on aluminum:
- Lift Arc: Gently touch the tungsten to the workpiece and then lift it about 1/8″ to 1/4″ (3-6mm) to initiate the arc. This is gentler on the tungsten but can sometimes be less reliable for starting.
- High Frequency (HF) Start: This is the preferred method for aluminum as it starts the arc without touching the tungsten to the workpiece, preventing tungsten contamination. Your TIG welder should have a HF start feature.
Tip: For aluminum, HF start is highly recommended to keep your tungsten clean and maintain a sharp arc.
4. Begin Welding
Once the arc is established, bring your filler rod into the arc zone.
Technique:
- Maintain a consistent arc length (usually about the diameter of your tungsten).
- Feed the filler rod into the leading edge of the puddle. Dip and withdraw the rod rhythmically, keeping the tip of the rod within the shielding gas envelope.
- Move at a consistent travel speed.
- Observe the puddle. It should be fluid but controllable. The oxide should melt away, revealing a bright, shiny molten pool.
Tip: For thinner materials, you might need to “peck” the filler rod in quickly to avoid adding too much heat. For thicker materials, you can feed it more continuously.
5. Fill the Puddle and Finish the Weld
As you reach the end of the weld, you’ll need to “fill the puddle” to avoid creating a crater that can crack.
Steps:
- Slightly increase your amperage (if your machine has amperage control like a foot pedal or torch switch).
- Briefly pause at the end of the weld, allowing the puddle to fill the void.
- Slowly reduce amperage or move the torch away while maintaining the filler rod in the puddle until the arc extinguishes.
Tip: Crater filling is crucial for preventing cracks, especially in aluminum alloys like 6xxx series.
Troubleshooting Common Aluminum TIG Welding Issues
Even with the right settings, you might encounter problems. Here are some common ones:
Porosity (Tiny Holes in the Weld)
- Cause: Contaminated filler metal or base material, insufficient shielding gas, drafts, or poor gas coverage.
- Solution: Rigorous cleaning is paramount. Increase gas flow rate, use a larger nozzle, or shield from drafts. Ensure your argon is pure. Check for leaks in your gas hose.
Lack of Fusion (Weld doesn’t penetrate into the base metal)
- Cause: Insufficient amperage, too fast travel speed, or a thick, unreceptive oxide layer.
- Solution: Increase amperage. Slow down your travel speed. Ensure thorough cleaning and sufficient AC balance for cleaning action.
Burn-Through (Holes or excessive melting)
- Cause: Amperage is too high for the material thickness, travel speed is too slow.
- Solution: Reduce amperage. Increase travel speed. If using pulse, consider reducing peak amperage or increasing background amperage/pulse time.
Cracking (Especially at the end of the weld or in the heat-affected zone)
- Cause: Incorrect filler metal selection (e.g., using 4043 on 5xxx series), rapid cooling, or poor puddle control at the end of the weld.
- Solution: Use the correct filler metal for your base alloy. Ensure you are filling the crater properly. Preheating can sometimes help with certain aluminum alloys, but it’s often not necessary for standard 6061 or 5052.
Tungsten Contamination (Tungsten particles in the weld)
- Cause: Arc starting by touching the tungsten to the workpiece, arc length too long, AC balance too far towards EP, or tungsten balled up excessively.
- Solution: Use HF start. Maintain a consistent, short arc length. Adjust AC balance towards EN. Ensure your tungsten is properly balled for AC. Grind or replace contaminated tungsten immediately.
Conclusion
TIG welding aluminum requires attention to detail, especially regarding settings and preparation. By understanding the role of amperage, AC balance, frequency, gas, tungsten, and filler metal, you can unlock consistent, high-quality results. Remember that practice is key. Don’t be discouraged by initial challenges; each weld will teach you something new. With this guide as your foundation, you’re well on your way to mastering TIG welding aluminum and creating impressive projects.
