

This guide teaches you how to set and adjust MIG welding voltage for different materials and thicknesses. You’ll learn the basics, avoid common mistakes, and get pro tips for consistent, high-quality welds every time.
Key Takeaways
- Voltage controls arc heat: Higher voltage increases heat and penetration; lower voltage reduces spatter and is better for thin metals.
- Match voltage to material thickness: Thicker metals need higher voltage; thin sheets require lower settings to prevent burn-through.
- Use the right wire speed too: Voltage and wire feed speed must work together—adjust both for smooth, stable arcs.
- Start with manufacturer charts: Most MIG welders include voltage/wire speed charts—use them as a starting point.
- Practice on scrap metal: Always test settings on similar scrap before welding your final piece.
- Watch for visual cues: A steady, crackling sound and smooth bead mean good voltage; popping or spatter means it’s off.
- Fine-tune in small steps: Adjust voltage in 0.5–1.0 increments to avoid overcorrecting.
What Is MIG Welding Voltage?
MIG welding voltage is the electrical force that drives the welding arc between the wire electrode and the metal you’re joining. Think of it like the heat setting on a stove—too low, and your food won’t cook; too high, and it burns. In MIG welding, voltage controls how hot the arc gets, which affects penetration, bead shape, and spatter.
Getting the voltage right is one of the most important parts of MIG welding. If it’s too low, the arc struggles to stay lit, and you’ll get poor fusion. If it’s too high, you’ll burn through thin metal or create excessive spatter. The goal is a stable, consistent arc that melts the wire and base metal evenly.
In this guide, you’ll learn how to set MIG welding voltage correctly, understand how it interacts with other settings, and troubleshoot common problems. Whether you’re a beginner or looking to refine your skills, mastering voltage will make your welds stronger, cleaner, and more professional.
Why Voltage Matters in MIG Welding
Voltage isn’t just a number on a dial—it directly affects your weld quality. Here’s how:
- Arc Stability: Proper voltage creates a smooth, crackling arc. Too low, and the arc sputters; too high, and it becomes harsh and erratic.
- Penetration: Higher voltage increases heat, which helps the weld penetrate deeper into thick materials. This is crucial for structural joints.
- Bead Appearance: Correct voltage produces a smooth, even bead with good fusion. Incorrect settings lead to uneven, ropey, or undercut beads.
- Spatter Control: Too much voltage causes excessive spatter—those tiny metal droplets that stick to your workpiece. Less spatter means less cleanup.
- Burn-Through Risk: On thin metals like sheet steel, high voltage can burn holes. Lower voltage keeps the heat manageable.
In short, voltage sets the tone for your entire weld. Get it right, and everything else falls into place.
How to Set MIG Welding Voltage: Step-by-Step
Setting MIG welding voltage isn’t guesswork—it’s a process. Follow these steps for reliable results every time.
Step 1: Identify Your Material and Thickness
Before touching the welder, know what you’re welding. Common materials include mild steel, stainless steel, and aluminum. Each behaves differently under heat.
Next, measure the thickness. A 1/8-inch (3mm) steel plate needs less voltage than a 1/2-inch (12mm) piece. Thin materials (under 1/8 inch) require lower voltage to avoid burn-through.
Step 2: Choose the Right Wire and Gas
Wire type and shielding gas affect voltage needs. For mild steel, use ER70S-6 wire with 75% argon / 25% CO2 gas. This combo works well with standard voltage ranges.
Aluminum requires different wire (like ER4043 or ER5356) and 100% argon gas. Voltage settings for aluminum are often lower than steel due to its lower melting point.
Step 3: Consult the Manufacturer’s Chart
Most MIG welders come with a voltage and wire feed speed (WFS) chart. This is your best starting point. For example:
- 18-gauge steel (0.047”): 16–18 volts
- 1/8-inch steel (0.125”): 19–21 volts
- 1/4-inch steel (0.25”): 22–24 volts
These are general ranges. Your welder’s chart may vary slightly, so always check it first.
Step 4: Set Wire Feed Speed (WFS)
Voltage and wire feed speed are partners. WFS controls how fast the wire feeds into the weld. Too fast with low voltage causes stubbing; too slow with high voltage leads to poor fusion.
Use the chart to set WFS first, then adjust voltage. For example, if the chart says 20 volts and 200 IPM (inches per minute) for 1/8-inch steel, start there.
Step 5: Test on Scrap Metal
Never weld your final piece without testing. Grab a scrap piece of the same material and thickness. Make a short test weld and observe:
- Is the arc smooth and steady?
- Is the bead even and well-fused?
- Is there minimal spatter?
If yes, you’re good to go. If not, adjust voltage in small steps.
Step 6: Fine-Tune the Voltage
Start at the recommended voltage. Listen to the arc:
- Good arc: A steady, crackling “frying” sound.
- Too low: Sputtering, popping, or the wire stubs into the metal.
- Too high: Harsh, loud arc with excessive spatter and possible burn-through.
Adjust voltage up or down in 0.5-volt increments. Re-test after each change. Most welders have a dial or digital display—turn slowly and listen.
Voltage Settings for Common Materials
Here’s a quick reference for typical voltage ranges. Always verify with your welder’s chart.
Mild Steel (ER70S-6 Wire, 75/25 Gas)
- 24-gauge (0.023”): 14–16 volts
- 18-gauge (0.047”): 16–18 volts
- 1/8-inch (0.125”): 19–21 volts
- 1/4-inch (0.25”): 22–24 volts
- 3/8-inch (0.375”): 24–26 volts
Stainless Steel (ER308L Wire, Tri-Mix Gas)
- 18-gauge: 17–19 volts
- 1/8-inch: 20–22 volts
- 1/4-inch: 23–25 volts
Aluminum (ER4043 or ER5356 Wire, 100% Argon)
- 1/8-inch: 18–20 volts
- 1/4-inch: 21–23 volts
- Note: Aluminum conducts heat quickly, so higher wire speed and slightly lower voltage often work best.
Troubleshooting Common Voltage Problems
Even with the right settings, issues can happen. Here’s how to fix them.
Problem: Excessive Spatter
Cause: Voltage too high or wire speed too low.
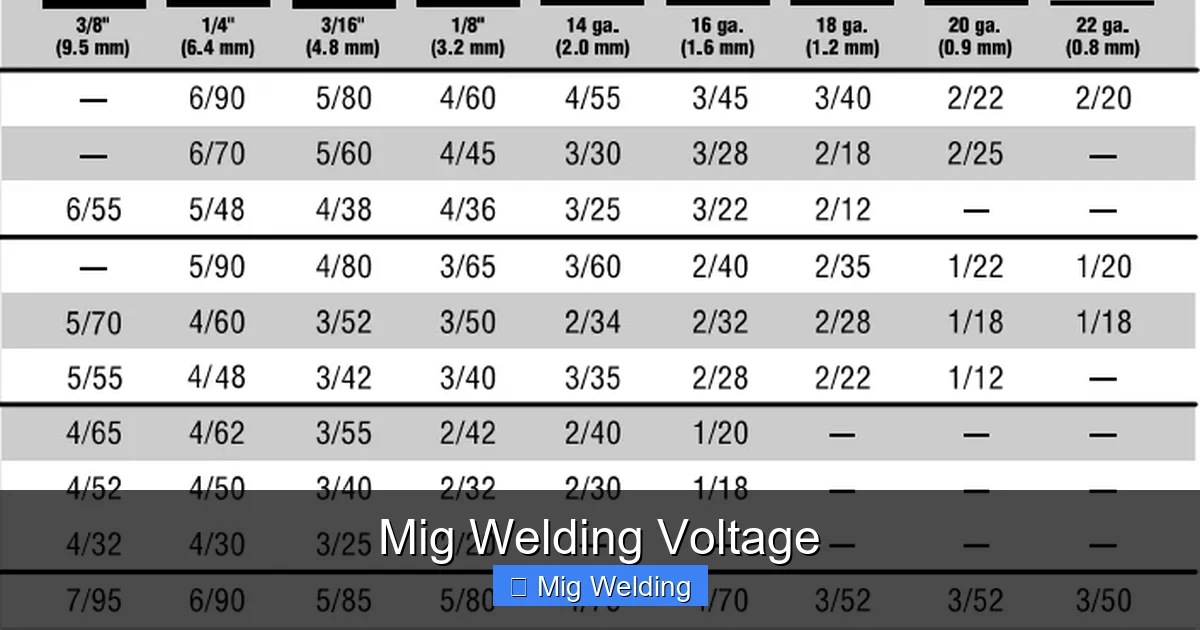
Visual guide about Mig Welding Voltage
Image source: 021208.com
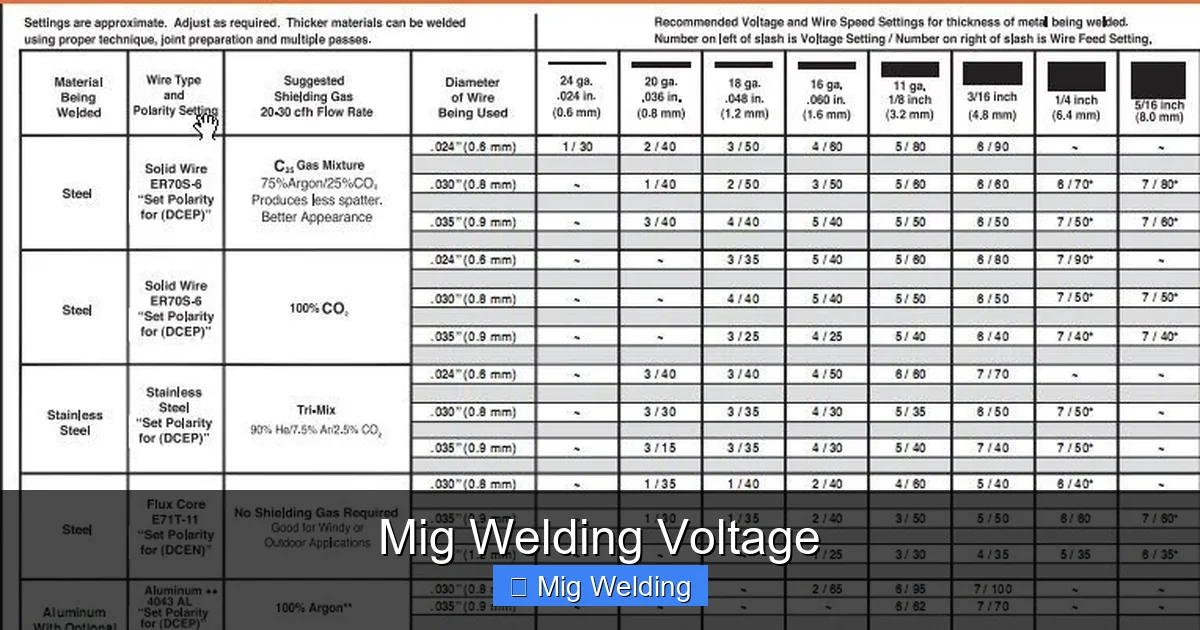
Visual guide about Mig Welding Voltage
Image source: i.pinimg.com
Solution: Lower voltage by 0.5–1.0 volts or increase wire speed slightly. Ensure gas flow is correct (usually 20–25 CFH).
Problem: Burn-Through on Thin Metal
Cause: Voltage too high or travel speed too slow.
Solution: Reduce voltage, increase travel speed, or use a heat sink. Consider pulse MIG welding for very thin materials.
Problem: Poor Penetration
Cause: Voltage too low or joint prep inadequate.
Solution: Increase voltage slightly, ensure proper gap in butt joints, and clean metal thoroughly.
Problem: Arc Won’t Start or Stubs
Cause: Voltage too low or wire too close to metal.
Solution: Increase voltage, check stick-out (should be 3/8–1/2 inch), and ensure good ground connection.
Problem: Uneven or Ropey Bead
Cause: Voltage too high or travel speed inconsistent.
Solution: Lower voltage and practice steady hand movement. Use a guide or fixture if needed.
Pro Tips for Perfect Voltage Control
- Keep your ground clamp clean and tight: A poor ground mimics low voltage issues.
- Use the right nozzle and contact tip: Worn tips cause erratic arcs—replace them regularly.
- Maintain consistent stick-out: Keep the wire 3/8 to 1/2 inch out of the nozzle for stable voltage.
- Watch your angle: A 10–15 degree push or drag angle helps control heat and bead shape.
- Record your settings: Keep a welding log with material, thickness, voltage, and WFS. It saves time on future projects.
Conclusion
Mastering MIG welding voltage is key to strong, clean, and professional-looking welds. It’s not about guessing—it’s about understanding how voltage affects your arc, penetration, and bead quality. Start with your welder’s chart, test on scrap, and fine-tune in small steps. Pay attention to sound, spatter, and bead appearance. With practice, you’ll develop a feel for the right voltage for any job. Remember, great welding is a mix of science and skill. Keep practicing, stay safe, and soon you’ll be setting voltage like a pro.