

Setting up MIG welding is essential for achieving strong, clean welds. This guide covers everything from selecting the right equipment to safety tips, helping beginners and pros weld confidently and safely.
Key Takeaways
- Choose the right MIG welder: Select a machine suitable for your project size and material type.
- Prepare your workspace: Ensure a clean, well-ventilated area with proper grounding and safety gear.
- Set correct parameters: Adjust voltage, wire feed speed, and shielding gas for optimal weld quality.
- Practice safety protocols: Wear protective gear and handle equipment carefully to prevent accidents.
- Perform test welds: Test on scrap material to fine-tune settings before working on your main project.
- Maintain your equipment: Regularly clean and inspect your MIG welder for longevity and safety.
How to Set Up MIG Welding
MIG welding is one of the easiest and most versatile welding methods, perfect for beginners and professionals alike. Proper setup is crucial to produce strong, clean welds. In this guide, you’ll learn how to set up your MIG welder step-by-step, along with safety tips, troubleshooting advice, and practical examples to help you get started confidently.
1. Gather Your Equipment and Safety Gear
Essential Equipment
- MIG welder: Choose a machine suited for your project (small for hobby, larger for industrial work).
- Welding wire: Select the appropriate wire type (solid or flux-cored) and gauge for your materials.
- Shielding gas: Typically, 75% argon and 25% CO2 for steel, or pure argon for aluminum.
- Gas regulator and hoses: Ensure proper connection and leak-free setup.
- Ground clamp and work lead: Critical for electrical safety and proper current flow.
- Protective gear: Welding helmet, gloves, long sleeves, and safety glasses to protect from sparks and UV rays.
Safety Tips
- Always work in a well-ventilated area to avoid fumes.
- Wear full protective gear at all times.
- Keep flammable materials away from the welding zone.
- Ensure your equipment is properly grounded to prevent electrical shock.
2. Prepare Your Workspace
Choose the Right Location
Set up in a clean, dry, and well-ventilated area. Avoid windy locations that can disrupt shielding gas flow.
Visual guide about How to Set Up Mig Welding
Image source: ourhometools.com
Visual guide about How to Set Up Mig Welding
Image source: theweldguru.com
Clear the Area
Remove clutter and flammable objects. Have a fire extinguisher nearby.
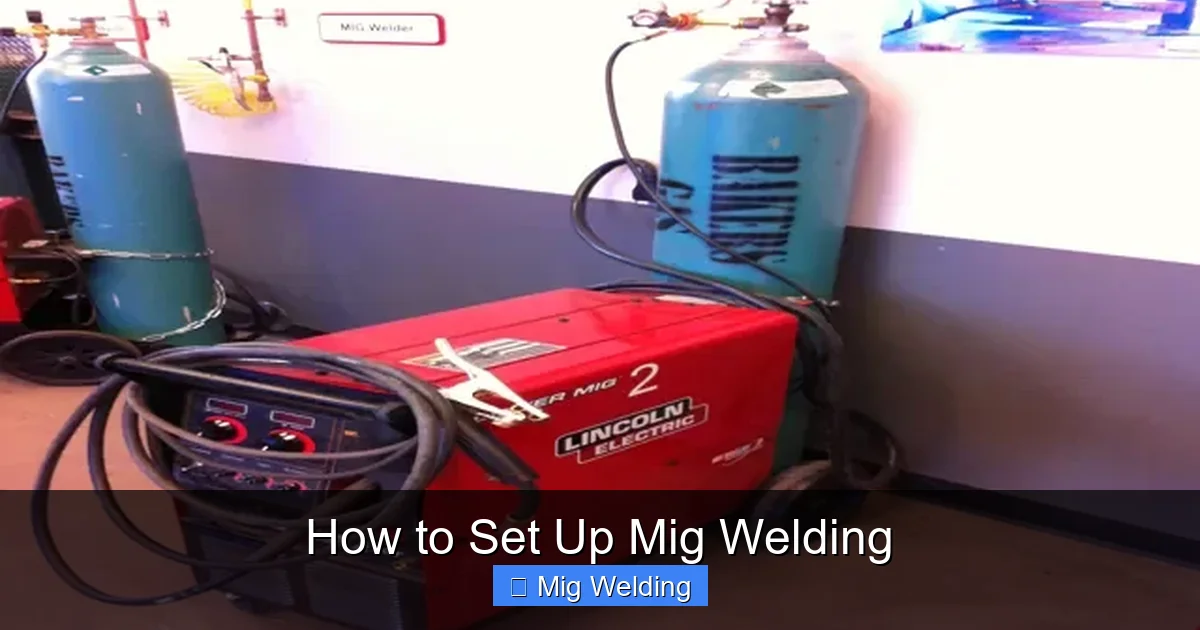
Set Up Your Equipment
- Place your welder on a sturdy, level surface.
- Connect the grounding clamp to your workpiece or worktable.
- Attach the welding gun and ensure all connections are tight.
3. Install and Adjust Your Welding Wire
Selecting the Right Wire
Use solid wire for most steel projects; flux-cored wire for outdoor or rusty materials. Choose wire gauge based on your project needs.
Visual guide about How to Set Up Mig Welding
Image source: i.ytimg.com
Loading the Wire
- Turn off the welder and unplug it.
- Open the wire spool compartment.
- Insert the wire spool and feed the wire through the wire feed mechanism.
- Ensure the wire is unwinding freely and is properly aligned.
- Close the compartment and tighten the spool clamp.
4. Connect and Regulate the Shielding Gas
Attach the Gas Cylinder
- Securely connect your gas regulator to the cylinder valve.
- Connect the regulator to your welding machine with the gas hose.
- Open the cylinder valve slowly and check for leaks.
Set the Gas Flow Rate
- Adjust the regulator to the recommended flow rate (usually 20-30 CFH).
- Test the flow using the gauge to ensure steady, even gas output.
5. Adjust Your Welding Settings
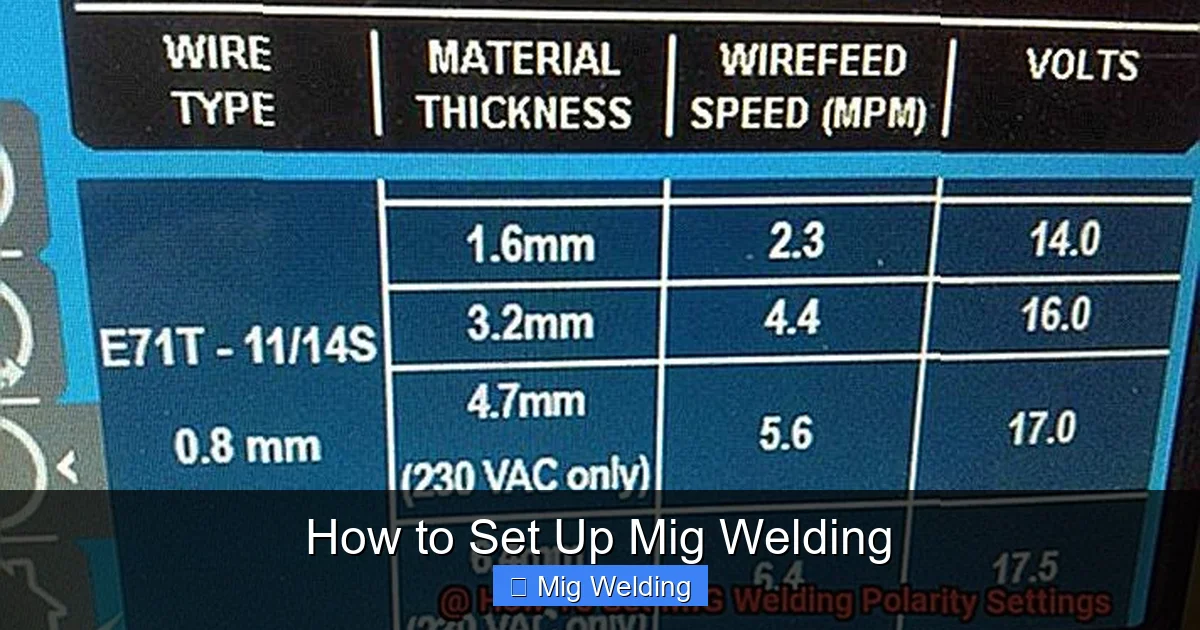
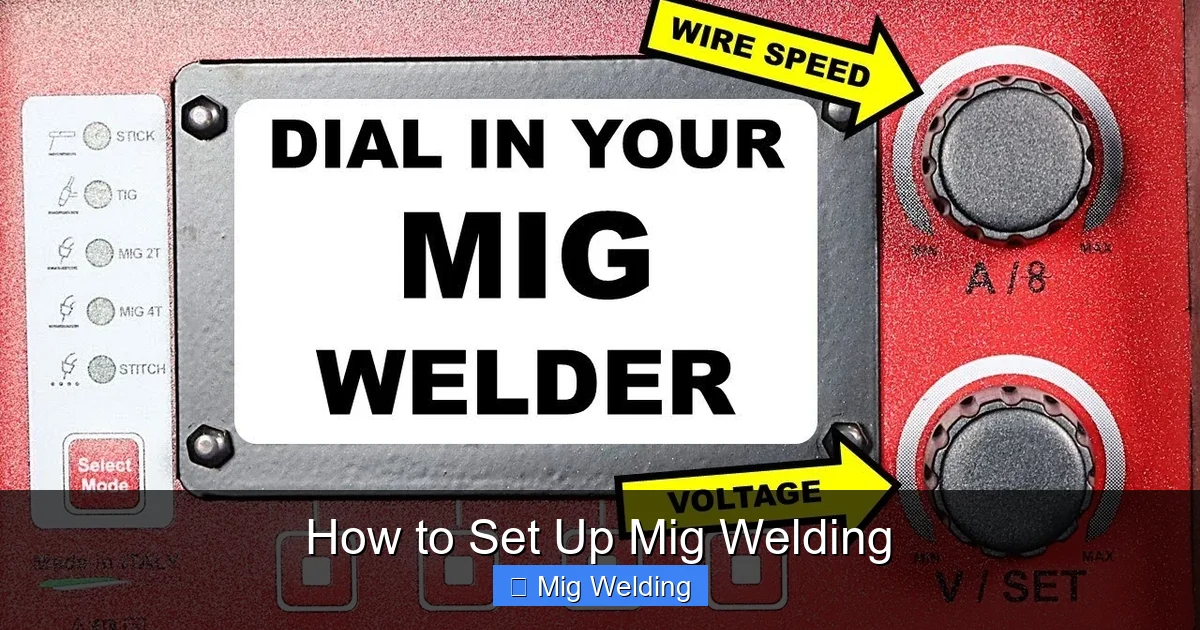
Set Voltage and Wire Feed Speed
- Consult your machine’s manual for recommended starting settings based on material thickness and wire type.
- Adjust voltage to control penetration; higher voltage for thicker materials.
- Set wire feed speed to match the wire type and diameter; too fast causes burn-through, too slow causes weak welds.
Test Your Settings
Perform a test weld on scrap metal. Adjust voltage and wire feed as needed for a clean, smooth bead.
6. Practice Welding Techniques
Starting the Weld
- Hold the gun at a 15-20 degree angle to the workpiece.
- Pull the trigger to start wire feeding and create a molten pool.
- Maintain a steady travel speed; too slow results in excessive heat, too fast causes weak welds.
Controlling the Weld
- Keep a consistent distance between the gun and workpiece.
- Use smooth, steady movements for uniform welds.
- Adjust speed and angle based on the weld quality.
7. Troubleshooting Common Issues
- Porosity or holes: Check shielding gas flow; ensure no leaks or drafts.
- Inconsistent welds: Verify wire feed speed and voltage settings.
- Spatter: Adjust wire feed or voltage; increase shielding gas flow.
- Burn-through: Reduce voltage or increase travel speed.
Conclusion
Setting up MIG welding properly is the foundation for successful welding projects. By choosing the right equipment, preparing your workspace, adjusting settings accurately, and practicing your technique, you can produce strong, clean welds every time. Remember to prioritize safety and maintenance to keep your setup functioning well for years to come.
Additional Tips
- Always read your welder’s manual for specific instructions.
- Start with small projects to build your confidence.
- Keep your equipment clean and well-maintained.
- Welding is a skill—practice regularly to improve your technique.