
Mastering TIG welding aluminum requires understanding the right settings. This TIG welding aluminum settings chart provides essential parameters to ensure strong, clean welds every time. Whether you’re a beginner or experienced welder, these guidelines will help you optimize your process.
Key Takeaways
- Proper amperage is crucial: Use the correct current based on the aluminum thickness to prevent burn-through or weak welds.
- Correct tungsten size and type: Choose the right tungsten electrode (e.g., 2% lanthanated) and size for stability and precision.
- Argon shielding gas: Maintain a steady flow rate (typically 15-20 CFH) for optimal shielding and clean welds.
- Filler rod selection: Match filler material to aluminum alloy for strong, compatible welds.
- Technique matters: Maintain a consistent travel speed and angle to produce smooth, even welds.
- Adjust settings based on thickness: Thinner materials require lower amperage; thicker materials need more heat.
Quick Answers to Common Questions
Question 1?
What is the ideal amperage range for TIG welding 1/8 inch aluminum?
Typically, 60-80 amps are suitable for 1/8 inch aluminum, but adjust based on your specific project and setup.
Question 2?
What type of tungsten electrode is best for aluminum TIG welding?
2% lanthanated or thoriated tungsten electrodes are commonly preferred for aluminum due to their stability and arc characteristics.
Question 3?
How much shielding gas flow do I need for TIG aluminum welding?
Maintain a flow rate of about 15-20 CFH of pure argon to ensure proper shielding and prevent contamination.
Question 4?
What filler rod should I use for welding aluminum?
Use 4043 filler rod for pure aluminum and 5356 for stronger, more corrosion-resistant welds, matching the alloy type.
Question 5?
How can I improve weld quality when TIG welding aluminum?
Maintain consistent technique, proper gas shielding, correct amperage, and clean the aluminum surface before welding.
📑 Table of Contents
Introduction
If you’re diving into TIG welding aluminum, you already know it’s a skill that requires precision, patience, and the right settings. Unlike steel, aluminum is more challenging to weld due to its thermal properties and oxide layer. To achieve strong, clean welds, understanding the correct TIG welding aluminum settings chart is essential.
This guide will walk you through the key parameters, practical tips, and best practices to help you set up your TIG welder. Whether you’re working on a small project or a large fabrication, knowing the optimal settings can make all the difference between a good weld and a perfect one.
Understanding the Basics of TIG Welding Aluminum
What is TIG Welding?
TIG, or Tungsten Inert Gas welding, uses a non-consumable tungsten electrode to produce the weld. It’s known for precision, neatness, and control, making it ideal for aluminum. The process involves adding a filler rod into the weld pool while shielding the area with inert gas, usually argon.
Visual guide about Tig Welding Aluminum Settings Chart
Image source: mewelding.com
Why Aluminum Needs Special Settings
Aluminum has a high thermal conductivity and a natural oxide layer that melts at a higher temperature than the metal itself. This makes controlling heat input crucial. Proper settings help avoid issues like warping, burn-through, or weak welds.
Key TIG Welding Aluminum Settings Chart
1. Amperage (Current)
The amperage determines the heat delivered during welding. For aluminum, a general rule of thumb is:
Visual guide about Tig Welding Aluminum Settings Chart
Image source: i.pinimg.com
- Thinner Aluminum (up to 1/8 inch or 3.2 mm): 50-100 amps
- Medium Thickness (1/8 to 1/4 inch or 3.2-6.4 mm): 100-200 amps
- Thicker Aluminum (over 1/4 inch or 6.4 mm): 200+ amps
Tip: Start with a lower amperage and increase gradually. Too high amps can burn through thin sheets, while too low may cause incomplete fusion.
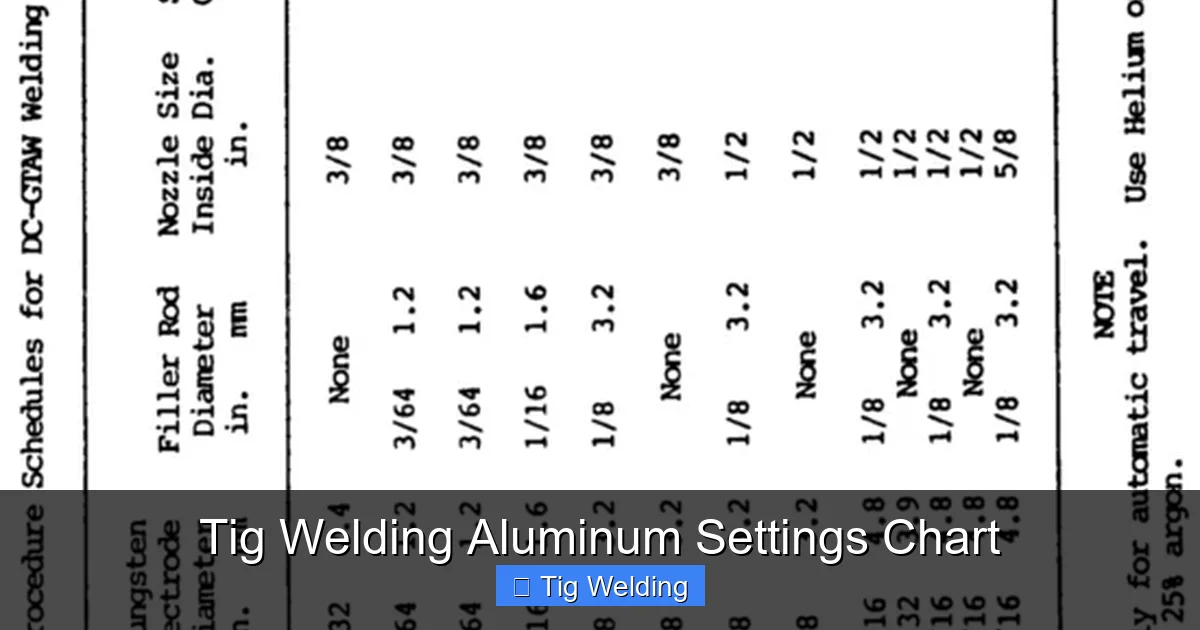
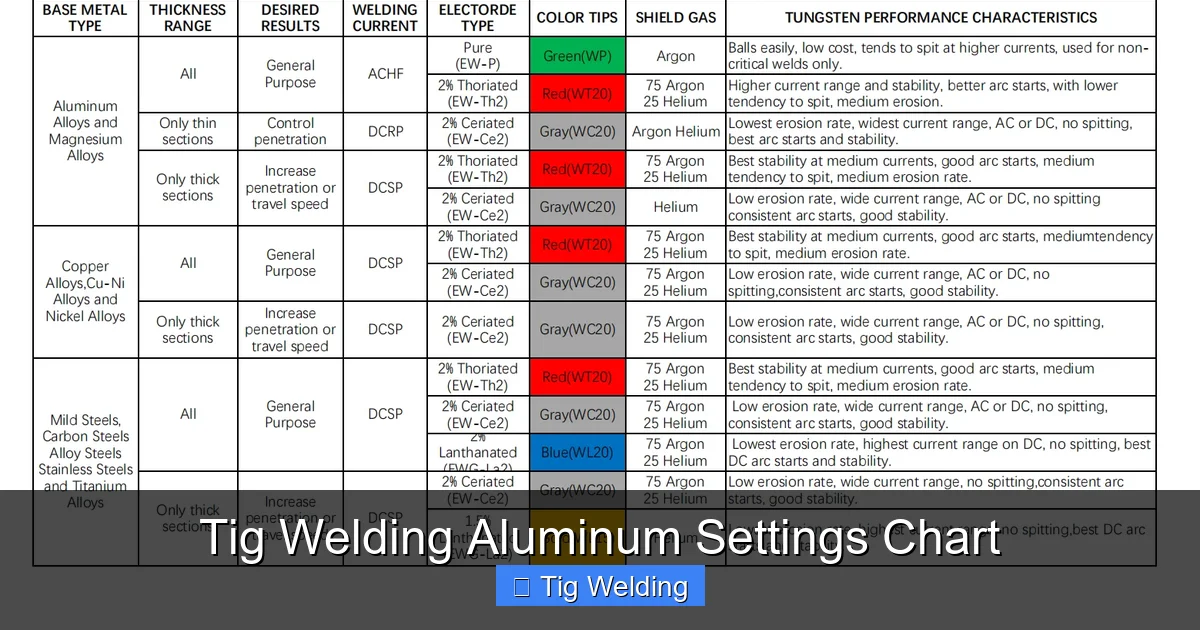
2. Tungsten Electrode Type and Size
Choosing the right tungsten type and size is vital for stability:
- Type: 2% lanthanated or thoriated electrodes are common choices for aluminum due to their stability.
- Size: 1/16 inch (1.6 mm) for thin material, 3/32 inch (2.4 mm) for medium, and 1/8 inch (3.2 mm) for thick aluminum.
Tip: Keep the tungsten sharpened and properly ground to a point for precise arcs.
3. Shielding Gas and Flow Rate
Use high-quality pure argon or a mix with helium for better heat control. Typical flow rates:
- Flow rate: 15-20 CFH (cubic feet per hour)
Ensure the gas coverage is consistent and free from turbulence to prevent contamination.
4. Filler Rod Selection
Match your filler rod to your aluminum alloy for optimal weld quality:
- Pure Aluminum: Use 4043 filler rod.
- Aluminum Alloys (2xxx, 6xxx series): Use 5356 or 4043, depending on strength and corrosion resistance needs.
Keep the filler rod clean and at room temperature for best results.
5. Welding Speed and Technique
Maintaining a consistent travel speed ensures even heat distribution. Tips include:
- Speed: Moderate, steady speed—too fast causes weak welds; too slow risks burn-through.
- Angle: Keep the torch at about 15-20 degrees from vertical, pointing into the weld pool.
Practice makes perfect—try on scrap pieces to find your optimal speed and angle.
Practical Examples and Tips
Let’s say you’re welding a 1/8-inch (3.2 mm) aluminum sheet. Based on the chart, set your amperage between 60-80 amps, use a 3/32 inch tungsten, and a flow rate of 15 CFH of argon. Keep your torch angle at 15 degrees, and feed the filler rod steadily into the weld pool. Adjust the amperage slightly if you notice issues like porosity or burn-through.
Visual guide about Tig Welding Aluminum Settings Chart
Image source: i.ytimg.com
Common Mistakes to Avoid
- Using too high amperage: Causes burn-through, especially on thin materials.
- Incorrect tungsten size: Leads to unstable arcs and poor welds.
- Inconsistent shielding gas flow: Results in contamination and porosity.
- Moving too fast or too slow: Affects weld quality and penetration.
- Neglecting material preparation: Failing to clean aluminum oxide can cause defects.
Conclusion
Mastering TIG welding aluminum requires understanding and applying the right settings. The TIG welding aluminum settings chart acts as your roadmap—guiding you through amperage, tungsten choice, gas flow, and technique. With practice and attention to detail, you’ll produce clean, strong welds that last.
Remember, every project might need slight adjustments, so use this chart as a starting point. Experiment, observe, and refine your process for the best results. Happy welding!
Frequently Asked Questions
What is the best way to prepare aluminum for TIG welding?
Clean the surface thoroughly with a wire brush or chemical cleaner to remove oxide layers and contaminants. Use a dedicated brush for aluminum to avoid contamination from other metals.
How does material thickness affect TIG welding settings?
Thicker aluminum requires higher amperage and slower travel speeds to ensure proper penetration. Thinner sheets need lower amperage and faster movement to prevent burn-through.
Can I TIG weld aluminum without a foot pedal?
Yes, but using a foot pedal provides better control over amperage during welding, which is especially helpful for delicate or precise work.
What are common problems when TIG welding aluminum and how to fix them?
Common issues include porosity, warping, and poor fusion. Fix these by ensuring proper gas flow, correct settings, clean material, and stable technique.
Is it necessary to use helium with argon when TIG welding aluminum?
Using a helium-argon mix can improve heat input and weld penetration, especially on thicker materials, but pure argon is sufficient for most applications.
How can I achieve a clean, aesthetic weld on aluminum?
Use proper shielding gas, maintain consistent technique, clean the surface thoroughly, and select the correct tungsten and filler rod. Practice makes perfect!