
MIG welding stainless steel requires precise settings and the right materials to avoid contamination and ensure strong, corrosion-resistant welds. This guide walks you through optimal voltage, wire feed speed, shielding gas, and techniques for success.
Key Takeaways
- Use ER308L or ER316L wire: These stainless steel MIG wires match most common grades and provide excellent weld quality and corrosion resistance.
- Shielding gas is critical: A 98% argon / 2% CO₂ mix (C2) protects the weld pool and prevents oxidation.
- Adjust voltage and wire feed speed carefully: Start with manufacturer recommendations and fine-tune based on material thickness and joint type.
- Keep everything clean: Stainless steel is prone to contamination—clean base metal, wire, and tools before welding.
- Use a push technique: Pushing the gun (not pulling) improves gas coverage and reduces spatter.
- Control heat input: Use lower heat settings and short weld passes to prevent warping and carbide precipitation.
- Post-weld cleanup matters: Remove oxidation with a stainless steel wire brush or pickling paste to maintain corrosion resistance.
Introduction to MIG Welding Stainless Steel
MIG welding stainless steel can seem intimidating, but with the right settings and techniques, it’s very achievable—even for hobbyists. Unlike mild steel, stainless steel has unique properties that require special attention to shielding gas, wire type, and heat control. If you’ve ever struggled with discolored welds, lack of fusion, or excessive spatter, this guide will help you get it right.
In this comprehensive how-to, you’ll learn the correct MIG welding stainless steel settings, including voltage, wire feed speed, and gas selection. We’ll also cover essential prep work, welding techniques, and troubleshooting tips to help you produce clean, strong, and corrosion-resistant welds every time.
Choosing the Right Wire for Stainless Steel
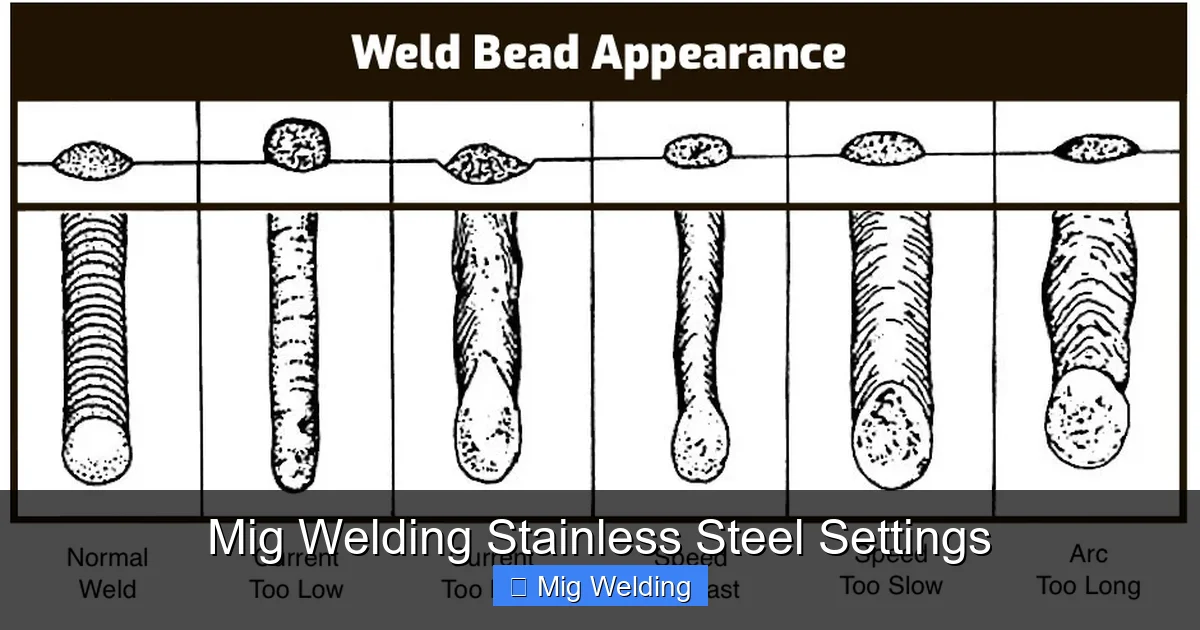
Visual guide about Mig Welding Stainless Steel Settings
Image source: weldguru.com
The wire you use is one of the most important factors in MIG welding stainless steel. Most stainless steels fall into the austenitic family (like 304 or 316), and the wire should match or closely resemble the base metal.
Recommended Wire Types
– ER308L: Ideal for welding 304 and 304L stainless steel—the most common type. It offers good ductility and corrosion resistance.
– ER316L: Best for 316 and 316L stainless steel, which contain molybdenum for enhanced resistance to chlorides and acids.
– ER309L: Used when welding stainless to mild steel or dissimilar metals.
Always choose a low-carbon version (the “L” in the name) to reduce the risk of carbide precipitation, which can weaken the weld over time.
Wire Diameter
Common diameters are 0.030″ and 0.035″. Use 0.030″ for thinner materials (under 1/8″) and 0.035″ for thicker sections. Make sure your MIG welder and liner are compatible with the wire size.
Selecting the Correct Shielding Gas
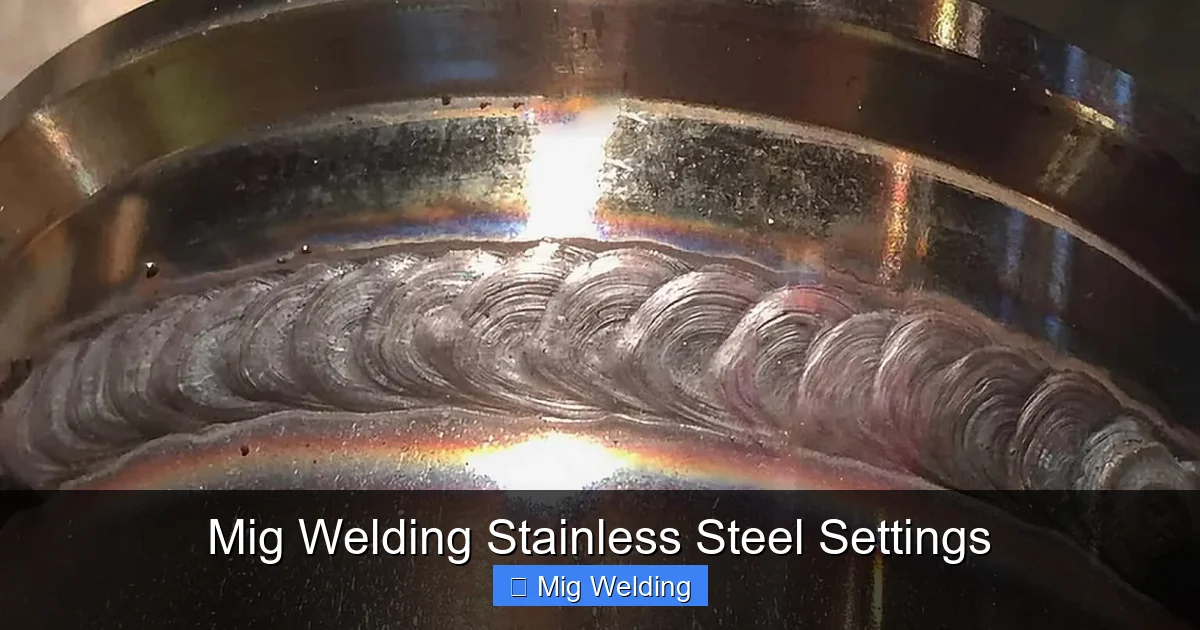
Visual guide about Mig Welding Stainless Steel Settings
Image source: weldguru.com
Stainless steel requires a shielding gas that protects the molten weld pool from oxygen and nitrogen in the air. Using the wrong gas leads to oxidation, porosity, and poor appearance.
Best Gas Mix for Stainless Steel
The most widely used and recommended mix is 98% argon / 2% carbon dioxide (C2). This blend provides excellent arc stability, minimal spatter, and good penetration without excessive oxidation.
Avoid pure CO₂ or high-CO₂ mixes—they increase spatter and can cause carbide formation. Tri-mix gases (argon/helium/CO₂) are used in specialized applications but are not necessary for most general welding.
Gas Flow Rate
Set your flow rate between 20–25 cubic feet per hour (CFH). Too little gas won’t protect the weld; too much can cause turbulence and draw in air.
Use a quality gas regulator and check for leaks. Always purge the gas line before starting by opening the valve for a few seconds.
Setting Voltage and Wire Feed Speed
Getting the right combination of voltage and wire feed speed (WFS) is key to a smooth arc and proper penetration. These settings depend on material thickness, joint design, and your welder’s capabilities.
Starting Points for Common Thicknesses
Use these as a baseline, then adjust based on your results:
- 18 gauge (1.2 mm): 16–18 volts, 150–180 IPM (inches per minute)
- 16 gauge (1.6 mm): 18–20 volts, 180–220 IPM
- 14 gauge (2.0 mm): 20–22 volts, 220–260 IPM
- 1/8″ (3.2 mm): 22–24 volts, 260–300 IPM
- 3/16″ (4.8 mm): 24–26 volts, 300–350 IPM
Fine-Tuning Your Settings
– If the arc is too harsh or spattery, reduce voltage slightly.
– If the wire stubs into the metal or burns back, increase WFS.
– For a smooth, quiet arc with good bead appearance, you’ve found the sweet spot.
Always refer to your welder’s manual for recommended settings. Many modern MIG welders have preset programs for stainless steel—use them as a starting point.
Preparing the Workpiece
Stainless steel is highly sensitive to contamination. Even small amounts of oil, grease, or carbon from mild steel can ruin a weld.
Cleaning the Base Metal
– Remove paint, oil, and grease with a solvent like acetone or a dedicated metal cleaner.
– Use a stainless steel wire brush (dedicated only to stainless) to remove scale, rust, or oxidation. Never use a brush that’s been on mild steel—it will transfer carbon.
– Wipe the area with a clean cloth before welding.
Joint Preparation
– For butt joints, a slight gap (1/16″) helps with penetration.
– Bevel thick materials (over 1/4″) at 30–45 degrees for better access.
– Use clamps or fixtures to hold parts securely—stainless expands and contracts more than mild steel, increasing warping risk.
Welding Technique and Travel Angle
Your welding technique has a big impact on weld quality, especially with stainless steel.
Push vs. Pull Technique
Always use the push technique (gun pointing away from the weld pool). This allows the shielding gas to cover the molten metal more effectively, reducing oxidation and improving bead appearance.
Travel Angle and Speed
– Hold the gun at a 10–15 degree angle in the direction of travel.
– Maintain a consistent travel speed—too slow causes excessive heat and warping; too fast leads to lack of fusion.
– Use a steady, smooth motion. Avoid weaving unless necessary for wide joints.
Short Weld Passes
Stainless steel conducts heat poorly, so heat builds up quickly. Use short weld passes (2–3 inches) with cooling time between them. This minimizes distortion and prevents sensitization (carbide precipitation) in the heat-affected zone.
Troubleshooting Common Problems
Even with the right settings, issues can arise. Here’s how to fix them:
Porosity (Bubbles in the Weld)
Causes: Contaminated base metal, low gas flow, wind, or dirty contact tip.
Fix: Clean the metal thoroughly, check gas flow, shield from drafts, and replace worn tips.
Discoloration (Blue, Purple, or Gray Tint)
Causes: Insufficient shielding gas or excessive heat.
Fix: Increase gas flow, use the push technique, and reduce voltage or travel faster.
Lack of Fusion
Causes: Low voltage, slow travel speed, or incorrect angle.
Fix: Increase voltage slightly, slow down, and ensure proper gun angle.
Excessive Spatter
Causes: High voltage, incorrect gas, or dirty wire.
Fix: Reduce voltage, verify gas mix, and clean or replace the wire.
Post-Weld Cleanup and Finishing
After welding, stainless steel often shows heat tint (oxidation) that can compromise corrosion resistance.
Removing Oxidation
– Use a stainless steel wire brush to scrub the weld and surrounding area.
– For heavier oxidation, apply pickling paste (available at welding supply stores), let it react, then rinse thoroughly.
– Avoid grinding with carbon steel wheels—use dedicated stainless tools.
Passivation (Optional)
For critical applications, passivation (using nitric or citric acid) restores the chromium oxide layer and improves corrosion resistance. This is common in food, medical, or marine industries.
Conclusion
MIG welding stainless steel doesn’t have to be complicated. By using the right wire (ER308L or ER316L), shielding gas (98/2 Argon/CO₂), and carefully tuned voltage and wire feed settings, you can produce strong, clean, and professional-looking welds. Remember to keep everything clean, use the push technique, and control heat input with short passes.
With practice and attention to detail, you’ll master MIG welding stainless steel and expand your capabilities beyond mild steel. Whether you’re building a custom exhaust, repairing kitchen equipment, or working on a fabrication project, these settings and tips will help you succeed.