
MIG welding cast aluminum can be tricky due to its brittleness and oxide layer, but with the right prep, tools, and techniques, you can achieve strong, clean welds. This guide walks you through every step—from cleaning to post-weld care—so you can tackle aluminum projects with confidence.
Key Takeaways
- Cleanliness is critical: Cast aluminum must be thoroughly cleaned to remove oil, dirt, and oxides before welding.
- Use the right filler rod: ER4043 or ER5356 aluminum wire works best for most cast aluminum applications.
- Preheat is essential: Heating the base metal to 400–600°F reduces cracking and improves weld penetration.
- Choose proper shielding gas: 100% argon gas ensures stable arc and prevents contamination.
- Adjust your MIG welder settings: Lower voltage and wire speed prevent burn-through on thin or porous castings.
- Work in short bursts: Pulse welding or short weld passes help manage heat input and distortion.
- Post-weld cleanup matters: Remove slag and inspect for cracks to ensure long-lasting results.
Introduction: Why MIG Welding Cast Aluminum Is Challenging—and Worth It
If you’ve ever tried welding cast aluminum, you know it’s not like welding steel. Cast aluminum is porous, prone to cracking, and covered in a stubborn oxide layer that can ruin your weld. But don’t let that scare you off—MIG welding cast aluminum is absolutely doable with the right approach. Whether you’re repairing an engine block, a vintage carburetor, or a custom automotive part, this guide will walk you through the entire process, from prep to finish.
You’ll learn how to choose the right equipment, clean the metal properly, set your welder correctly, and avoid common pitfalls. By the end, you’ll have the skills and confidence to handle aluminum castings like a pro.
Step 1: Gather the Right Tools and Materials
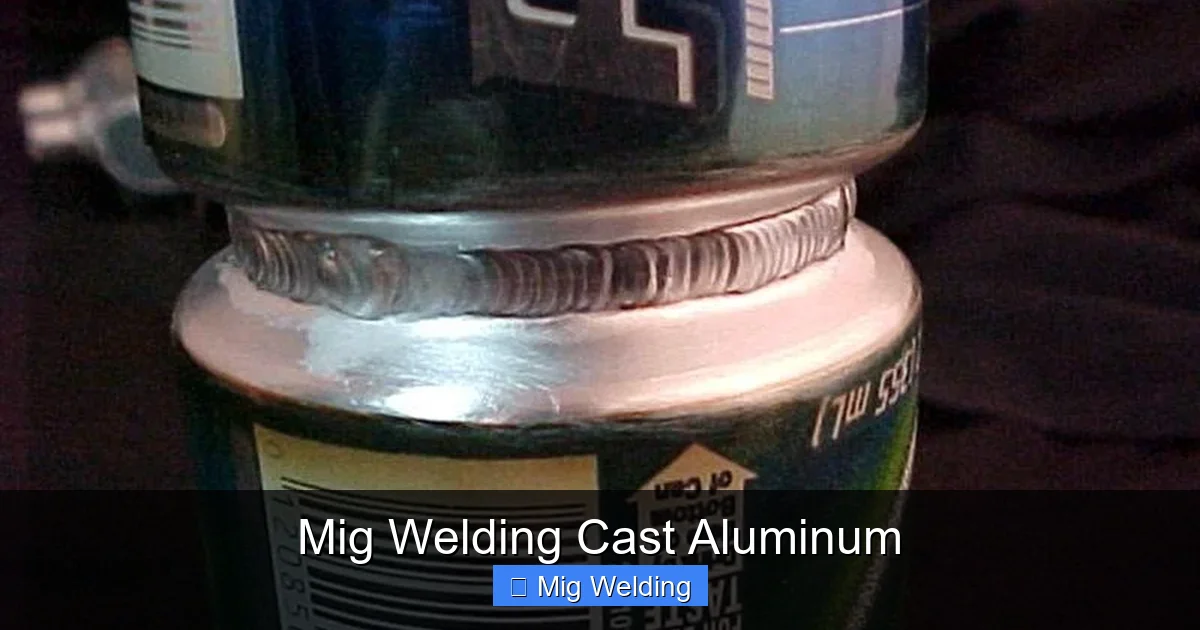
Visual guide about Mig Welding Cast Aluminum
Image source: makemoneywelding.com
Before you strike an arc, make sure you have everything you need. Using the wrong gear can lead to failed welds, wasted time, and frustration.
Essential Equipment
- MIG welder with spool gun or push-pull gun: Standard MIG welders struggle with aluminum wire because it’s soft and bends easily. A spool gun feeds the wire smoothly and prevents birdnesting.
- Aluminum welding wire: Use ER4043 (good for most castings) or ER5356 (stronger, better for high-stress areas). Both are 0.035” or 0.045” in diameter.
- 100% argon shielding gas: Never use CO2 or mixed gases—they cause porosity and unstable arcs.
- Preheating torch or furnace: A propane torch or small furnace helps bring the casting to the right temperature.
- Wire brush (stainless steel): Dedicated to aluminum only—never use one that’s touched steel.
- Acetone or aluminum cleaner: For removing grease and oil.
- Heat-resistant gloves and safety gear: Aluminum reflects heat and UV light, so wear a welding helmet, gloves, and long sleeves.
Optional but Helpful Tools
- Chipping hammer and wire brush for post-weld cleanup
- Clamps and fixtures to hold the casting steady
- Infrared thermometer to monitor preheat temperature
Step 2: Clean the Cast Aluminum Thoroughly
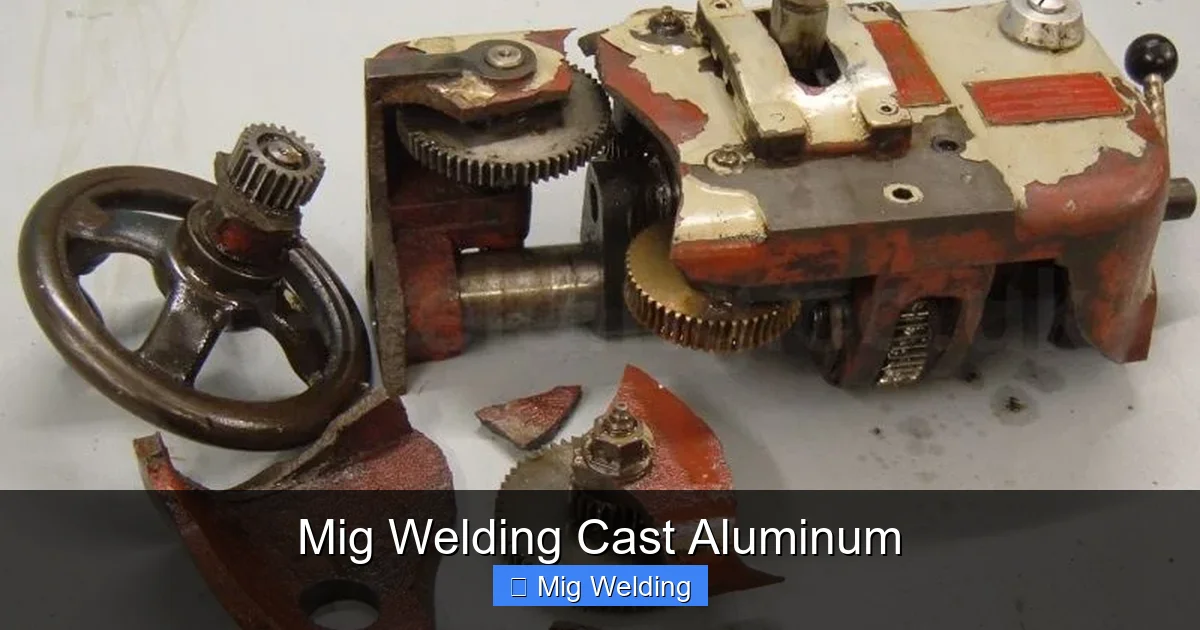
Visual guide about Mig Welding Cast Aluminum
Image source: mig-welding.co.uk
This step is non-negotiable. Even tiny amounts of oil, dirt, or oxide can ruin your weld.
Remove Surface Contaminants
Start by wiping the area with acetone or a dedicated aluminum cleaner. Use a clean rag and work in one direction to avoid spreading grease. Let it dry completely.
Scrub Off the Oxide Layer
Aluminum forms a hard oxide layer (Al₂O₃) that melts at a much higher temperature than the base metal. If you don’t remove it, your weld will be weak and porous.
Use a stainless steel wire brush—dedicated only to aluminum—to scrub the surface. Brush in one direction, and don’t reuse the brush on steel. For tight spots, use a rotary tool with a stainless steel wire wheel.
Degrease Again if Needed
If the part was recently machined or handled, wipe it down once more with acetone. Oils from your hands can contaminate the weld zone.
Step 3: Preheat the Casting
Cast aluminum cools quickly and is prone to thermal shock. Preheating reduces stress and helps the weld penetrate evenly.
Why Preheat?
Without preheat, the weld pool cools too fast, leading to cracks, lack of fusion, and porosity. Preheating also helps burn off any remaining moisture or contaminants.
How to Preheat
Use a propane torch or small furnace to slowly heat the entire casting—not just the weld zone. Aim for a temperature between 400°F and 600°F.
- Use an infrared thermometer to check the temperature.
- Heat evenly—don’t focus on one spot.
- For large castings, consider using a heat blanket or oven.
Tip: If you don’t have a thermometer, sprinkle a few drops of water on the metal. If they sizzle and evaporate quickly, it’s likely above 400°F.
Step 4: Set Up Your MIG Welder
Aluminum requires different settings than steel. Here’s how to dial in your machine.
Wire Feed Speed and Voltage
Start with these general settings for 1/8” (3mm) thick cast aluminum:
- Wire feed speed: 200–300 inches per minute (IPM)
- Voltage: 18–22 volts
Adjust based on your welder’s chart and test welds. Lower settings prevent burn-through; higher settings improve penetration.
Use a Spool Gun or Push-Pull System
Aluminum wire is soft and kinks easily. A spool gun mounts near the torch and feeds the wire directly, reducing friction. If you’re using a standard MIG setup, consider upgrading—it makes a huge difference.
Set Gas Flow Rate
Use 20–30 cubic feet per hour (CFH) of 100% argon. Too little gas causes porosity; too much creates turbulence and pulls in air.
Step 5: Tack and Weld the Joint
Now it’s time to weld—but take it slow and steady.
Tack First
Place small tacks every 1–2 inches to hold the pieces in place. This prevents warping and ensures alignment.
Weld in Short Passes
Cast aluminum conducts heat quickly, so long welds can overheat and crack. Instead:
- Weld 1–2 inches at a time.
- Let each pass cool slightly before continuing.
- Use a backstep or stitch welding technique to control heat.
Maintain a Short Arc Length
Keep the torch close to the workpiece—about 1/2 inch away. A short arc gives better control and reduces spatter.
Push the Puddle, Don’t Drag
Unlike steel, you should push the weld pool with a slight angle (10–15 degrees). This helps the shielding gas protect the molten metal and improves visibility.
Step 6: Manage Heat and Avoid Cracking
Heat management is the key to success with cast aluminum.
Use Interpass Cooling
After each weld pass, let the area cool to around 300°F before welding again. Use a heat sink (like a copper bar) clamped nearby to draw away excess heat.
Avoid Overheating
If the metal starts to glow red or bubble, stop immediately. Overheating weakens the casting and increases cracking risk.
Peen the Weld (Optional)
Lightly tapping the weld with a ball-peen hammer while it’s still warm can relieve stress and reduce cracking. Be gentle—don’t deform the metal.
Step 7: Post-Weld Cleanup and Inspection
Your job isn’t done until you’ve cleaned and checked the weld.
Remove Slag and Oxides
Use a stainless steel wire brush to clean the weld surface. Aluminum welds often have a dull gray oxide coating that needs to be brushed off.
Inspect for Defects
Look for:
- Cracks (use a magnifying glass if needed)
- Porosity (small holes in the weld)
- Lack of fusion (weld not bonding to base metal)
If you find issues, grind them out and reweld—but remember to clean and preheat again.
Stress Relieve (Optional)
For critical repairs, consider stress-relieving the part by heating it to 600°F and letting it cool slowly in still air. This reduces internal stresses and improves durability.
Troubleshooting Common Problems
Even with careful prep, things can go wrong. Here’s how to fix common issues:
Porosity in the Weld
- Cause: Contamination, moisture, or poor gas coverage.
- Fix: Clean the metal better, check gas flow, and ensure the nozzle isn’t clogged.
Cracking Along the Weld
- Cause: Rapid cooling, lack of preheat, or high stress.
- Fix: Increase preheat, use shorter passes, and avoid welding in cold environments.
Wire Feeding Problems
- Cause: Soft aluminum wire kinking in the liner.
- Fix: Use a spool gun or push-pull system, and keep the gun as straight as possible.
Burn-Through
- Cause: Too much heat or slow travel speed.
- Fix: Reduce voltage, increase travel speed, and use a heat sink.
Conclusion: Mastering MIG Welding Cast Aluminum
MIG welding cast aluminum isn’t easy, but it’s not impossible. The secret is in the details: clean the metal, preheat properly, use the right gear, and manage your heat input. With practice, you’ll be able to repair engine parts, fabricate custom components, and tackle projects that others avoid.
Remember, every failed weld is a lesson. Keep your tools clean, your settings dialed in, and your patience high. Soon, you’ll be welding aluminum castings with the confidence of a seasoned pro.