
Mastering MIG welding aluminum polarity is essential for strong, clean welds. This guide explains the correct polarity setup, equipment tips, and common mistakes to avoid.
Key Takeaways
- Use DCEN (Direct Current Electrode Negative) polarity: This is the standard setting for MIG welding aluminum, ensuring proper heat transfer and arc stability.
- Choose the right shielding gas: A 100% argon gas mix is ideal for aluminum to prevent oxidation and improve weld quality.
- Use a spool gun or push-pull system: Aluminum wire is soft and prone to birdnesting; a spool gun reduces feeding issues.
- Clean the material thoroughly: Aluminum oxidizes quickly—remove oxide layers with a stainless steel brush or chemical cleaner before welding.
- Adjust wire feed speed and voltage: Start with manufacturer recommendations and fine-tune based on material thickness and joint design.
- Avoid AC polarity on standard MIG welders: Unlike TIG welding, MIG welding aluminum requires DCEN, as most MIG machines don’t support AC output.
- Practice on scrap metal first: Aluminum behaves differently than steel—practice helps you dial in settings and technique.
Introduction: Why Polarity Matters in MIG Welding Aluminum
If you’ve ever tried MIG welding aluminum, you know it’s not as straightforward as welding steel. One of the most common mistakes beginners make is using the wrong polarity. Unlike steel, which typically uses DCEP (Direct Current Electrode Positive), aluminum requires DCEN (Direct Current Electrode Negative) for successful MIG welding.
Getting the polarity right ensures proper heat distribution, arc stability, and penetration. In this guide, we’ll walk you through everything you need to know about MIG welding aluminum polarity—from setup and equipment to troubleshooting common issues. By the end, you’ll be confident in setting up your welder correctly and producing clean, strong aluminum welds.
Understanding Polarity in MIG Welding
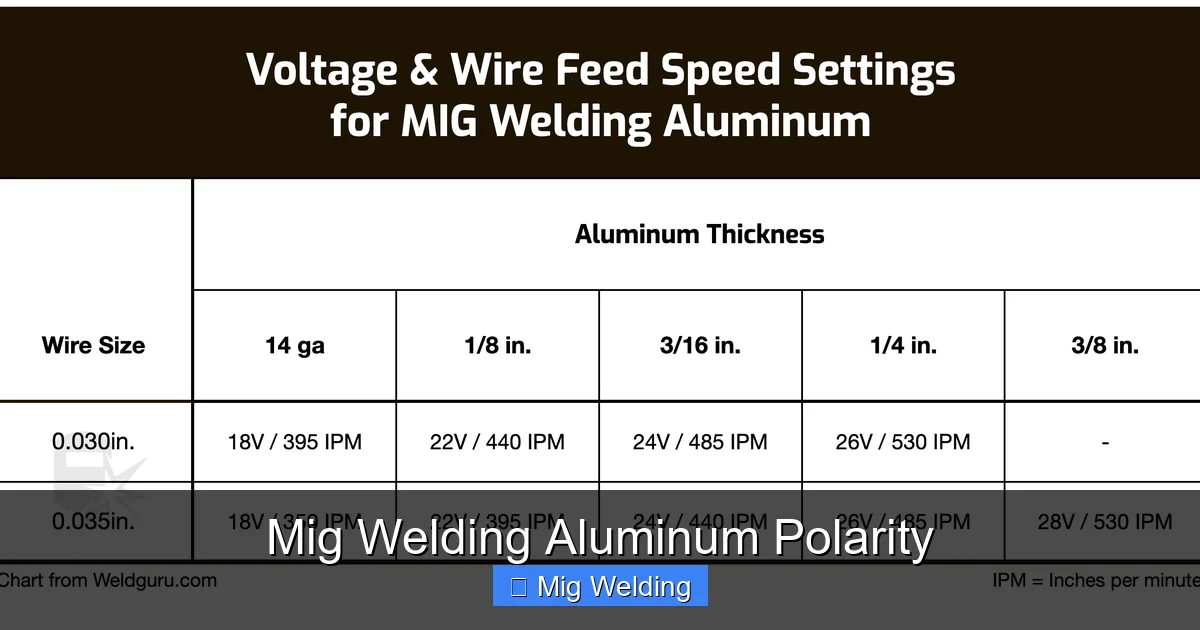
Visual guide about Mig Welding Aluminum Polarity
Image source: weldguru.com
Before diving into the steps, let’s clarify what polarity means in welding. Polarity refers to the direction of electrical current flow in your welding circuit. There are two main types:
- DCEN (Direct Current Electrode Negative): The electrode (wire) is negative, and the workpiece is positive. Heat concentrates on the workpiece, which is ideal for aluminum.
- DCEP (Direct Current Electrode Positive): The electrode is positive, and the workpiece is negative. This setup generates more heat at the electrode, commonly used for steel.
Aluminum has a high thermal conductivity and a low melting point compared to steel. Using DCEP on aluminum would cause excessive wire burn-back and poor penetration. That’s why DCEN is the only correct polarity for MIG welding aluminum.
Step 1: Set Your Welder to DCEN Polarity
Visual guide about Mig Welding Aluminum Polarity
Image source: images-eu.ssl-images-amazon.com
The first and most critical step is configuring your MIG welder for DCEN. Here’s how:
Check Your Welder’s Manual
Not all MIG welders are designed for aluminum. Confirm that your machine supports DCEN and can handle aluminum wire (typically 4043 or 5356). Most modern MIG welders have polarity switches or interchangeable leads.
Switch the Polarity Leads
On many MIG welders, you’ll need to physically swap the electrode and ground cables:
- Connect the electrode cable (gun) to the negative (-) terminal.
- Connect the ground cable (clamp) to the positive (+) terminal.
This reverses the current flow, setting the system to DCEN. Some welders have a simple switch—just flip it to “DCEN” or “Aluminum” mode.
Double-Check Connections
Loose or reversed connections are a common cause of welding issues. Ensure all cables are tightly secured and correctly positioned before welding.
Step 2: Choose the Right Equipment
Aluminum welding demands specific tools to handle its unique properties.
Use a Spool Gun or Push-Pull System
Aluminum wire is soft and bends easily, which can cause it to tangle or “birdnest” in the feeder. A spool gun mounts directly on the torch and holds a small spool of wire, reducing feeding distance. Alternatively, a push-pull system uses a motor in the gun to pull the wire while the feeder pushes it, minimizing resistance.
Select the Correct Wire
Common aluminum wires include:
- 4043: Good for general-purpose welding, lower melting point, and less crack-sensitive.
- 5356: Stronger and more ductile, ideal for structural applications.
Use a U-groove drive roll designed for aluminum to avoid flattening the wire.
Use 100% Argon Shielding Gas
Aluminum oxidizes quickly when exposed to air. A 100% argon shielding gas creates a clean environment around the weld pool, preventing contamination. Avoid argon-CO2 mixes—they’re for steel, not aluminum.
Step 3: Prepare the Aluminum Surface
Aluminum forms a thin oxide layer that melts at a higher temperature than the base metal. If not removed, this oxide can cause porosity and weak welds.
Clean with a Stainless Steel Brush
Use a dedicated stainless steel wire brush (never used on steel) to scrub the surface. Brush in one direction to avoid embedding contaminants.
Degrease with Acetone or Alcohol
Wipe the area with acetone or isopropyl alcohol to remove oils, grease, or dirt. Let it dry completely before welding.
Store Cleaned Metal Properly
Aluminum re-oxidizes quickly. Weld within a few hours of cleaning, or store the cleaned piece in a dry, sealed container.
Step 4: Set Up Your Welding Parameters
Correct voltage and wire feed speed are crucial for a stable arc and good penetration.
Start with Manufacturer Recommendations
Check your welder’s chart for suggested settings based on material thickness. For example:
- 1/8″ (3mm) aluminum: ~18–20 volts, 200–250 IPM wire feed speed.
- 1/4″ (6mm) aluminum: ~20–22 volts, 250–300 IPM.
Fine-Tune as Needed
If the arc is unstable or the weld looks splattery:
- Increase voltage for a smoother arc and better puddle fluidity.
- Decrease wire speed if the wire stubs into the puddle.
Always make small adjustments and test on scrap metal first.
Step 5: Welding Technique Tips
Aluminum welds differently than steel—here’s how to adapt your technique.
Use a Push Technique
Always push the gun away from the weld pool (not drag). This improves gas coverage and reduces the risk of contamination.
Maintain a Short Arc Length
Keep the gun close to the workpiece (about 1/2 inch or 12mm). A long arc causes spatter and instability.
Weld at a Steady Speed
Move too fast, and you’ll get lack of fusion. Too slow, and you risk burn-through. Aim for a consistent, fluid motion.
Preheat Thick Aluminum (Optional)
For materials over 1/4″ thick, preheating to 250–350°F (120–175°C) reduces thermal shock and improves fusion.
Troubleshooting Common Issues
Even with correct polarity, problems can arise. Here’s how to fix them:
Porosity (Bubbles in the Weld)
- Cause: Contaminated base metal or insufficient gas coverage.
- Fix: Re-clean the surface, check gas flow (20–25 CFH), and ensure no drafts are disrupting the shield.
Wire Burn-Back
- Cause: Wire feed speed too high or incorrect polarity (DCEP instead of DCEN).
- Fix: Reduce wire speed and double-check polarity settings.
Birdnesting (Wire Tangles in Feeder)
- Cause: Soft aluminum wire jamming in the drive rolls.
- Fix: Use a spool gun, switch to U-groove rolls, and reduce tension on the drive roll.
Poor Penetration
- Cause: Low voltage or incorrect travel speed.
- Fix: Increase voltage slightly and slow down your travel speed.
Conclusion: Mastering MIG Welding Aluminum Polarity
Getting the polarity right is the foundation of successful MIG welding on aluminum. By setting your welder to DCEN, using the right equipment, and following proper cleaning and welding techniques, you’ll produce strong, clean, and professional-looking welds.
Remember, aluminum is unforgiving—small mistakes like using the wrong polarity or skipping surface prep can ruin a weld. But with practice and attention to detail, you’ll soon be welding aluminum with confidence. Start with scrap metal, dial in your settings, and don’t rush the process.
With this guide, you now have everything you need to tackle MIG welding aluminum the right way. Happy welding!