

Learning MIG welding at home is easier than you think—with the right tools, safety gear, and practice, you can master this versatile welding technique in your garage or workshop. This guide walks you through everything from setting up your equipment to troubleshooting common issues, so you can weld with confidence.
Key Takeaways
- Start with safety first: Always wear a welding helmet, gloves, and flame-resistant clothing to protect yourself from sparks and UV rays.
- Choose the right MIG welder: Look for a 110V machine with adjustable voltage and wire speed for home use, such as a 140-amp model.
- Practice on scrap metal: Use old steel pieces to test settings and improve your technique before working on real projects.
- Master the basics of setup: Learn how to load wire, set gas flow, and adjust voltage for different metal thicknesses.
- Focus on consistent technique: Keep a steady travel speed, correct gun angle (10–15 degrees), and proper distance from the workpiece.
- Maintain your equipment: Clean the gun nozzle, check wire feed, and store gas cylinders safely to ensure long-term performance.
- Learn from mistakes: Troubleshoot issues like porosity or spatter by adjusting gas, wire, or technique.
How to Learn MIG Welding at Home
If you’ve ever wanted to learn how to learn MIG welding at home, you’re in the right place. MIG welding (Metal Inert Gas welding) is one of the most beginner-friendly welding methods, making it perfect for DIYers, hobbyists, and home mechanics. Whether you’re fixing a fence, building a custom shelf, or restoring a car, MIG welding gives you the power to join metal quickly and cleanly.
The best part? You don’t need a professional shop to get started. With a few essential tools, a safe workspace, and consistent practice, you can become proficient in MIG welding right from your garage or basement. This guide will walk you through every step—from choosing your first welder to mastering your technique and troubleshooting common problems.
Step 1: Understand the Basics of MIG Welding
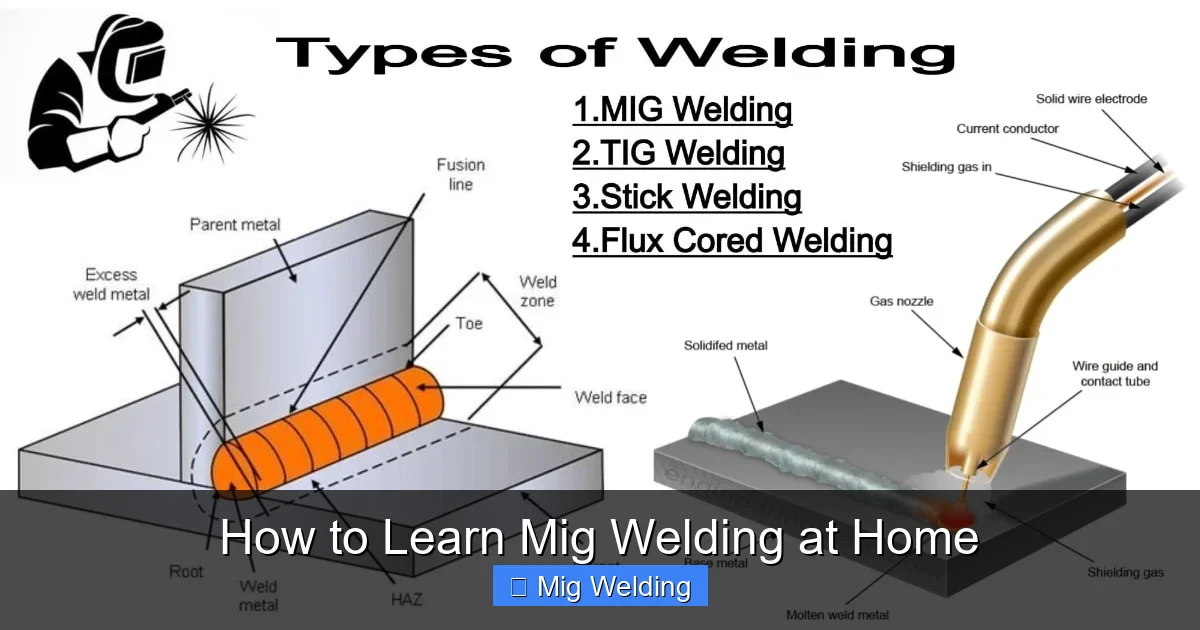
Before you pick up a welder, it helps to know how MIG welding works. MIG welding uses a continuous wire electrode fed through a welding gun. At the same time, a shielding gas (usually a mix of argon and CO₂) flows out to protect the weld pool from contamination. When you pull the trigger, an electric arc melts the wire and the base metal, fusing them together.
This process is fast, clean, and great for thin to medium-thick metals like mild steel. It’s also relatively easy to control, which is why so many beginners start with MIG.
Key Components of a MIG Welder
- Power source: Provides the electricity needed to create the arc.
- Wire feeder: Pushes the welding wire through the gun at a steady speed.
- Welding gun: Holds the wire and delivers gas and electricity to the weld.
- Ground clamp: Completes the electrical circuit by connecting to the workpiece.
- Gas cylinder: Supplies the shielding gas (usually stored separately).
Step 2: Choose the Right MIG Welder for Home Use
Not all MIG welders are created equal. For home use, you’ll want a machine that’s affordable, easy to set up, and powerful enough for common projects.
What to Look For
- Voltage: Most home welders run on 110V (standard household outlet). Look for a 140-amp model—it’s strong enough for 1/4-inch steel but still manageable for beginners.
- Adjustability: Choose a welder with adjustable voltage and wire speed. This lets you fine-tune your settings for different materials.
- Included accessories: Some kits come with a welding gun, ground clamp, and even a small gas cylinder. These can save you money.
- Brand reliability: Stick with trusted brands like Lincoln Electric, Hobart, or Miller for better support and durability.
Recommended Starter Welder
A great option for beginners is the Hobart Handler 140. It’s user-friendly, reliable, and widely used by home welders. It runs on 110V and can handle mild steel up to 1/4 inch thick—perfect for most DIY projects.
Step 3: Gather Your Safety Gear
Welding is safe when done correctly, but it involves intense heat, bright light, and flying sparks. Never skip safety gear.
Essential Safety Equipment
- Welding helmet: Must have an auto-darkening lens (shade 9–13) to protect your eyes from UV and infrared rays.
- Welding gloves: Use thick, flame-resistant gloves (like leather MIG gloves) to protect your hands.
- Flame-resistant clothing: Wear a welding jacket or heavy cotton shirt—no synthetic fabrics, which can melt.
- Closed-toe shoes: Steel-toed boots are ideal.
- Respirator or fume extractor: Welding fumes can be harmful. Use a respirator or work in a well-ventilated area.
Workspace Safety Tips
- Clear the area of flammable materials (paper, gasoline, etc.).
- Use a fire extinguisher nearby.
- Ensure good ventilation—open windows or use a fan.
- Keep a first-aid kit handy.
Step 4: Set Up Your Welding Station
A proper setup makes welding easier and safer. Here’s how to get started.
Step-by-Step Setup
- Place the welder on a stable, dry surface. Keep it away from water and flammable materials.
- Connect the ground clamp to a clean, unpainted part of your workpiece or a metal table.
- Install the wire spool. Most welders use 0.030-inch solid wire for mild steel. Make sure the spool spins freely.
- Load the wire into the feeder. Follow your welder’s manual—usually involves threading the wire through the drive rolls and into the gun.
- Connect the gas cylinder. Attach the regulator and hose, then open the valve slowly. Set gas flow to 20–25 cubic feet per hour (CFH).
- Test the gun. Pull the trigger (without welding) to check wire feed and gas flow.
Tip: Clean Your Metal
Always grind or wire brush the metal before welding. Oil, paint, and rust can cause weak welds or porosity.
Step 5: Practice Basic Welding Techniques
Now it’s time to weld! Start with simple beads on scrap metal.
How to Make a Good Weld
- Gun angle: Hold the gun at a 10–15 degree angle, pointing in the direction of travel.
- Distance: Keep the nozzle ½ inch from the metal.
- Travel speed: Move steadily—too slow causes burn-through; too fast creates a weak bead.
- Technique: Use a straight line or slight weave for wider welds. Keep the arc on the leading edge of the puddle.
Practice Drills
- Stringer beads: Practice straight lines on 1/8-inch steel.
- Butt joints: Weld two flat pieces edge-to-edge.
- Lap joints: Overlap two pieces and weld along the seam.
Common Beginner Mistakes
- Too much voltage: Causes spatter and burn-through. Lower the voltage if the weld looks messy.
- Too little gas: Leads to porosity (tiny holes in the weld). Check your gas flow and connections.
- Incorrect wire speed: Too fast = birdnesting (wire piles up). Too slow = weak arc. Adjust until the sound is smooth and steady.
Step 6: Troubleshoot Common Problems
Even experienced welders run into issues. Here’s how to fix the most common ones.
Porosity (Holes in the Weld)
Cause: Contamination or insufficient gas.
Fix: Clean the metal thoroughly, check gas flow, and ensure the nozzle isn’t clogged.

Visual guide about How to Learn Mig Welding at Home
Image source: tankbig.com
Excessive Spatter
Cause: Too much voltage or incorrect wire speed.
Fix: Reduce voltage slightly or increase wire speed. Use anti-spatter spray on the nozzle.
Weak or Incomplete Fusion
Cause: Too fast travel speed or low heat.
Fix: Slow down and increase voltage. Make sure the arc is penetrating both sides of the joint.
Wire Feeding Problems
Cause: Dirty drive rolls or incorrect tension.
Fix: Clean the drive rolls and adjust tension so the wire feeds smoothly without slipping.
Step 7: Maintain Your Equipment
Good maintenance keeps your welder running smoothly.
Daily Checks
- Clean the gun nozzle with a nozzle cleaning tool.
- Check wire feed for smooth operation.
- Inspect gas hoses for leaks.
Monthly Maintenance
- Replace worn contact tips.
- Lubricate drive rolls if needed.
- Store wire in a dry place to prevent rust.
Step 8: Keep Learning and Building Projects
The more you weld, the better you’ll get. Start with simple projects like:
- Welding a metal shelf bracket
- Repairing a garden tool
- Building a small cart or stand
As you gain confidence, try welding aluminum (requires a spool gun) or thicker steel. Watch online tutorials, join welding forums, and consider taking a local class for hands-on feedback.
Conclusion
Learning how to learn MIG welding at home is a rewarding skill that opens doors to countless DIY projects. With the right equipment, safety habits, and practice, you’ll be welding like a pro in no time. Start small, stay safe, and don’t be afraid to make mistakes—every weld teaches you something new. Before you know it, you’ll be tackling bigger builds and saving money by doing it yourself. So grab your welder, fire up the gas, and start creating!
