

This guide teaches you everything about using flux core wire for MIG welding, from setup to technique. You’ll learn how to choose the right wire, adjust your welder, and avoid common mistakes for professional-quality results.
Key Takeaways
- Flux core wire creates its own shielding gas, making it ideal for outdoor welding and windy conditions.
- Choose the right wire type: E71T-1 for general use, E71T-11 for thin metals, and E71T-GS for single-pass jobs.
- Set your welder to DCEN (direct current electrode negative) for most flux core applications.
- Use a push technique (not pull) when welding with flux core to protect the weld pool and reduce spatter.
- Clean your base metal thoroughly—rust, paint, and oil cause porosity and weak welds.
- Adjust voltage and wire feed speed based on material thickness and wire diameter for optimal penetration.
- Always wear proper safety gear, including a welding helmet, gloves, and flame-resistant clothing.
What Is Flux Core Wire for MIG Welding?
Flux core wire is a special type of welding electrode used in MIG (Metal Inert Gas) welding that contains a flux compound inside a hollow metal tube. Unlike solid MIG wire, which requires an external shielding gas (like argon or CO2), flux core wire generates its own protective gas when heated. This makes it perfect for welding outdoors, in drafty areas, or on dirty or rusty metal where gas shielding might be disrupted.
There are two main types of flux core wire:
– Self-shielded flux core (no external gas needed)
– Dual-shielded flux core (used with external gas for extra protection)
Most beginners start with self-shielded wire because it’s simpler and more forgiving in tough conditions.
Why Use Flux Core Wire?

Visual guide about Flux Core Wire for Mig Welding
Image source: weldingproperty.com
Flux core wire offers several advantages over solid wire:
- Works in windy or outdoor environments – No gas cylinder means no gas blowaway.
- Better penetration on thick or dirty metals – The flux helps burn through rust and mill scale.
- Portable and convenient – No need to carry heavy gas tanks.
- Great for structural and repair work – Commonly used in construction, farming, and automotive repairs.
However, flux core welding produces more spatter and slag than gas-shielded MIG welding, so cleanup is a bit more involved.
Choosing the Right Flux Core Wire
Visual guide about Flux Core Wire for Mig Welding
Image source: weldingproperty.com
Not all flux core wires are the same. The right choice depends on your project, material thickness, and welding position.
Common Flux Core Wire Types
- E71T-1: Best for general-purpose welding on mild steel. Offers smooth arc, low spatter, and good bead appearance. Works well in all positions.
- E71T-11: Designed for thin materials (18 gauge to 1/4 inch). Has a softer arc and is easier to control for beginners.
- E71T-GS: A simpler, single-pass wire ideal for quick repairs and farm work. Not as versatile but very affordable.
Wire Diameter Matters
Common diameters include 0.030″, 0.035″, and 0.045″.
– Use 0.030″ or 0.035″ for thinner metals (up to 1/4 inch).
– Use 0.045″ for thicker materials (1/4 inch and up) for deeper penetration.
Always match your wire diameter to your welder’s capabilities and the material you’re welding.
Setting Up Your MIG Welder for Flux Core
Proper setup is crucial for clean, strong welds. Here’s how to configure your machine.
Switch to Flux Core Mode
Most MIG welders have a switch or setting for flux core welding. This usually reverses the polarity and adjusts the wire feed mechanism. Check your owner’s manual if you’re unsure.
Set the Correct Polarity
Flux core wire requires DCEN (Direct Current Electrode Negative). This means the electrode (wire) is negative, and the workpiece is positive.
– On most welders, this means connecting the welding lead to the negative (-) terminal and the ground clamp to the positive (+) terminal.
– Some machines have a polarity switch—flip it to “Flux” or “DCEN.”
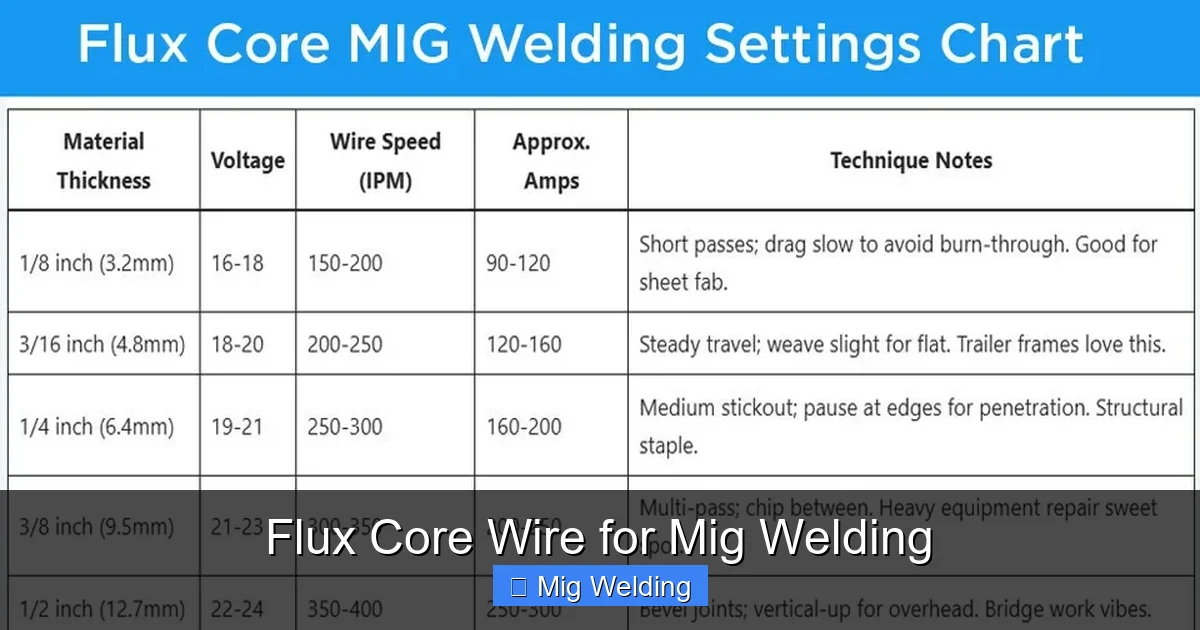
Adjust Voltage and Wire Feed Speed
These two settings control heat and wire delivery. Use your welder’s chart as a starting point, then fine-tune:
– Thin metal (18–16 gauge): Low voltage (14–16V), slower wire feed.
– Medium metal (14–1/8 inch): Medium settings (16–20V).
– Thick metal (1/4 inch and up): Higher voltage (20–24V), faster wire feed.
Start low and increase until the arc sounds smooth and steady—like frying bacon.
Install the Correct Drive Roll
Use a V-groove or knurled drive roll designed for flux core wire. Solid wire uses smooth V-grooves, but flux core’s softer coating can get crushed. Knurled rolls grip better without damaging the wire.
Preparing Your Workpiece
Even though flux core handles dirty metal better than solid wire, preparation still matters.
Clean the Metal
Remove rust, paint, oil, and mill scale with a wire brush, grinder, or sandpaper. Focus on the weld area—any contamination can cause porosity or weak joints.
Clamp and Fit-Up
Secure your pieces with clamps or magnets. Gaps larger than 1/16 inch can cause burn-through or lack of fusion. For butt joints, a tight fit is best.
Choose the Right Joint Type
Flux core works well on:
– Butt joints
– Lap joints
– T-joints
Avoid complex joints until you’re comfortable with the basics.
Welding Technique: Step-by-Step
Now that everything’s set up, it’s time to weld.
Put on Safety Gear
Always wear:
– Auto-darkening welding helmet
– Leather gloves
– Flame-resistant jacket or apron
– Closed-toe shoes
– Safety glasses under the helmet
Welding produces intense UV light and sparks—protect yourself.
Position the Gun Correctly
Hold the MIG gun at a 10–15 degree angle, pointing in the direction of travel. Keep the nozzle ½ to ¾ inch from the workpiece.
Use the Push Technique
Unlike solid wire (which uses a pull or drag technique), flux core welding works best with a push motion. Push the gun away from you as you weld.
– This helps the flux shield the weld pool.
– It also gives you better visibility of the puddle.
– Pushing reduces spatter and improves bead shape.
Maintain a Steady Travel Speed
Move too fast, and you’ll get a thin, weak weld. Too slow, and you’ll burn through or create excess spatter.
– Aim for a consistent, smooth motion.
– Listen to the arc: a steady “frying” sound means you’re on track.
– Watch the puddle—it should be about the width of a dime for thin metal, nickel-sized for thicker material.
Watch for Common Signs
– Good weld: Smooth, even bead with minimal spatter.
– Too much spatter: Reduce voltage or wire speed.
– Poor penetration: Increase voltage or slow down.
– Porosity (holes in the weld): Clean the metal better or check for wind.
Troubleshooting Common Problems
Even experienced welders run into issues. Here’s how to fix them.
Excessive Spatter
Causes: Too high voltage, too fast wire feed, or incorrect polarity.
Fix: Lower voltage, reduce wire speed, and double-check DCEN polarity.
Poor Penetration
Causes: Low voltage, fast travel speed, or wrong wire size.
Fix: Increase voltage, slow down, or switch to a thicker wire.
Porosity (Air Bubbles in the Weld)
Causes: Dirty metal, wind, or incorrect technique.
Fix: Clean the base metal, shield the weld area from drafts, and use the push technique.
Wire Feeding Problems
Causes: Wrong drive roll, tangled spool, or liner issues.
Fix: Use a knurled drive roll, check for kinks in the wire, and clean the liner.
Burn-Through on Thin Metal
Causes: Too high heat or slow travel speed.
Fix: Reduce voltage, increase travel speed, or use a lower-amperage wire (0.030″).
Cleaning Up After Welding
Flux core leaves behind a layer of slag (a glassy residue) that must be removed.
Chip Off the Slag
Use a chipping hammer to knock off the slag right after welding. Be careful—don’t hit the weld itself.
Wire Brush the Weld
Go over the weld with a stainless steel wire brush to remove any remaining slag and spatter. This also helps inspect the weld quality.
Inspect the Weld
Look for:
– Cracks
– Undercut (grooves along the weld edge)
– Lack of fusion
If you see defects, grind them out and re-weld.
Tips for Success
– Practice on scrap metal before welding your actual project.
– Keep your wire dry—moisture in the flux causes porosity. Store spools in a dry place.
– Use a welding table with a ground clamp for consistent electrical contact.
– Start with short welds to get a feel for the arc and puddle.
– Record your settings so you can repeat good results.
Conclusion
Flux core wire for MIG welding is a powerful, versatile tool for both beginners and pros. It lets you weld outdoors, on dirty metal, and without the hassle of gas cylinders. By choosing the right wire, setting up your welder correctly, and using proper technique, you can produce strong, clean welds every time. Remember: practice makes perfect. Start simple, learn from each weld, and soon you’ll be tackling tough jobs with confidence.