

Aluminum MIG welding troubleshooting doesn’t have to be frustrating. This guide walks you through common issues like porosity, wire feeding problems, and burn-through, with clear fixes to improve your welds. Learn the right settings, techniques, and tools to weld aluminum like a pro.
Key Takeaways
- Use 100% argon shielding gas: Aluminum requires pure argon to prevent contamination and ensure clean, stable arcs.
- Clean the metal thoroughly: Oils, oxides, and dirt cause porosity—always wire brush and solvent-clean aluminum before welding.
- Choose the right wire and liner: Use 4043 or 5356 aluminum wire with a U-groove drive roll and Teflon liner to avoid birdnesting.
- Adjust voltage and wire speed: Too much heat causes burn-through; too little leads to poor penetration—fine-tune settings for your material thickness.
- Maintain consistent travel speed: Moving too fast creates weak welds; too slow causes overheating and distortion.
- Check gun angle and stick-out: Keep a 10–15° work angle and minimal stick-out (3/8 inch) for better control and gas coverage.
- Preheat thick aluminum: Heating to 300–400°F reduces thermal shock and improves fusion on heavy sections.
Introduction to Aluminum MIG Welding Troubleshooting
Welding aluminum with a MIG welder can feel like trying to tame a slippery eel—it’s tricky, unforgiving, and full of surprises. Unlike steel, aluminum conducts heat quickly, oxidizes fast, and demands precision in setup and technique. But once you master the basics, it becomes one of the most rewarding materials to weld.
This guide is your go-to resource for aluminum MIG welding troubleshooting. Whether you’re a hobbyist or a professional, you’ll learn how to identify, fix, and prevent the most common problems. From porosity and wire feeding issues to burn-through and poor fusion, we’ll walk you through each challenge with practical, step-by-step solutions. By the end, you’ll have the confidence to tackle aluminum projects with clean, strong, and professional-looking welds.
Understanding the Challenges of Aluminum MIG Welding
Before diving into fixes, it’s important to understand why aluminum is harder to weld than steel. Aluminum has a low melting point, high thermal conductivity, and a naturally occurring oxide layer that melts at a much higher temperature than the base metal. This oxide layer can trap contaminants and cause weld defects if not removed.
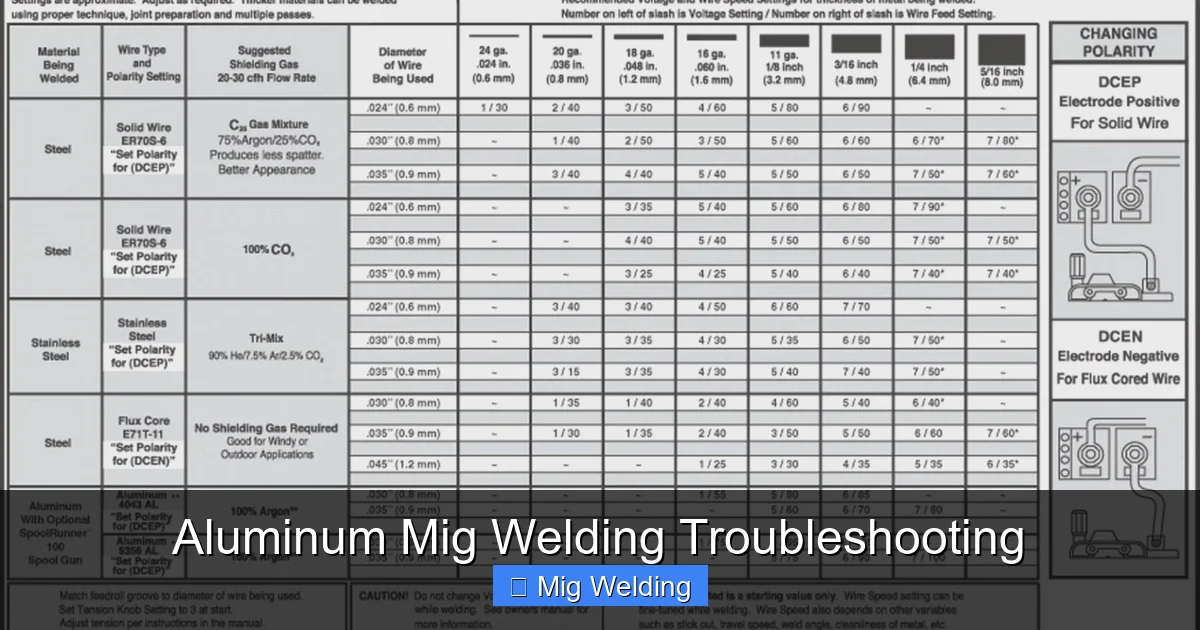
Visual guide about Aluminum Mig Welding Troubleshooting
Image source: i.pinimg.com
Additionally, aluminum expands and contracts more than steel when heated, increasing the risk of warping and cracking. These factors mean that even small mistakes—like using the wrong gas or dirty filler wire—can lead to failed welds. But with the right knowledge and preparation, you can overcome these challenges.
Essential Setup for Successful Aluminum MIG Welding
Proper setup is the foundation of good aluminum welding. Skipping this step is the number one reason beginners struggle. Here’s how to get it right:
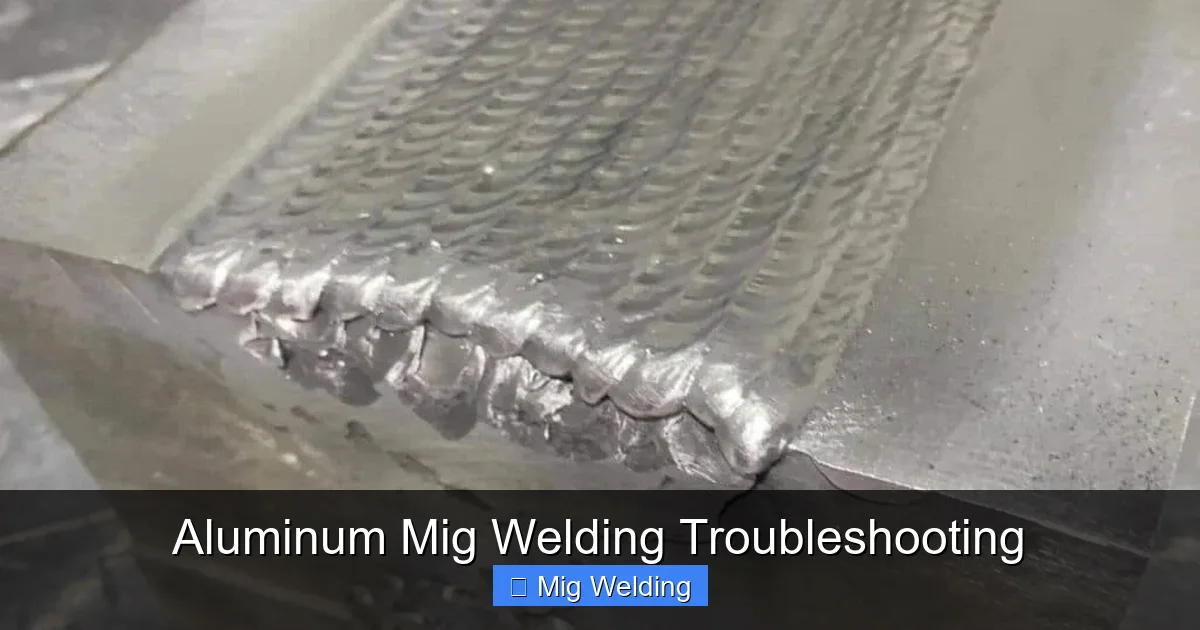
Visual guide about Aluminum Mig Welding Troubleshooting
Image source: weldingmastermind.com
1. Use the Right Equipment
Not all MIG welders can handle aluminum. You need a machine with pulse welding capability or at least a spool gun. Push-pull guns are also effective for longer wire runs. Standard MIG guns often cause wire feeding problems because aluminum wire is soft and bends easily.
Invest in a spool gun if your welder doesn’t have one built-in. It holds a small spool of wire close to the gun, reducing friction and preventing birdnesting (when the wire tangles in the liner).
2. Choose the Correct Wire
Use either 4043 or 5356 aluminum welding wire. 4043 is easier to use and less prone to cracking, making it ideal for beginners. 5356 is stronger and better for structural applications but can be more sensitive to heat input.
Always store wire in a dry, sealed container. Moisture causes porosity, and aluminum wire absorbs humidity quickly.
3. Set Up the Wire Feeder Properly
Aluminum wire requires special handling. Use U-groove drive rolls instead of V-groove (used for steel). V-groove rolls can crush the soft aluminum wire, causing feeding issues.
Replace your standard steel liner with a Teflon or nylon liner. These materials reduce friction and prevent the wire from deforming as it feeds through.
Adjust tension carefully—too tight and you’ll deform the wire; too loose and it won’t feed smoothly. A good rule of thumb: you should be able to bend the wire slightly with your fingers without it kinking.
4. Shielding Gas: 100% Argon is a Must
Never use CO2 or mixed gases for aluminum. 100% argon is the only acceptable shielding gas. It provides a stable arc, good arc initiation, and protects the weld pool from atmospheric contamination.
Use a flow rate of 20–30 CFH (cubic feet per hour). Too little gas leads to porosity; too much can cause turbulence and draw in air.
Common Aluminum MIG Welding Problems and How to Fix Them
Even with perfect setup, issues can arise. Here are the most common problems and how to troubleshoot them.
1. Porosity (Pinholes in the Weld)
Porosity looks like tiny bubbles or holes in the weld bead. It weakens the joint and is usually caused by contamination or poor gas coverage.
Causes:
- Dirt, oil, or moisture on the base metal or wire
- Insufficient shielding gas
- Wind or drafts blowing gas away
- Dirty or damaged contact tip
How to Fix It:
- Clean the aluminum with a stainless steel wire brush (dedicated to aluminum only) and wipe with acetone or alcohol.
- Check gas flow and ensure the nozzle is clean and unobstructed.
- Weld in a draft-free area or use a windscreen.
- Replace the contact tip if it’s worn or clogged.
2. Wire Feeding Problems (Birdnesting, Skipping, or Jamming)
If the wire stops feeding or jams in the liner, you’ve likely got a feeding issue. This is common with aluminum due to its softness.
Causes:
- Incorrect drive roll type (using V-groove instead of U-groove)
- Dirty or damaged liner
- Excessive tension on the drive rolls
- Long cable runs without a spool gun
How to Fix It:
- Switch to U-groove drive rolls.
- Clean or replace the liner with a Teflon version.
- Reduce drive roll tension—just enough to feed smoothly.
- Use a spool gun for better wire control.
3. Burn-Through or Warping
Aluminum melts fast. Too much heat can burn holes through thin material or warp the entire piece.
Causes:
- Too high voltage or wire speed
- Slow travel speed
- No preheating on thick sections
How to Fix It:
- Lower voltage and wire speed. Start with manufacturer recommendations and adjust down.
- Increase travel speed—keep the arc moving steadily.
- Preheat thick aluminum (over 1/4 inch) to 300–400°F using a torch or heating blanket. This reduces thermal shock and helps control heat input.
4. Poor Penetration or Lack of Fusion
If the weld doesn’t fuse properly to the base metal, it’s usually due to low heat or incorrect technique.
Causes:
- Too low voltage or wire speed
- Fast travel speed
- Incorrect gun angle
How to Fix It:
- Increase voltage slightly and check wire speed.
- Slow down your travel speed to allow more heat into the joint.
- Use a 10–15° work angle (gun pointing slightly forward) to direct heat into the joint.
- Ensure the joint is clean and properly fit-up. Gaps cause lack of fusion.
5. Whiskers (Stringy Spatter)
Whiskers are long, hair-like strands of aluminum that stick out of the weld. They’re annoying and weaken the joint.
Causes:
- Too high wire speed
- Long stick-out (wire extending too far from the nozzle)
- Poor arc stability
How to Fix It:
- Reduce wire speed.
- Keep stick-out to 3/8 inch or less.
- Ensure good ground connection and stable power supply.
Best Practices for Consistent Results
Prevention is better than cure. Follow these tips to avoid problems before they start:
- Clean everything: Base metal, wire, and contact tip. Even fingerprints can cause porosity.
- Use a dedicated wire brush: Never use a brush that’s been on steel—it will contaminate the aluminum.
- Practice on scrap metal: Test your settings before welding the real piece.
- Maintain your equipment: Clean the liner regularly, check gas seals, and replace worn tips.
- Work in a controlled environment: Avoid wind, humidity, and extreme temperatures.
Conclusion
Aluminum MIG welding troubleshooting doesn’t have to be a headache. With the right setup, clean materials, and proper technique, you can produce strong, clean welds every time. Remember: cleanliness, correct gas, and proper wire feeding are the pillars of success.
Start by mastering the basics—use 100% argon, a spool gun, and clean metal. Then, fine-tune your voltage, speed, and travel technique. When problems arise, refer back to this guide to diagnose and fix them quickly. With practice, you’ll move from frustration to confidence, tackling aluminum projects with ease and precision.