

Porosity in MIG welding weakens welds and compromises structural integrity. This guide explains the causes, how to prevent it, and step-by-step fixes to ensure smooth, bubble-free results every time.
Key Takeaways
- Proper gas coverage is essential: Use the right shielding gas mix and ensure adequate flow rate to protect the weld pool from atmospheric contamination.
- Clean base metal matters: Remove rust, oil, paint, and moisture before welding to prevent gas entrapment.
- Correct wire and drive rolls: Use clean, dry welding wire and properly aligned drive rolls to avoid feeding issues that cause porosity.
- Optimize travel speed and angle: Welding too fast or at the wrong angle traps gas; maintain a consistent, steady motion.
- Check for leaks and wind: Inspect hoses and connections for leaks, and avoid welding in drafty areas that disrupt gas shielding.
- Use the right voltage and amperage: Incorrect settings can cause unstable arcs and poor penetration, leading to porosity.
- Store equipment properly: Keep gas cylinders upright and welding wire in dry, sealed containers to maintain quality.
Understanding Porosity in MIG Welding
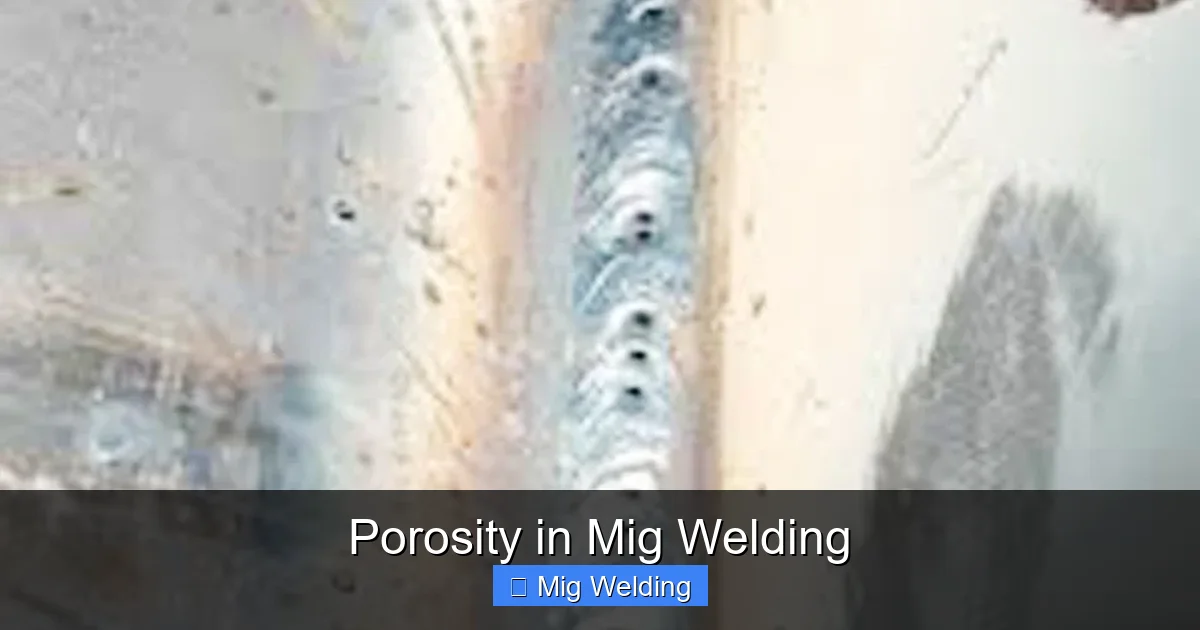
Porosity is one of the most common—and frustrating—defects in MIG welding. It appears as tiny bubbles or holes in the weld bead, caused by gas getting trapped as the weld cools. These pockets weaken the joint, reduce corrosion resistance, and can lead to weld failure under stress.
But here’s the good news: porosity is almost always preventable. With the right knowledge and attention to detail, you can produce clean, strong welds every time. This guide walks you through the causes of porosity, how to spot it, and—most importantly—how to stop it from happening in the first place.
Whether you’re a beginner or an experienced welder, mastering porosity control will improve your weld quality, save time on rework, and boost your confidence in the shop or on the job site.
What Causes Porosity in MIG Welding?

Visual guide about Porosity in Mig Welding
Image source: fixitmanblog.com
Before you can fix porosity, you need to understand what’s causing it. Most porosity issues stem from contamination or improper shielding. Here are the main culprits:
1. Poor Shielding Gas Coverage
The shielding gas (usually a mix of argon and CO₂) protects the molten weld pool from oxygen, nitrogen, and moisture in the air. If the gas doesn’t fully cover the weld, these elements react with the metal and form gas pockets.
Common causes include:
– Low gas flow rate (below 15–20 CFH)
– Wind or drafts blowing the gas away
– Leaks in the gas hose or regulator
– Worn or damaged nozzle or diffuser
2. Contaminated Base Metal
Dirt, oil, grease, paint, rust, or moisture on the metal surface release gases when heated. These gases get trapped in the weld as it solidifies. Even a thin layer of mill scale or water can cause porosity.
3. Dirty or Moist Welding Wire
Welding wire can absorb moisture from the air, especially if stored improperly. Moisture turns to steam when heated, creating gas bubbles in the weld. Dirty wire with oil or grease has the same effect.
4. Incorrect Welding Technique
Welding too fast, using the wrong travel angle, or holding the gun too far from the workpiece can disrupt gas coverage and trap air. A shaky or inconsistent hand movement also increases the risk.
5. Equipment Issues
Faulty regulators, clogged nozzles, misaligned drive rolls, or worn contact tips can all lead to poor wire feeding and unstable arcs—both of which contribute to porosity.
How to Prevent Porosity: Step-by-Step
Visual guide about Porosity in Mig Welding
Image source: weldinginto.com
Now that you know the causes, let’s go over how to prevent porosity with practical, actionable steps.
Step 1: Prepare the Base Metal
Always clean the metal before welding. Use a wire brush (dedicated to the metal type) to remove rust, scale, and paint. For oily or greasy surfaces, wipe with a solvent like acetone or a degreaser. Let it dry completely.
Tip: If you’re welding aluminum, clean with a stainless steel brush and avoid using brushes that have touched steel—cross-contamination causes porosity.
Step 2: Check and Maintain Your Shielding Gas
Use the correct gas mix for your material:
– Mild steel: 75% argon / 25% CO₂ (C25)
– Stainless steel: 90% helium / 7.5% argon / 2.5% CO₂ or tri-mix
– Aluminum: 100% argon
Set the flow rate between 15 and 25 cubic feet per hour (CFH). Too low, and the gas won’t protect the weld; too high, and turbulence pulls in air.
Inspect your gas system:
– Check hoses for cracks or leaks (use soapy water to test)
– Ensure the regulator and flowmeter are working
– Replace worn nozzles and diffusers
Step 3: Store and Handle Welding Wire Properly
Keep your welding wire in a dry, sealed container. If it’s exposed to humidity, it can absorb moisture. For long-term storage, use a wire feeder with a cover or a sealed drum.
Never handle wire with oily hands or gloves. Even small amounts of oil can cause porosity.
Step 4: Set the Correct Welding Parameters
Use the manufacturer’s recommended voltage and wire feed speed for your material thickness and joint type. Too high or too low settings cause unstable arcs and poor penetration.
Example: For 1/8-inch mild steel, start with 18–20 volts and a wire feed speed of 200–250 inches per minute (IPM). Adjust as needed.
Step 5: Optimize Your Welding Technique
Hold the MIG gun at a 10–15 degree angle, pointing in the direction of travel. Keep the nozzle 1/2 to 3/4 inch from the workpiece.
Move at a steady, consistent speed. Too fast, and the gas doesn’t have time to protect the weld; too slow, and you risk burn-through or excessive heat input.
Use a push or drag technique depending on the joint:
– Push technique (nozzle angled forward): Better visibility, less spatter
– Drag technique (nozzle angled back): Deeper penetration, better for thick materials
Step 6: Protect the Weld from Wind and Drafts
Even a light breeze can blow away shielding gas. If welding outdoors, use windbreaks or screens. Indoors, close doors and windows, and avoid fans or ventilation near the weld area.
Step 7: Inspect and Maintain Your Equipment
Regularly check:
– Drive rolls: Make sure they’re the right size and not worn
– Contact tip: Replace if worn or clogged
– Liner: Clean or replace if kinked or dirty
– Gun nozzle: Clear of spatter and ensure proper gas flow
A well-maintained machine runs smoother and produces better welds.
Troubleshooting Porosity: What to Do If It Happens
Even with the best preparation, porosity can still occur. Here’s how to diagnose and fix it:
If You See Small, Scattered Pores
This usually means minor contamination or low gas flow.
– Recheck gas flow rate and connections
– Clean the base metal again
– Ensure the wire is dry and clean
If Pores Are Large or Clustered
This suggests a major shielding issue or moisture problem.
– Inspect for gas leaks
– Replace the nozzle or diffuser
– Dry the welding wire in a heated cabinet if possible
If Porosity Occurs at the Start or End of the Weld
The arc may be unstable at the beginning or end.
– Use a run-on/run-off tab to avoid starting/stopping on the workpiece
– Increase gas pre-flow and post-flow settings on your machine
If Porosity Happens in Aluminum Welds
Aluminum is especially sensitive to moisture and contamination.
– Clean with acetone and a stainless steel brush
– Use 100% argon gas
– Consider using a spool gun for better wire feeding
Pro Tips for Flawless MIG Welds
– Always do a test weld on scrap metal before starting your project
– Keep a welding log to track settings and results
– Use a gas lens or nozzle extension for better gas coverage in tight spaces
– Preheat thick materials to reduce moisture and improve gas flow
Conclusion
Porosity in MIG welding doesn’t have to be a constant battle. By understanding the root causes—contamination, poor gas coverage, and technique issues—you can take control and produce clean, strong welds every time.
Start with clean metal, use the right gas and settings, maintain your equipment, and protect your weld from the environment. With practice and attention to detail, you’ll minimize porosity and maximize weld quality.
Remember: a little prevention goes a long way. Take the time to set up correctly, and you’ll save hours on rework and repairs down the line. Happy welding!