

Mastering MIG welding wire for aluminum starts with choosing the right alloy, wire diameter, and shielding gas. This guide walks you through setup, technique, and common pitfalls to help you achieve smooth, strong welds on aluminum projects.
Key Takeaways
- Choose the right wire alloy: ER4043 and ER5356 are the most common options—ER4043 for general use and ER5356 for higher strength and corrosion resistance.
- Use proper shielding gas: 100% argon is essential to prevent oxidation and ensure clean, stable arcs.
- Clean the base metal thoroughly: Aluminum oxidizes quickly—remove oils, dirt, and oxide layers before welding.
- Set the correct voltage and wire feed speed: Aluminum requires higher travel speeds and precise settings to avoid burn-through.
- Use a spool gun or push-pull system: Aluminum wire is soft and prone to birdnesting—special feeding systems prevent jams.
- Maintain a consistent travel angle: A 10–15 degree push angle helps control the weld pool and improves penetration.
- Post-weld cleaning is crucial: Remove flux residue and inspect for cracks or porosity to ensure weld integrity.
Introduction: Why MIG Welding Aluminum Is Different
MIG welding aluminum can feel like a whole new world if you’re used to steel. It’s lighter, more conductive, and reacts differently to heat and contaminants. But with the right wire, tools, and technique, you can produce clean, strong aluminum welds that look professional and hold up under stress.
In this guide, you’ll learn everything you need to know about MIG welding wire for aluminum—from selecting the best alloy to setting up your machine and avoiding common mistakes. Whether you’re repairing a boat, building a custom car part, or working on a DIY project, this step-by-step guide will help you get consistent results.
Step 1: Choose the Right MIG Welding Wire for Aluminum
The first and most important decision is picking the correct wire. Not all aluminum wires are created equal, and using the wrong one can lead to weak welds, cracking, or poor appearance.
Visual guide about Mig Welding Wire for Aluminum
Image source: weldguru.com
Common Aluminum Wire Alloys
Two alloys dominate the market: ER4043 and ER5356. Here’s how to choose between them:
- ER4043: This is a silicon-alloyed wire that flows easily and produces smooth, shiny welds. It’s great for general-purpose welding, especially on 6000-series aluminum (like 6061). It has good crack resistance and works well with thicker materials.
- ER5356: This magnesium-alloyed wire offers higher tensile strength and better corrosion resistance. It’s ideal for 5000-series aluminum (like 5052 or 5083) and applications where strength matters—think marine or structural work.
Pro Tip: If you’re unsure which alloy your base metal is, ER4043 is a safe default for most projects. But always check the material specs when possible.
Wire Diameter Matters
Aluminum wire typically comes in diameters of 0.030″, 0.035″, and 0.045″. Thinner wires (0.030″) are better for thin materials and lower heat input, while thicker wires (0.045″) work well for heavier sections.
For most hobbyists and light fabrication, 0.035″ is the sweet spot—it balances ease of feeding and weld quality.
Step 2: Set Up Your MIG Welder for Aluminum
Welding aluminum isn’t just about the wire—your machine setup is just as important.
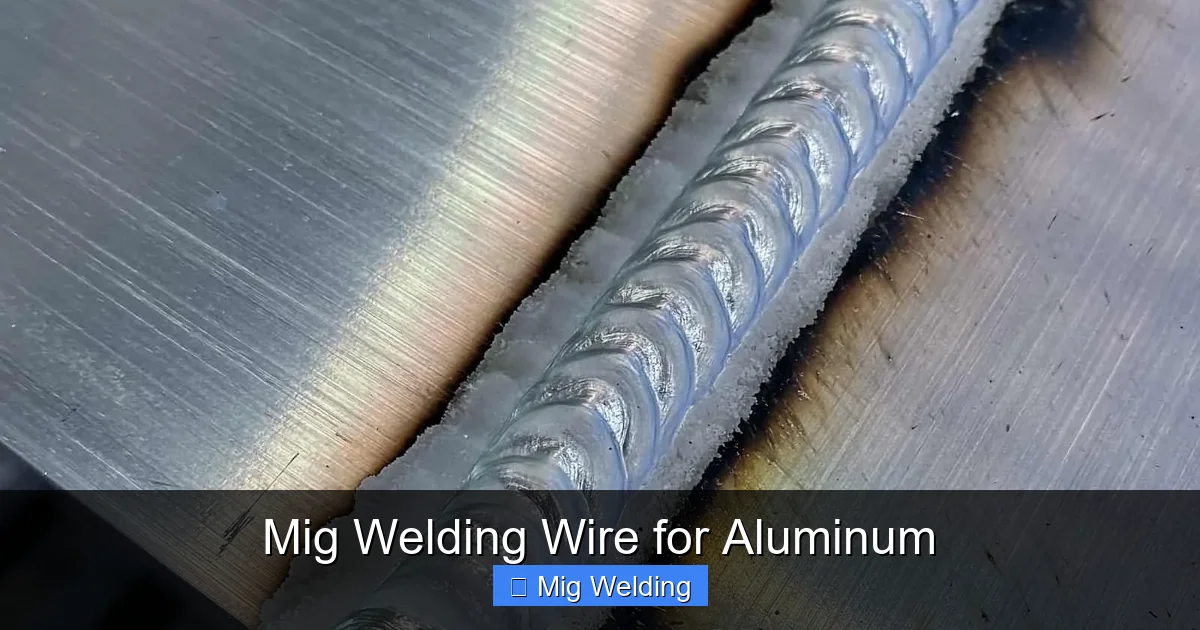
Visual guide about Mig Welding Wire for Aluminum
Image source: weldguru.com
Use a Spool Gun or Push-Pull System
Aluminum wire is soft and bends easily. If you try to feed it through a standard MIG gun, it’ll kink or “birdnest” in the liner. That’s why most welders use either a spool gun or a push-pull system.
- Spool gun: Holds a small spool of wire right at the gun, eliminating long feed distances. Great for occasional use.
- Push-pull system: Uses a motor in the gun to pull the wire while the feeder pushes it—ideal for frequent aluminum welding.
If you’re serious about aluminum MIG welding, investing in one of these systems is a must.
Switch to Argon Shielding Gas
Unlike steel, which uses a mix of argon and CO2, aluminum requires 100% argon shielding gas. CO2 reacts with aluminum and causes porosity and oxidation.
Use a flow rate of 20–30 cubic feet per hour (CFH). Too little gas leads to contamination; too much can cool the weld pool too quickly.
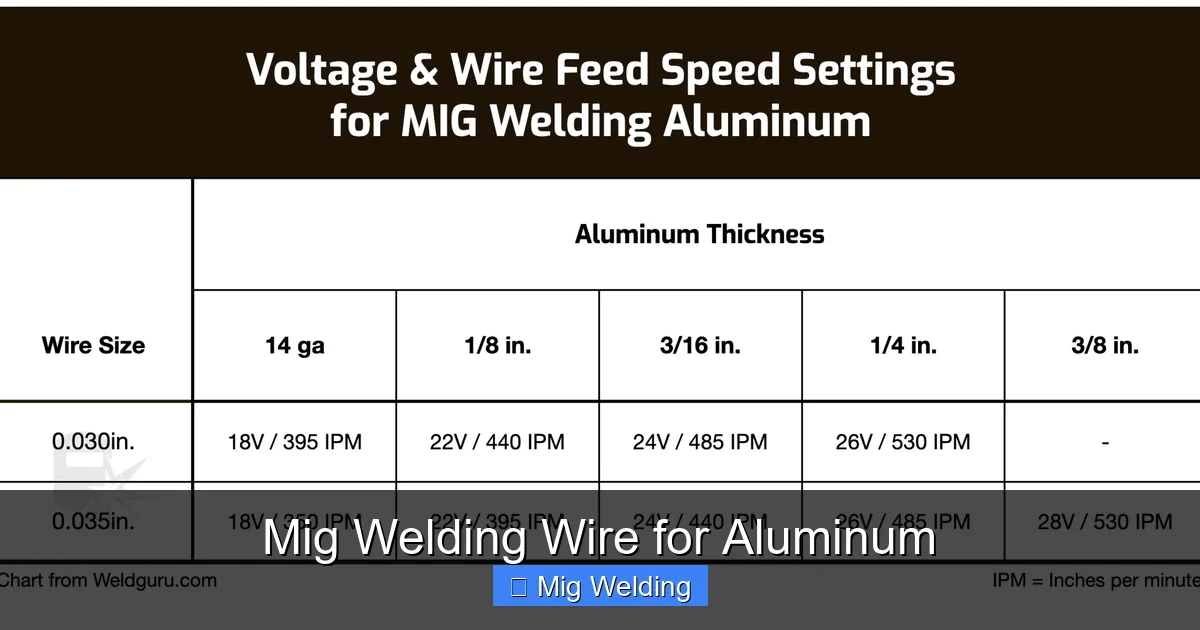
Adjust Voltage and Wire Feed Speed
Aluminum conducts heat faster than steel, so you need higher voltage and faster wire feed speeds. A good starting point is:
- 0.035″ wire: 18–22 volts and 300–500 inches per minute (IPM)
- 0.045″ wire: 20–24 volts and 250–400 IPM
Always do a test weld on scrap metal and adjust based on bead appearance. A smooth, shiny bead with good penetration is your goal.
Step 3: Prepare the Aluminum Surface
Aluminum forms a thin oxide layer the moment it’s exposed to air. This layer melts at a much higher temperature than the base metal, which can cause incomplete fusion and porosity.
Clean Thoroughly Before Welding
Follow this cleaning routine:
- Degrease: Wipe the surface with acetone or a dedicated aluminum cleaner to remove oils and grease.
- Mechanically clean: Use a stainless steel wire brush (dedicated only to aluminum) to scrub off the oxide layer.
- Wipe again: Give it one final wipe with a clean cloth to remove dust and debris.
Important: Never use a wire brush that’s been used on steel—iron contamination can ruin your weld.
Keep It Clean During Welding
Aluminum oxidizes quickly. If you’re welding a large piece, clean small sections just before welding. Avoid touching the cleaned area with bare hands—oils from your skin can cause contamination.
Step 4: Master the Welding Technique
Even with the right wire and setup, your technique makes or breaks the weld.
Use a Push Angle
Always push the weld pool away from you at a 10–15 degree angle. This helps the shielding gas protect the molten metal and improves visibility of the puddle.
Pulling (drag technique) can trap gas and lead to porosity.
Maintain a Short Arc Length
Keep the gun close to the workpiece—about ½ inch away. A long arc increases spatter and reduces control.
Travel Fast and Steady
Aluminum dissipates heat quickly, so you need to move fast to avoid burning through. But don’t rush—maintain a steady, consistent speed to ensure even penetration.
If the weld looks ropey or uneven, slow down slightly. If it’s too thin or undercutting, speed up.
Watch the Puddle
A good aluminum puddle is shiny, fluid, and slightly concave. If it’s bubbling or turning gray, you’re getting contamination—stop and clean the area.
Step 5: Troubleshooting Common Problems
Even experienced welders run into issues. Here’s how to fix the most common problems with MIG welding aluminum.
Porosity (Air Bubbles in the Weld)
Cause: Contamination, moisture, or insufficient shielding gas.
Fix: Clean the metal thoroughly, check gas flow, and ensure no drafts are blowing across the weld area.
Burn-Through
Cause: Too much heat or slow travel speed.
Fix: Reduce voltage, increase travel speed, or use a heat sink (like copper backing bar) to draw away excess heat.
Wire Feeding Problems (Birdnesting)
Cause: Soft aluminum wire jamming in the liner.
Fix: Use a spool gun or push-pull feeder. Also, make sure your drive rolls are set to the correct tension—too tight can crush the wire.
Poor Penetration
Cause: Low voltage or incorrect angle.
Fix: Increase voltage slightly and ensure you’re using a push angle. Also, check that your ground clamp is secure—aluminum’s conductivity demands a solid connection.
Discoloration or Gray Welds
Cause: Oxidation due to poor cleaning or gas coverage.
Fix: Re-clean the metal and verify gas flow. Consider using a trailing shield for extra protection on critical welds.
Step 6: Post-Weld Care and Inspection
Once the weld is complete, your job isn’t done.
Clean the Weld
Use a stainless steel brush to remove any surface oxidation or flux residue. This improves appearance and helps with inspection.
Inspect for Defects
Look for cracks, porosity, undercut, or lack of fusion. If you spot issues, grind them out and re-weld.
For critical applications, consider non-destructive testing like dye penetrant inspection.
Consider Post-Weld Heat Treatment
In some cases, especially with thick sections, stress relieving or heat treatment may be needed to prevent cracking. Consult a welding engineer for high-stress applications.
Conclusion: Practice Makes Perfect
MIG welding aluminum with the right wire and technique is totally achievable—even for beginners. Start with clean materials, use the correct ER4043 or ER5356 wire, set your machine properly, and focus on smooth, fast travel.
Don’t get discouraged by early mistakes. Aluminum is finicky, but every weld teaches you something. With practice, you’ll produce strong, professional-looking joints that stand the test of time.
Remember: the right MIG welding wire for aluminum is just the beginning. Your setup, preparation, and technique are what turn a good wire into a great weld.