

Understanding the correct amperage is crucial for successful TIG welding. This guide breaks down the complexities of TIG welding amperage, providing you with a comprehensive understanding and practical knowledge. Learn how to select the appropriate settings based on material type, thickness, joint design, and even your welding position. Mastering amperage control will elevate your TIG welding skills, leading to stronger, cleaner, and more aesthetically pleasing welds.
Tig Welding Chart Amperage: Your Essential Guide to Perfect Welds
Welcome, aspiring and seasoned welders, to the ultimate guide on TIG welding amperage! If you’ve ever stared at your TIG welder, unsure of where to set that dial, or if your welds just aren’t turning out quite right, you’re in the right place. This guide will demystify TIG welding amperage, transforming it from a confusing number into a controllable tool that unlocks your welding potential.
TIG welding, also known as Gas Tungsten Arc Welding (GTAW), is renowned for its precision, cleanliness, and ability to produce beautiful, high-quality welds. But achieving these results hinges on mastering several key parameters, with amperage being arguably the most critical. Get it wrong, and you’re looking at weak, porous, or unsightly welds. Get it right, and you’re on your way to creating structurally sound and visually stunning joints.
In this comprehensive how-to guide, we’ll cover everything you need to know about TIG welding amperage. You’ll learn:
- What amperage actually is in the context of TIG welding.
- The fundamental factors that influence your amperage settings.
- How to use TIG welding amperage charts effectively.
- Step-by-step instructions on setting and adjusting amperage.
- Practical tips for achieving optimal welds.
- Troubleshooting common amperage-related issues.
By the end of this guide, you’ll have the confidence and knowledge to select and control TIG welding amperage like a pro, regardless of the material or application. Let’s dive in!
Key Takeaways
- Amperage is the “heat” control in TIG welding, directly influencing weld puddle fluidity and penetration.
- Material type and thickness are primary factors in determining the correct amperage.
- Joint design and welding position also play a significant role in amperage selection.
- Amperage charts are valuable starting points, but fine-tuning based on observation is essential.
- Too little amperage leads to lack of fusion and poor penetration, while too much can cause burn-through and excessive heat input.
- Practicing with different settings on scrap material is the best way to develop an intuitive feel for amperage control.
- Choosing the right tungsten electrode diameter is closely linked to your amperage selection.
Understanding TIG Welding Amperage
Before we get to charts and settings, let’s understand what we’re dealing with. Amperage, measured in amperes (A), is essentially the flow of electrical current. In TIG welding, amperage dictates the amount of heat generated by the arc. Think of it as the “heat control” for your weld. A higher amperage means a hotter arc, leading to a larger, more fluid weld puddle and deeper penetration. Conversely, a lower amperage means a cooler arc, resulting in a smaller, more controlled puddle and shallower penetration.
The amperage is what melts your base metal and, if used, your filler metal. The balance between amperage, travel speed, and filler metal addition is what creates a sound weld bead. Too much amperage, and you risk burning through your material or creating an overly wide, washed-out weld. Too little amperage, and you won’t achieve proper fusion, leaving you with a weak joint that can easily fail.
Key Factors Influencing Amperage Selection
There’s no single magic number for TIG welding amperage. The ideal setting is a dynamic target influenced by several crucial factors. Understanding these will empower you to make informed decisions:
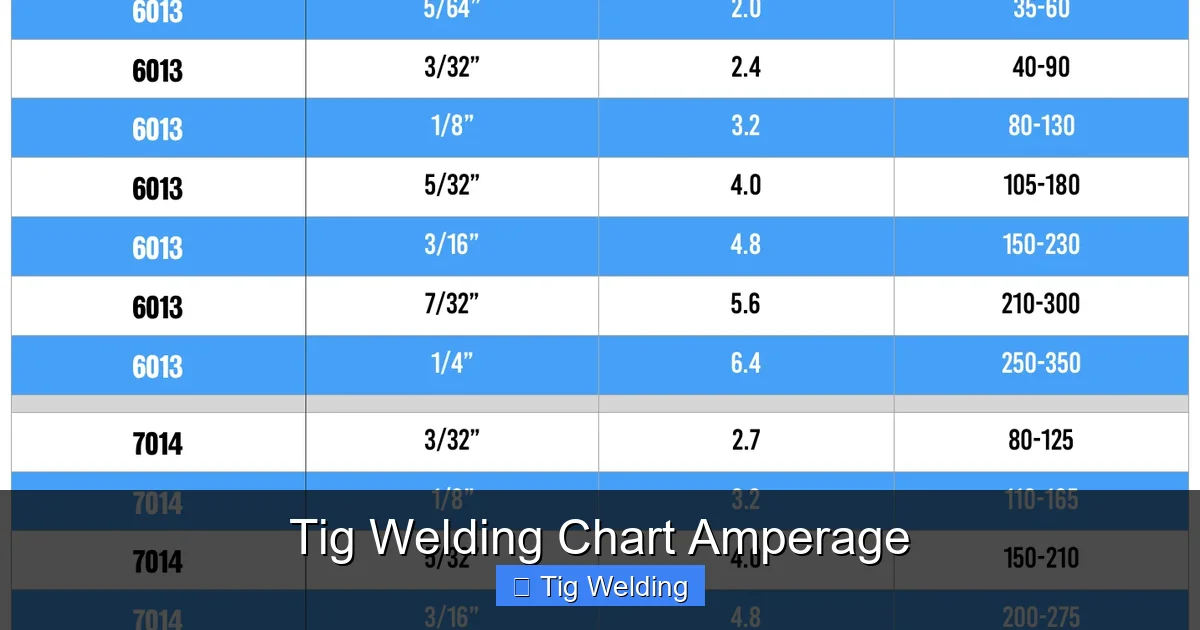
Visual guide about Tig Welding Chart Amperage
Image source: i.pinimg.com
1. Material Type
Different metals have varying melting points and thermal conductivity, directly impacting the amperage required. Generally:
- Steel (Mild Steel, Stainless Steel): Steel is forgiving and can handle a wide range of amperages. Stainless steel may require slightly higher amperage than mild steel of the same thickness due to its lower thermal conductivity.
- Aluminum: Aluminum conducts heat very efficiently and requires higher amperages than steel for the same thickness. Its oxide layer also needs more heat to break down. When welding aluminum with AC current, the cleaning action can influence your perception of heat, and you might need to adjust accordingly.
- Other Metals (Titanium, Copper, etc.): These have unique properties and often require specific amperage ranges and welding techniques. Always consult specialized charts or experienced welders for these materials.
2. Material Thickness
This is perhaps the most significant factor after material type. Thicker materials require more heat to melt and penetrate effectively. Thinner materials require less heat to avoid burning through.
- Thin Materials (e.g., 20-gauge sheet metal): Typically require lower amperages (e.g., 20-50A).
- Medium Thickness Materials (e.g., 1/8 inch or 3mm plate): Fall into a mid-range (e.g., 50-150A).
- Thick Materials (e.g., 1/4 inch or 6mm plate and above): Will need higher amperages (e.g., 150A+), often requiring multiple passes for full penetration.
3. Joint Design
The type of joint you’re welding will affect how heat dissipates and how easily you can achieve penetration.
- Butt Joints: Often require settings that promote good penetration along the entire joint.
- Lap Joints: Heat needs to penetrate through the top piece to fuse with the bottom piece. This might influence your travel speed and sometimes amperage.
- Corner Joints: Can be tricky; the heat tends to concentrate at the corner, potentially leading to burn-through on one side if not managed.
- T-Joints: Similar to lap joints, you need to fuse the fillet into both base metals.
For thicker materials, beveling the edges of the joint (creating a V-groove, U-groove, etc.) is common. This allows for better access and ensures full penetration in the root pass, and may require adjusting amperage for subsequent passes.
4. Welding Position
Gravity plays a role in how the molten weld puddle behaves. Your welding position can influence the ideal amperage and technique.
- Flat Position (1G, 1F): Easiest position. Gravity helps the puddle spread. Standard amperage settings are generally used.
- Horizontal Position (2G, 2F): Gravity tries to pull the puddle down. You might need to slightly reduce amperage and use a weaving technique to counteract this.
- Vertical Up (3G, 3F): Challenging. You’re welding against gravity. Lower amperage is usually necessary, and you’ll need to control the puddle size carefully, often using a stepping or slight weaving motion to build up the weld.
- Overhead Position (4G, 4F): Most difficult. Gravity works against you, pulling the puddle downwards. Very low amperage is typically required, along with a fast travel speed and a tight arc to minimize the puddle size and prevent it from dripping.
5. Tungsten Electrode Diameter and Type
The size and type of tungsten electrode you use are directly related to your amperage capabilities. A thicker tungsten can handle higher amperages without melting or becoming unstable. Different electrode types (e.g., pure tungsten, thoriated, ceriated, lanthanated) also have different current-carrying capacities and arc characteristics.
- 0.040″ (1.0mm) tungsten: Suitable for lower amperages (up to ~75A).
- 1/16″ (1.6mm) tungsten: A common all-rounder, good for moderate amperages (up to ~150A).
- 3/32″ (2.4mm) tungsten: For higher amperages (up to ~200-250A).
- 1/8″ (3.2mm) tungsten: For very high amperages (250A+).
Generally, use the largest diameter tungsten that your amperage requirement can support without overheating. This provides a more stable arc.
Using TIG Welding Amperage Charts
TIG welding amperage charts are invaluable tools, especially for beginners. They provide recommended amperage ranges based on material type and thickness. Think of them as your starting point, a guide to get you in the ballpark.
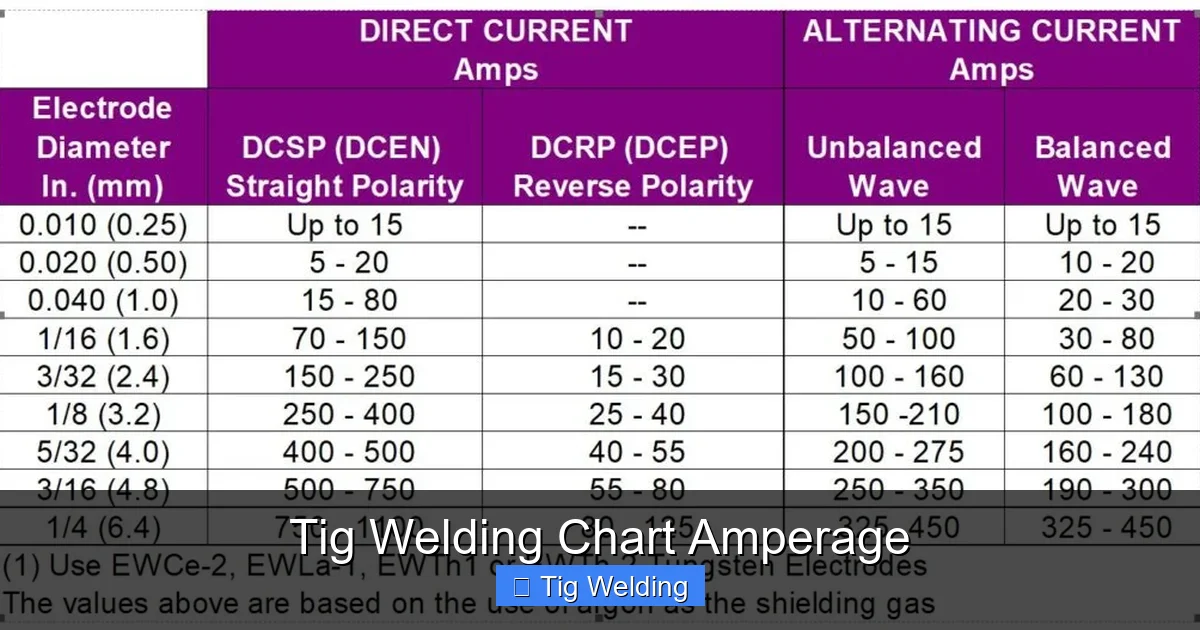
Visual guide about Tig Welding Chart Amperage
Image source: sanrexwelding.com
How to Read an Amperage Chart
Most charts are organized in a grid or table format:
- Rows: Typically represent material thickness (e.g., 1/16″, 1/8″, 1/4″).
- Columns: Usually represent material type (e.g., Mild Steel, Stainless Steel, Aluminum).
- Cells: Contain the recommended amperage range (e.g., 75-110A) for a specific material and thickness combination.
Example: If you are welding 1/8″ (3mm) thick mild steel, you would find the row for 1/8″ and the column for Mild Steel. The intersection of these will give you a recommended amperage range. Let’s say it’s 90-130A.
Limitations of Amperage Charts
While incredibly useful, remember that charts are generalizations. They don’t account for all the variables we discussed earlier, such as joint design, welding position, joint fit-up, AC/DC balance for aluminum, or your personal welding style and travel speed. Therefore, always use charts as a starting point and be prepared to adjust.
Step-by-Step: Setting and Adjusting TIG Amperage
Here’s how to approach setting and adjusting your TIG welder’s amperage:
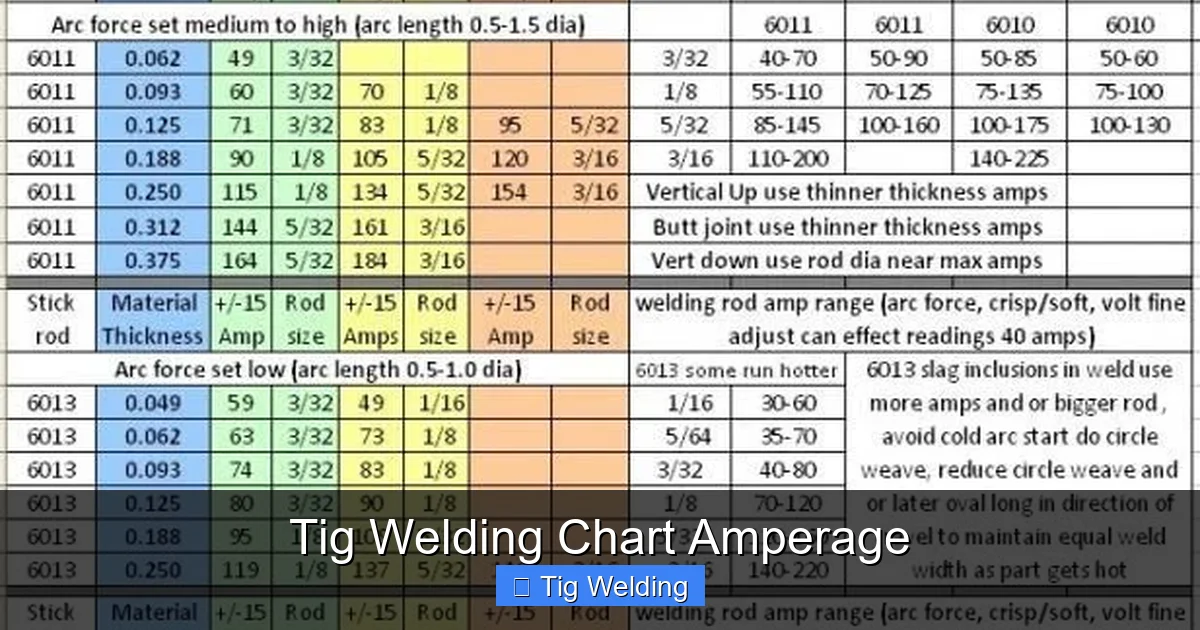
Visual guide about Tig Welding Chart Amperage
Image source: i.pinimg.com
Step 1: Identify Your Material and Its Thickness
This is the foundational step. Accurately determine what you’re welding and how thick it is. If you’re unsure, use calipers or a thickness gauge.
Step 2: Consult an Amperage Chart
Find a reliable TIG welding amperage chart (many are available online or in welding handbooks) and locate the recommended range for your material and thickness.
Step 3: Select a Starting Point
Choose a value within the recommended range. A good strategy is to start at the lower end of the range if you’re new to the material or thickness, or if you’re concerned about burning through. If you’re aiming for deeper penetration on a thicker piece, you might start in the middle or upper end.
Step 4: Prepare Your Welder and Workspace
- Ensure your TIG torch is set up correctly: Tungsten sharpened, correct gas flow (e.g., Argon for most TIG applications), and electrode is the right size for your amperage.
- Safety first: Wear all appropriate PPE (welding helmet, gloves, jacket, etc.).
- Have scrap material ready: Practice pieces of the same material and thickness you’ll be welding are crucial.
Step 5: Perform a Test Weld
Using your scrap material, strike an arc and make a short weld bead. Focus on maintaining a consistent arc length and travel speed.
Step 6: Evaluate Your Weld
Inspect the test weld closely. Look for:
- Penetration: Is there a visible root bead on the backside of the weld (if accessible)? Is the bead well-formed?
- Weld Puddle Fluidity: Did the puddle move smoothly? Was it too stiff (too cold) or too runny (too hot)?
- Bead Appearance: Is the bead too wide and flat (too hot)? Is it narrow and ropy (too cold)?
- Undercutting: Has the arc cut into the base metal, creating a groove along the edge of the weld? This is often a sign of too much amperage or moving too slowly.
- Burn-Through: Did you create a hole? This is a sure sign of too much amperage or holding the arc too long in one spot.
Step 7: Adjust Amperage as Needed
Based on your evaluation, make adjustments:
- If the weld is too cold (lack of fusion, poor penetration, bead is too narrow/ropy): Increase amperage slightly.
- If the weld is too hot (burn-through, undercut, bead is too wide/flat, excessive spatter): Decrease amperage slightly.
- If you’re having trouble controlling the puddle (too runny): You might need to reduce amperage and/or increase your travel speed.
- If the puddle is too stiff (not melting enough): You might need to increase amperage and/or slow your travel speed.
Make small, incremental adjustments (e.g., 5-10A at a time) and perform another test weld. Repeat this process until you achieve the desired results.
Step 8: Fine-Tune with Travel Speed and Arc Length
Remember, amperage is just one piece of the puzzle. Once your amperage is dialed in, focus on maintaining a consistent travel speed and arc length. These factors work in conjunction with amperage to control heat input and weld bead characteristics.
Practical Tips for Amperage Control
- Listen to Your Arc: A well-set arc has a consistent, crisp sound. A sputtering or crackling sound can indicate issues with amperage or gas flow.
- Watch the Puddle: The weld puddle is your best indicator. Learn to read its size, shape, and fluidity. It should be responsive to your torch movement but not so large that it becomes unmanageable.
- Don’t Be Afraid to Adjust On-the-Fly: If you notice your puddle is getting too big, you can sometimes compensate by slightly reducing amperage (if your machine has amperage control on the torch) or by increasing travel speed. Similarly, if it’s too small, you might be able to increase amperage briefly or slow down.
- Practice, Practice, Practice: The more you weld, the more intuitive amperage control becomes. Spend time welding on scrap pieces, deliberately changing your amperage to see the effects.
- Consider Pulse TIG: For certain applications, especially with thin materials or when welding out-of-position, pulsed TIG welding can be a lifesaver. It alternates between a high peak amperage (for penetration) and a low background amperage (to let the puddle cool and solidify), giving you more control.
- Use the Right Tungsten Grind: A sharp, pointed tungsten generally provides a more focused arc, which can be beneficial for precise heat control. A blunter tip can result in a wider, softer arc.
Troubleshooting Amperage-Related Issues
Here are some common problems and their likely amperage-related causes:
- Problem: Burn-through (holes in the material)
- Cause: Amperage is too high.
- Solution: Reduce amperage. Also, ensure you are moving at an adequate travel speed and not holding the arc in one spot for too long.
- Problem: Lack of Fusion / Poor Penetration (weld looks like it’s sitting on top of the metal)
- Cause: Amperage is too low.
- Solution: Increase amperage. Ensure your travel speed isn’t too fast and that you’re using adequate filler material.
- Problem: Undercutting (grooves along the edge of the weld)
- Cause: Amperage is too high, or travel speed is too slow.
- Solution: Reduce amperage or increase travel speed. Sometimes a slight weave can help fill the undercut.
- Problem: Weld Puddle is Unmanageable (too large and runny)
- Cause: Amperage is too high for the material thickness or welding position.
- Solution: Reduce amperage. Consider your travel speed and welding position. For overhead or vertical up, significantly lower amperage is often required.
- Problem: Arc is Unstable or Wandering
- Cause: Could be amperage-related (e.g., amperage too low for the tungsten size, or vice-versa), but also check tungsten condition, gas flow, and cleanliness of the material.
- Solution: Ensure amperage is appropriate for tungsten size. Re-sharpen tungsten. Check gas flow. Clean base metal thoroughly.
Conclusion
Mastering TIG welding amperage is a journey, not a destination. While charts provide an excellent starting point, the true skill lies in developing an understanding of how amperage interacts with material, thickness, joint design, and your own technique. By diligently applying the principles outlined in this guide—understanding the fundamentals, considering all influencing factors, using charts wisely, and practicing consistently—you’ll be well on your way to achieving clean, strong, and professional-looking TIG welds.
Don’t be discouraged by initial challenges. Every weld you make is a learning opportunity. Keep experimenting, keep observing, and keep refining your settings. With patience and practice, you’ll soon develop an intuitive feel for the perfect amperage, turning you into a confident and capable TIG welder.