

MIG welding galvanized steel requires special precautions due to toxic fumes and zinc coating challenges. This guide walks you through safe setup, proper techniques, and post-weld cleanup for strong, professional results.
Key Takeaways
- Safety is critical: Always wear a respirator and weld in well-ventilated areas to avoid inhaling toxic zinc fumes.
- Remove the zinc coating: Grind off the galvanized layer at the weld zone to prevent porosity and improve weld quality.
- Use the right settings: Adjust voltage and wire speed higher than for mild steel due to zinc’s lower melting point.
- Choose proper filler wire: ER70S-2 or ER70S-6 wires work best for galvanized steel and help reduce cracking.
- Control travel speed: Weld slightly faster to minimize heat input and avoid burning through the thin zinc layer.
- Clean after welding: Remove white zinc oxide residue with a wire brush or mild acid solution to prevent corrosion.
- Test your setup: Practice on scrap material first to fine-tune your machine settings and technique.
Introduction: Why MIG Welding Galvanized Steel Is Tricky
MIG welding galvanized steel can be a real challenge—even for experienced welders. The zinc coating that protects the steel from rust also creates hazards and welding complications. When heated, zinc releases toxic fumes, and if not handled properly, it can cause weak, porous welds. But with the right approach, you can MIG weld galvanized steel safely and effectively.
In this guide, you’ll learn how to prepare, set up, and execute strong, clean welds on galvanized metal. We’ll cover safety, equipment, techniques, and troubleshooting so you can tackle this job with confidence—whether you’re working on a car frame, fence, or industrial equipment.
Safety First: Protecting Yourself from Zinc Fumes
Before you even turn on your welder, safety must be your top priority. Galvanized steel is coated with zinc, and when heated during welding, it vaporizes into zinc oxide fumes. Breathing these fumes can cause “metal fume fever”—a flu-like illness with symptoms like fever, chills, nausea, and fatigue.
Visual guide about Mig Welding Galvanized
Image source: garagewelding.com
Wear a Proper Respirator
Never rely on dust masks. Use a NIOSH-approved respirator with organic vapor and particulate filters (like a P100 filter). For heavy or prolonged welding, consider a powered air-purifying respirator (PAPR) for better comfort and protection.
Ensure Strong Ventilation
Work in a well-ventilated area—preferably outdoors or in a shop with exhaust fans. Position fans to pull fumes away from your breathing zone. If welding indoors, use a fume extractor gun or portable fume extractor near the weld zone.
Avoid Skin Contact
Wear long sleeves, gloves, and a welding jacket to prevent skin burns from sparks and spatter. Zinc residue can also irritate the skin, so wash thoroughly after welding.
Preparing the Galvanized Steel
Proper preparation is key to a successful weld. The zinc coating must be removed from the weld area to prevent contamination and ensure a strong bond.
Visual guide about Mig Welding Galvanized
Image source: garagewelding.com
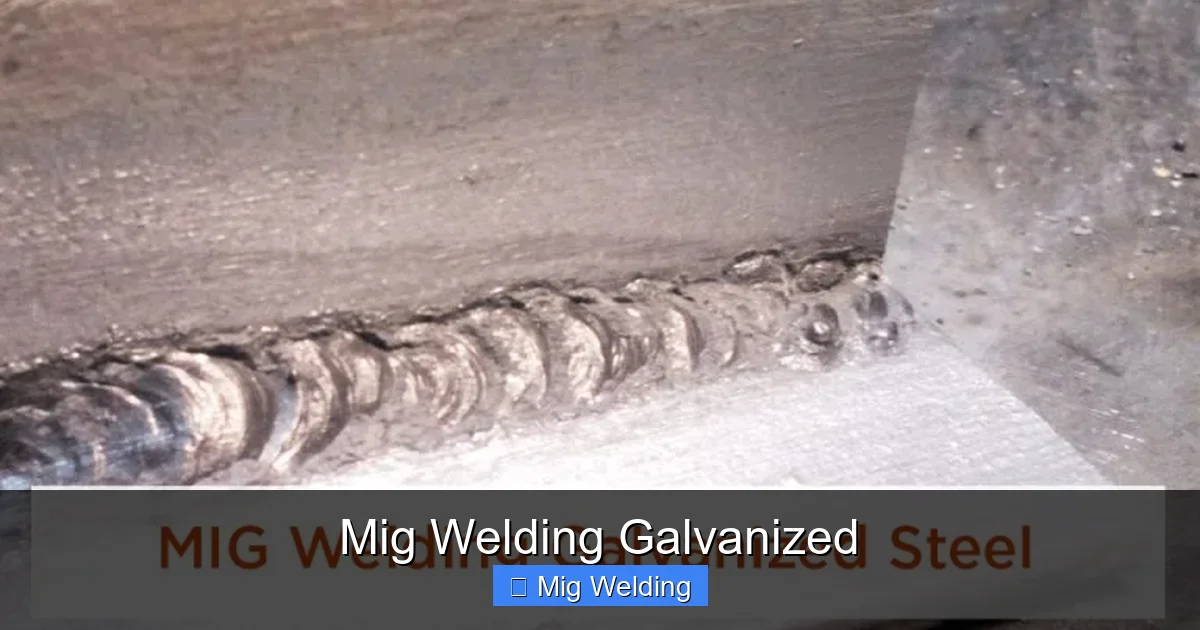
Grind Off the Zinc Coating
Use an angle grinder with a flap disc or wire brush to remove the galvanized layer at least 1–2 inches on either side of the weld joint. You’ll see the shiny zinc disappear, revealing the dull gray steel underneath. This step reduces fumes and prevents zinc from mixing into the weld pool, which causes porosity.
Clean the Surface
After grinding, wipe the area with a clean cloth and acetone or a degreaser to remove oil, dirt, or residue. Even small contaminants can weaken the weld.
Check for Thickness
Galvanized steel is often thinner than bare steel due to the coating process. Be mindful of this when setting your welding parameters to avoid burn-through.
Setting Up Your MIG Welder
Galvanized steel requires slight adjustments to your standard MIG settings. The zinc coating conducts heat differently and melts at a lower temperature than steel, so you’ll need to adapt.
Choose the Right Wire
Use ER70S-2 or ER70S-6 solid wire. These wires have deoxidizers that help handle contaminants and reduce the risk of porosity. Avoid flux-cored wire unless you’re welding outdoors—it can trap zinc fumes and create more spatter.
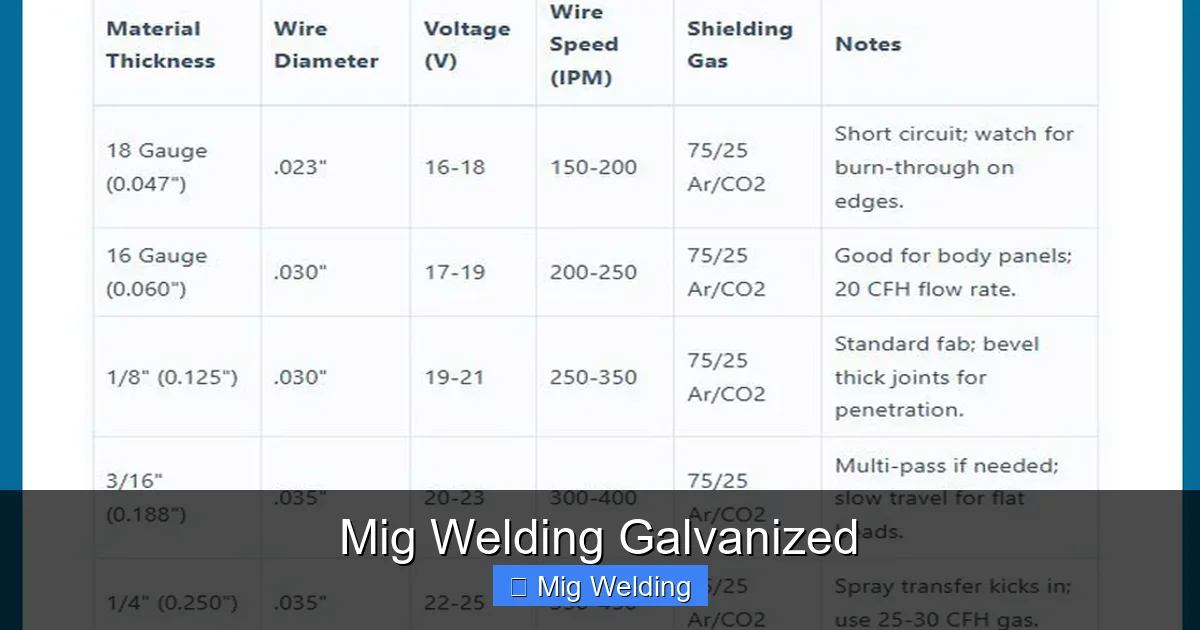
Adjust Voltage and Wire Speed
Start with settings about 10–15% higher than you’d use for mild steel of the same thickness. For example, if you’d use 18 volts for 1/8” steel, try 20–21 volts for galvanized. Increase wire feed speed slightly to maintain a stable arc.
Use a Slight Push Technique
Hold the MIG gun at a 10–15 degree angle and push (rather than drag) the weld puddle. This helps push the zinc vapor away from the molten pool and reduces porosity.
Shorten Your Stick-Out
Keep the wire stick-out (the length of wire extending from the nozzle) short—about 1/2 inch. This improves arc stability and reduces spatter.
Welding Techniques for Galvanized Steel
Now that your machine is set and the metal is prepped, it’s time to weld. Use these techniques for clean, strong results.
Maintain a Steady Travel Speed
Weld slightly faster than usual. The zinc coating burns off quickly, and too much heat can cause burn-through or excessive spatter. A consistent, smooth motion helps maintain control.
Watch for Sparkling and Popping
Some popping and sparkling is normal as the zinc burns off. But if you see excessive spatter or the weld looks rough, you may be going too slow or using too much heat. Adjust your speed or reduce voltage slightly.
Use a Weave if Needed
For wider joints, use a slight weave (side-to-side motion), but keep it narrow. Avoid wide weaves that trap zinc vapor in the weld.
Weld in Short Passes if Necessary
For thicker materials or long welds, use multiple short passes. This helps control heat buildup and reduces distortion.
Post-Weld Cleanup and Inspection
After welding, your job isn’t done. Proper cleanup ensures the weld lasts and looks professional.
Remove Zinc Residue
You’ll notice a white, powdery substance around the weld—this is zinc oxide. Use a stainless steel wire brush to scrub it off. For stubborn residue, apply a mild acid like vinegar or a commercial zinc remover, then rinse and dry thoroughly.
Inspect the Weld
Check for cracks, porosity, or lack of fusion. A good weld should be smooth, consistent, and free of holes. If you see issues, grind them out and re-weld.
Apply Protective Coating
Since you’ve removed the galvanized layer, the weld area is now vulnerable to rust. Apply a cold galvanizing compound or zinc-rich paint to protect the exposed steel. This restores corrosion resistance and blends with the surrounding metal.
Troubleshooting Common Problems
Even with careful preparation, issues can arise. Here’s how to fix the most common problems when MIG welding galvanized steel.
Porosity (Holes in the Weld)
Cause: Trapped zinc vapor or moisture. Solution: Ensure the zinc is fully removed, clean the metal, and use a push technique. Check your gas flow—use 20–25 CFH of 75/25 argon/CO2 mix.
Excessive Spatter
Cause: Too much voltage or wire stick-out. Solution: Reduce voltage slightly, shorten stick-out, and ensure your ground clamp is secure.
Burn-Through
Cause: Too much heat or slow travel speed. Solution: Lower voltage, increase travel speed, or use a heat sink (like copper backing) behind the weld.
Weak or Cracked Welds
Cause: Contamination or improper filler wire. Solution: Re-clean the joint, use ER70S-2 wire, and avoid welding in drafty areas that disrupt gas coverage.
Conclusion: Mastering MIG Welding on Galvanized Steel
MIG welding galvanized steel doesn’t have to be intimidating. By prioritizing safety, removing the zinc coating, adjusting your settings, and using the right techniques, you can produce strong, clean welds every time. Remember: practice on scrap metal first, and always clean and protect your weld after finishing.
With these steps, you’ll not only avoid health risks but also deliver professional-quality results. Whether you’re repairing a trailer or building a gate, you now have the knowledge to tackle galvanized steel with confidence.