

This comprehensive guide dives deep into the critical role of gas flow in TIG welding. Learn about the types of shielding gases, how to set the correct flow rate for optimal results, and common mistakes to avoid. Understanding and mastering gas flow is essential for achieving strong, clean, and aesthetically pleasing TIG welds.
Gas Flow TIG Welding
TIG (Tungsten Inert Gas) welding, also known as GTAW (Gas Tungsten Arc Welding), is a highly versatile and precise welding process. It’s renowned for producing clean, strong, and aesthetically pleasing welds on a wide range of metals, from thin stainless steel to thick aluminum. While TIG welding involves several key variables like amperage, tungsten type, and filler metal, one often-overlooked yet absolutely critical element is **gas flow**.
This guide is designed to demystify gas flow in TIG welding. You’ll learn exactly why it’s so important, what gases are used, how to set the correct flow rate, and what to do when things don’t go according to plan. By mastering gas flow, you’ll significantly improve the quality and reliability of your TIG welds. Let’s get started!
Key Takeaways
- Shielding gas protects the weld pool: It prevents atmospheric contaminants like oxygen and nitrogen from entering the molten metal, which can cause defects.
- Argon is the most common TIG gas: It’s inert, affordable, and works well for most TIG welding applications on various metals.
- Flow rate is crucial: Too low a flow rate leaves the weld vulnerable; too high a flow rate can cause turbulence and disrupt the arc.
- Consider metal type and thickness: Thicker metals and certain alloys may require slightly higher flow rates or a mix of gases.
- Check for leaks: Regular inspection of your gas cylinder, regulator, and torch consumables ensures consistent gas delivery.
- Environmental factors matter: Drafts or windy conditions necessitate higher gas flow rates or shielding the weld area.
Understanding the Role of Shielding Gas in TIG Welding
The fundamental purpose of shielding gas in TIG welding is to create a protective atmosphere around the tungsten electrode, the molten weld pool, and the hot, solidified weld bead. Think of it as a force field against the enemies of a good weld: atmospheric contaminants.
Why is Shielding Gas So Important?
When metal is heated to its molten state during welding, it becomes highly reactive with the surrounding air. The primary culprits are:
- Oxygen: Can cause oxidation, leading to brittle welds, porosity (tiny holes), and discoloration.
- Nitrogen: Can cause embrittlement and porosity, weakening the weld structure.
- Moisture: Can break down into hydrogen and oxygen, both detrimental to weld quality.
The shielding gas displaces these atmospheric contaminants, preventing them from entering the weld pool. This protection is vital for achieving welds that are:
- Strong and Ductile: Free from the weakening effects of absorbed gases.
- Clean and Free of Defects: Avoiding porosity, inclusions, and surface contamination.
- Aesthetically Pleasing: Minimizing discoloration and ensuring a smooth, uniform bead appearance.
Without adequate shielding gas, your TIG welds will likely be weak, riddled with defects, and look far from professional.
Types of Shielding Gases Used in TIG Welding
Visual guide about Gas Flow Tig Welding
Image source: mig-welding.co.uk
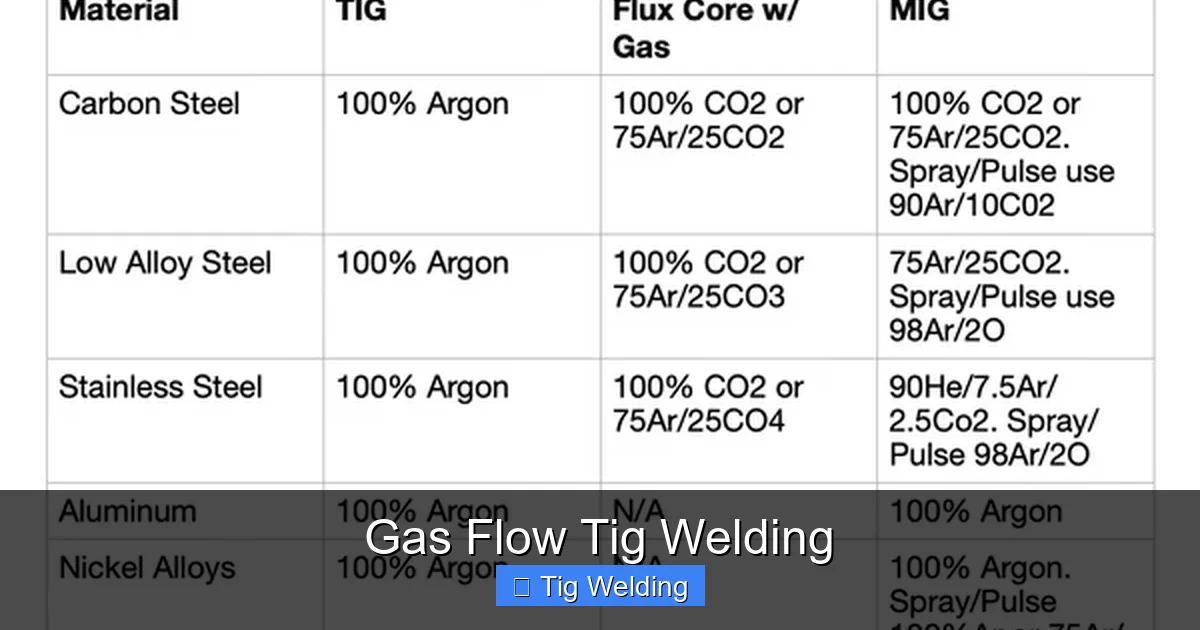
While the term “TIG welding” implies an “Inert Gas” process, there’s a spectrum of gases and gas mixtures used, depending on the material being welded and the desired outcome.
Argon (Ar)
Argon is the workhorse of TIG welding. It’s an inert gas, meaning it doesn’t chemically react with the base metal or the tungsten electrode.
- Pros: Excellent shielding properties, readily available, relatively inexpensive, produces a stable arc, good cleaning action on aluminum and magnesium.
- Cons: Can result in a wider, flatter bead profile on some metals compared to helium.
- Applications: Widely used for welding aluminum, magnesium, stainless steel, nickel alloys, copper, titanium, and steel. It’s often the go-to gas for beginners and for general-purpose TIG welding.
Helium (He)
Helium is another inert gas, but it has different characteristics than argon.
- Pros: Higher thermal conductivity means it transfers more heat to the weld pool, resulting in faster travel speeds and deeper penetration. It also produces a wider, flatter bead.
- Cons: More expensive than argon, can lead to a less stable arc, less effective at cleaning oxides than argon, especially on aluminum.
- Applications: Often used for welding thicker sections of aluminum, magnesium, and copper alloys, or when higher travel speeds are desired. It’s also used in gas mixtures to improve arc characteristics.
Gas Mixtures
For specific applications, mixtures of argon, helium, and sometimes even small amounts of other gases are used to optimize arc stability, penetration, and bead profile.
- Argon/Helium Mixtures: Common for welding thicker aluminum or when seeking deeper penetration and faster welding speeds. As the percentage of helium increases, so does the heat input.
- Argon/Hydrogen Mixtures: Primarily used for stainless steel and nickel alloys. Hydrogen acts as a deoxidizer and can improve bead appearance and reduce oxidation, giving a brighter finish. However, hydrogen can cause issues if not used correctly, especially on thicker materials or when welding carbon steel, as it can lead to embrittlement.
- Argon/Nitrogen Mixtures: Used for welding some stainless steels and nickel alloys, particularly in specific industrial applications.
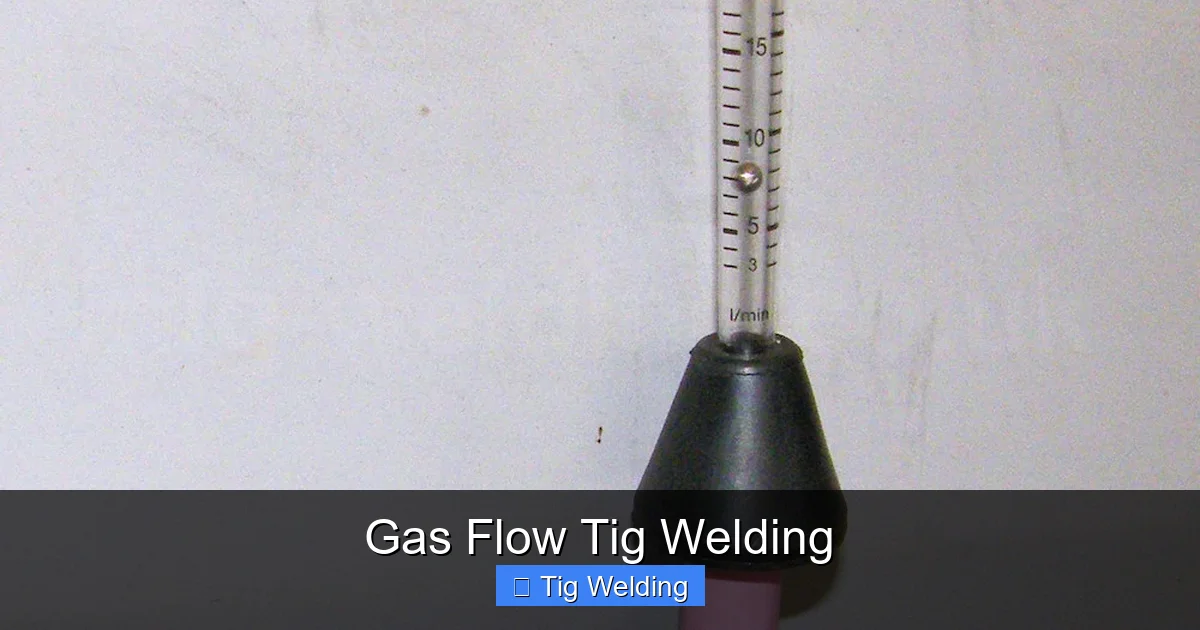
Setting the Correct Gas Flow Rate
Visual guide about Gas Flow Tig Welding
Image source: fitwelding.com
This is where understanding gas flow truly becomes a practical skill. The gas flow rate, measured in cubic feet per hour (CFH) or liters per minute (LPM), dictates how much shielding gas is delivered to the weld area. Getting this right is a delicate balance.
Factors Influencing Gas Flow Rate
Several factors influence the ideal gas flow rate for your TIG welding application:
- Base Metal: Different metals have different reactivity and require varying levels of shielding.
- Metal Thickness: Thicker materials generally require a longer duration of gas coverage and sometimes a slightly higher flow rate to account for heat dispersion.
- Shielding Gas Type: As discussed, helium transfers more heat, so you might use a slightly different flow rate than pure argon.
- Torch Size and Type: Larger torch bodies and longer consumables might require a higher flow to ensure adequate coverage.
- Amperage: Higher amperages often mean a larger weld pool and more heat, potentially requiring more shielding.
- Environmental Conditions: Drafts, wind, or outdoor welding necessitate higher flow rates to overcome air movement.
- Nozzle Size: The size of the ceramic cup on your TIG torch plays a role. Larger cups generally require higher flow rates to ensure the gas envelops the entire weld area without turbulence.
General Guidelines for Argon Flow Rate
For most standard TIG welding applications using pure argon, here are some general guidelines. These are starting points, and you will likely need to adjust based on the factors above.
Common Flow Rates (Argon)
- Small, delicate work (e.g., thin stainless steel, jewelry): 10-15 CFH (5-7 LPM)
- General purpose welding (e.g., 1/8″ steel, general aluminum): 15-25 CFH (7-12 LPM)
- Thicker materials or aluminum welding: 25-35+ CFH (12-17+ LPM)
How to Set Your Gas Flow Rate
You’ll use a flowmeter regulator attached to your gas cylinder to control the flow rate.
Step-by-Step Flow Rate Setting:
- Ensure Cylinder Valve is Closed: Before adjusting anything, make sure the main valve on your gas cylinder is completely closed.
- Connect Regulator: Securely attach the flowmeter regulator to the gas cylinder valve.
- Open Cylinder Valve Slowly: Slowly open the main valve on the gas cylinder. You should hear gas entering the regulator.
- Adjust Flow Control Valve: The flowmeter will have a ball (in a tube) or a needle valve. Adjust this control to set the desired flow rate (CFH or LPM). Start with a recommended setting for your application.
- Check Pressure Gauges: Your regulator will have at least two gauges. One shows the tank pressure (high pressure), and the other (the flowmeter gauge) shows the regulated pressure and the flow rate.
- Close Cylinder Valve When Finished: Always close the cylinder valve when you are done welding for the day.
Best Practices for Gas Flow in TIG Welding
Visual guide about Gas Flow Tig Welding
Image source: st.hotrod.com
Beyond just setting the flow rate, a few best practices will ensure your shielding gas is doing its job effectively.
Pre-Flow and Post-Flow Settings
Your TIG welder likely has adjustable pre-flow and post-flow settings. These are crucial for optimal gas coverage.
- Pre-Flow: This setting determines how long the shielding gas flows *before* the welding arc starts.
- Purpose: To establish a protective gas shield around the tungsten electrode and the weld area before any molten metal is created.
- Typical Setting: 0.5 to 1 second is usually sufficient for most applications. For very sensitive materials or conditions, you might extend this slightly.
- Post-Flow: This setting determines how long the shielding gas continues to flow *after* the welding arc has stopped.
- Purpose: To protect the hot, newly solidified weld bead and the tungsten electrode from atmospheric contamination as they cool down. This is especially important for preventing oxidation and discoloration.
- Typical Setting: This is more variable. A good starting point is 1 second per 10 amps of welding current. For example, at 100 amps, you’d set post-flow to around 10 seconds. For thin materials or less critical welds, you might reduce this. For critical welds or reactive metals, you might increase it.
Torch Angle and Gas Coverage
How you hold your torch and the angle at which you direct the gas stream are critical.
- Keep the Nozzle Close: The ceramic cup (nozzle) on your TIG torch should be held relatively close to the workpiece, typically 1/4″ to 1/2″ away. This ensures the gas flows directly onto the weld pool and doesn’t dissipate too quickly.
- Torch Angle: Aim to direct the gas flow directly at the weld pool. A slight angle (around 10-15 degrees) is often ideal. Avoid pointing the gas stream directly at the tungsten, as this can create turbulence.
- Avoid Arc Wander: If the arc seems to be “blowing” around, your gas flow might be too high, or you might be in a draft.
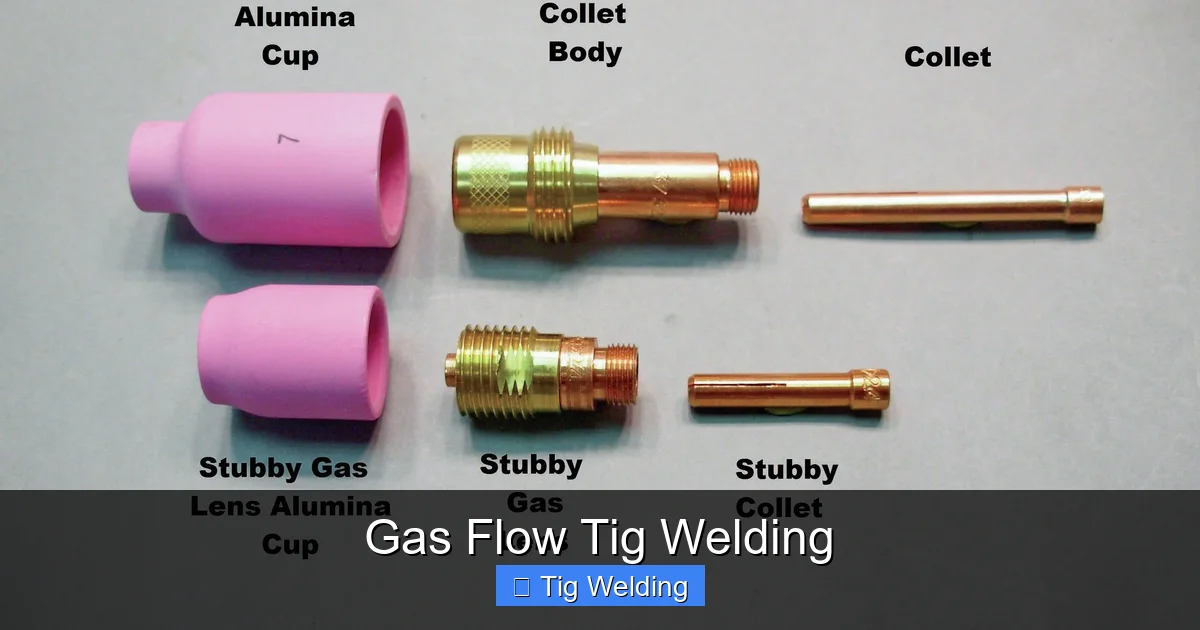
Checking for Leaks
Gas leaks are silent assassins of good TIG welds. They can lead to inconsistent shielding and poor weld quality without you even realizing it.
- Cylinder Connection: Ensure the regulator is tightly screwed onto the cylinder valve.
- Hoses: Visually inspect all hoses for cracks or damage. You can use soapy water on connections; bubbles will indicate a leak.
- Torch Consumables:
- Collet and Collet Body: Ensure they are properly seated.
- Gas Lens: If you are using a gas lens (highly recommended for better gas coverage), ensure the screen is not damaged and the assembly is tight. A loose gas lens will leak shielding gas.
- Nozzle: Make sure the ceramic cup is properly fitted and not cracked.
- Regulator: While less common, the regulator itself can develop internal leaks.
Welding in Drafty Conditions
Welding outdoors or in a workshop with significant air movement presents a major challenge for shielding gas.
- Increase Gas Flow: You’ll need to significantly increase your gas flow rate to overcome the airflow. This might mean pushing flow rates to 30-40 CFH or even higher, depending on the severity of the draft.
- Use a Larger Nozzle: A larger ceramic cup can help create a wider, more dispersed gas shield, offering better protection in windy conditions.
- Create a Shield: If possible, erect temporary barriers (like welding blankets or screens) around your welding area to block drafts.
- Use Gas Lenses: Gas lenses are essential for improving gas coverage, especially in less-than-ideal conditions.
Troubleshooting Gas Flow Issues
Even with careful setup, you might encounter problems. Here’s how to diagnose and fix common gas flow issues.
Problem: Discolored Welds (Bronze, Yellow, or Black)
This is a classic sign of inadequate shielding gas.
- Possible Causes:
- Low gas flow rate.
- Insufficient pre-flow or post-flow time.
- Drafts or wind affecting the gas shield.
- Gas leak in the torch consumables or hoses.
- Incorrect gas type for the material.
- Solutions:
- Increase the gas flow rate.
- Adjust pre-flow and post-flow settings.
- Improve shielding in drafty conditions (see above).
- Check for and fix any gas leaks.
- Verify you are using the correct shielding gas (e.g., pure argon for most applications).
Problem: Porosity (Tiny Holes) in the Weld
Porosity indicates contaminants have entered the weld pool.
- Possible Causes:
- Same as discolored welds (insufficient shielding, leaks, drafts).
- Contaminated filler metal or base metal.
- Using the wrong type of shielding gas (e.g., too much hydrogen in a mixture for steel).
- Arcing too far from the weld pool, allowing atmospheric contamination.
- Solutions:
- Address shielding gas issues as described for discoloration.
- Ensure your base metal and filler rod are clean and free of oils, paint, rust, or other contaminants.
- Verify you are using the correct gas mixture.
- Keep your torch closer to the weld pool and maintain a consistent arc length.
Problem: Inconsistent Arc or “Sputtering”
An unstable arc can be frustrating and lead to poor welds.
- Possible Causes:
- Gas flow too high, causing turbulence around the tungsten.
- Gas flow too low, allowing contaminants to reach the arc.
- Dirty or damaged tungsten electrode.
- Damaged gas lens or nozzle.
- Incorrect gas mixture.
- Solutions:
- Adjust gas flow rate to find the sweet spot.
- Clean or replace your tungsten electrode.
- Inspect and clean or replace your torch consumables (gas lens, nozzle).
- Ensure you are using the correct gas type or mixture.
Conclusion
Mastering gas flow in TIG welding is not just a technical detail; it’s the foundation upon which strong, clean, and beautiful welds are built. By understanding the purpose of shielding gas, choosing the right gas for your application, and meticulously setting and monitoring your flow rates, pre-flow, and post-flow, you’ll dramatically improve your TIG welding results.
Remember to always check for leaks, consider your environmental conditions, and be prepared to make adjustments. With practice and attention to these details, you’ll find yourself producing welds with greater confidence and a consistently higher quality. Happy welding!