

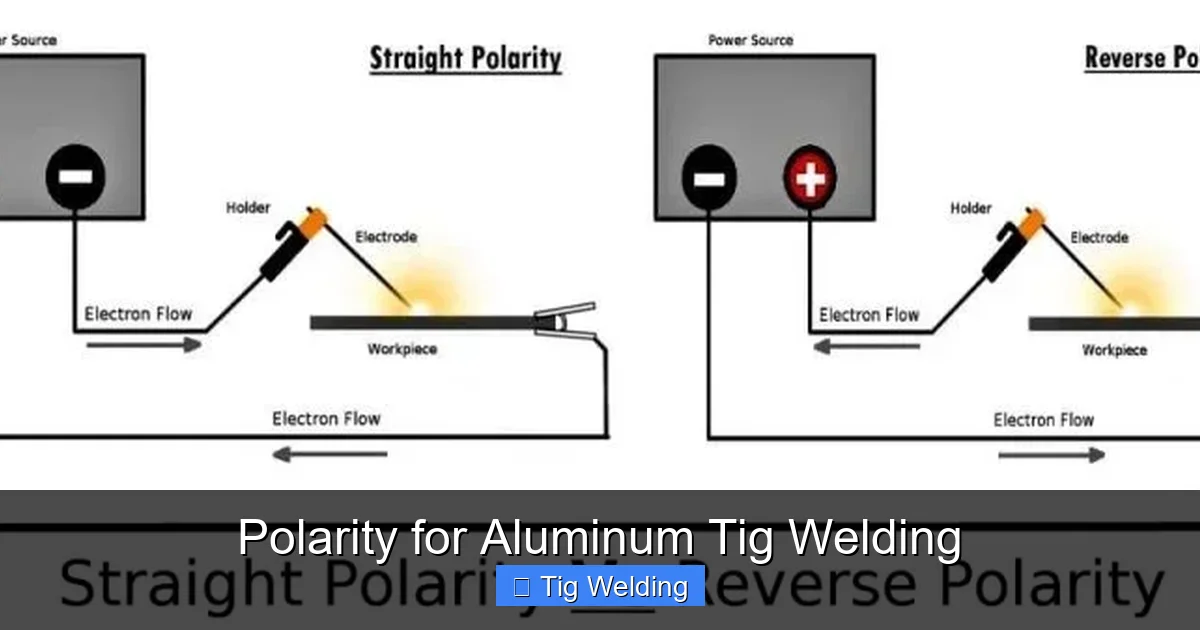
Understanding polarity is crucial for successful aluminum TIG welding. This guide explains that aluminum TIG welding exclusively uses AC (Alternating Current) to leverage its cleaning action and penetrate the oxide layer. We’ll cover the optimal AC balance, frequency, and electrode selection, along with practical tips and common troubleshooting to help you achieve strong, high-quality aluminum welds.
Polarity for Aluminum TIG Welding
Welcome, aspiring aluminum TIG welders! You’ve picked a fantastic skill to learn. Aluminum TIG welding can produce some of the cleanest, most aesthetically pleasing welds, but it also comes with its unique challenges. One of the most fundamental aspects, and often a point of confusion for beginners, is polarity. Get this wrong, and you’ll struggle to get a clean, strong weld. Get it right, and you’ll unlock the potential for beautiful, durable aluminum joints.
In this comprehensive guide, we’re going to dive deep into the world of polarity for aluminum TIG welding. You’ll learn exactly why a specific type of current is essential, how to adjust its parameters for optimal results, and what electrode choices will best serve you. By the end of this article, you’ll have the knowledge to confidently set up your TIG welder for aluminum and start producing professional-quality welds. Let’s get started!
Key Takeaways
- AC is King for Aluminum: Aluminum TIG welding requires AC to break down the stubborn aluminum oxide layer, preventing contamination and ensuring good fusion.
- Balance Control is Key: Adjusting the AC balance (electrode positive/negative ratio) is vital. Too much positive can overheat the tungsten, while too much negative hinders cleaning.
- Frequency Fine-Tunes the Arc: Higher frequencies create a more focused, directional arc, improving puddle control and speed, especially on thinner materials.
- Electrode Selection Matters: Pure tungsten (green band) or Zirconiated tungsten (brown band) are best for AC aluminum welding due to their good arc stability and resistance to contamination.
- Sharp Tungsten for AC: For AC aluminum, a slightly balled or rounded tip is generally preferred over a needle-sharp point to maintain a stable arc.
- Troubleshooting Common Issues: Understand how polarity affects tungsten life, arc stability, and weld appearance to fix problems like balling tungsten or poor cleaning.
Understanding the Challenge: Aluminum’s Oxide Layer
Before we even talk about polarity, it’s crucial to understand *why* aluminum welding is different. Aluminum is an amazing metal, but it forms a very tough, stubborn oxide layer on its surface. This oxide has a much higher melting point than the aluminum metal itself – around 3700°F (2040°C) compared to aluminum’s 1220°F (660°C).
If you try to TIG weld aluminum with DC (Direct Current) like you might for steel, you’ll find that the heat from the arc will melt the aluminum base metal *before* it can break down this oxide layer. The oxide will get pushed into the weld puddle, causing inclusions, porosity, and a weak, brittle weld. Essentially, you’ll just be melting a hole in the aluminum without actually fusing anything properly.
The Solution: AC (Alternating Current)
This is where AC comes to the rescue! Alternating Current, as the name suggests, constantly reverses its direction. In TIG welding, this means the current rapidly switches between being positive and negative. This rapid switching has two critical benefits for aluminum:
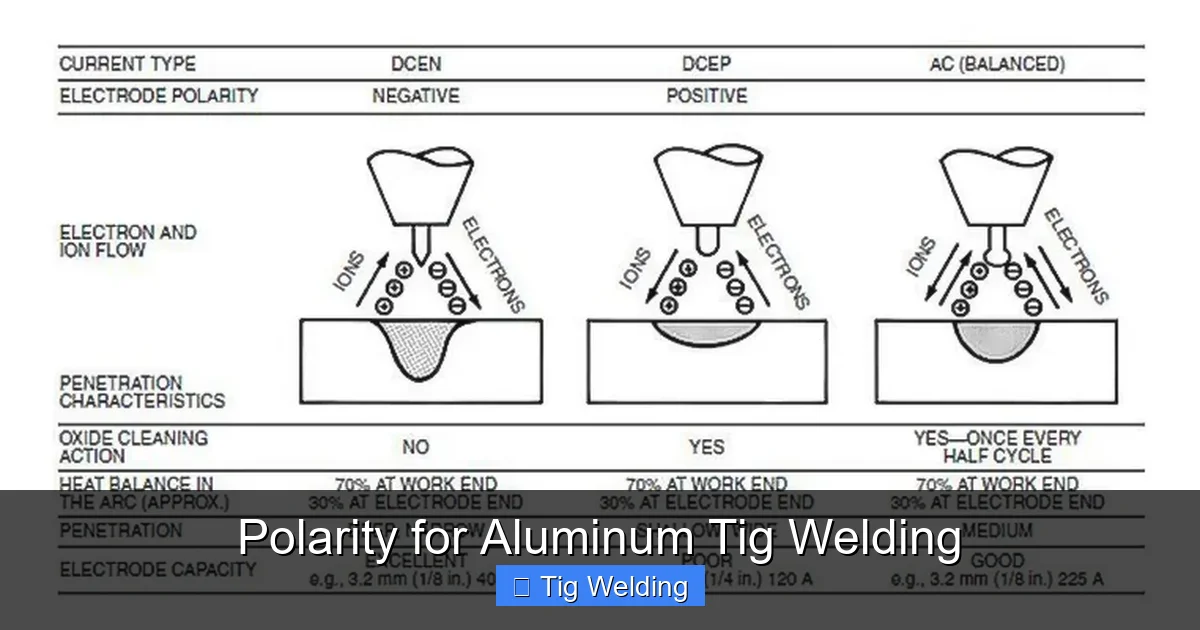
The Cleaning Action: During the negative part of the cycle (electrode negative), the arc has a “cleaning” effect. It bombards the surface of the aluminum with electrons, which helps to blast away the oxide layer. This is often referred to as “cathode cleaning” or “arc cleaning.”
Visual guide about Polarity for Aluminum Tig Welding
Image source: blog.red-d-arc.com
Penetration: During the positive part of the cycle (electrode positive), the arc provides the heat needed to melt the base metal and filler material, allowing for proper fusion.
Therefore, for aluminum TIG welding, you will *always* use AC. The challenge isn’t choosing between AC and DC; it’s about understanding and mastering the various settings within AC that control this cleaning and melting process.
Setting Up Your TIG Welder for AC Aluminum
Modern AC TIG welders offer several parameters to fine-tune your arc. While the exact labels might vary slightly between manufacturers, here are the key settings you need to understand:
AC Balance Control
This is arguably the most important AC setting for aluminum. AC balance controls the ratio of electrode negative (EN) time to electrode positive (EP) time within each AC cycle. It’s often expressed as a percentage of electrode negative.
What it does: It directly influences the amount of cleaning action versus penetration you get.

Visual guide about Polarity for Aluminum Tig Welding
Image source: vietmfg.com

Visual guide about Polarity for Aluminum Tig Welding
Image source: image.slidesharecdn.com
- Higher EN (e.g., 70-80% EN): This means more time the electrode is negative. This provides more cleaning action but less penetration. It’s good for thicker aluminum or when you need to thoroughly clean a dirty surface. However, too much EN can lead to a wider, less focused arc and might not provide enough heat for good fusion.
- Lower EN (e.g., 40-50% EN): This means less time the electrode is negative and more time it’s positive. This provides less cleaning action but more penetration. It’s useful for thinner aluminum where you want a more concentrated heat input and a narrower bead. Too little EN can result in insufficient cleaning, leading to oxide inclusions.
Finding the Sweet Spot
The ideal AC balance setting is a balance (pun intended!) between effective cleaning and sufficient penetration. For most common aluminum alloys and thicknesses, a good starting point is typically between **50% and 70% Electrode Negative**.
Practical Tip: Always start with a recommended setting for the material thickness you are welding, and then adjust based on your observation of the arc and the weld puddle.
Example: For 1/8-inch thick 6061 aluminum, you might start with around 60% EN. If you notice the puddle isn’t penetrating well or is still showing signs of oxidation, increase the EN. If your tungsten starts to ball up excessively or you’re having trouble controlling the puddle, you might decrease the EN slightly.
AC Frequency
AC frequency, measured in Hertz (Hz), determines how rapidly the current alternates. Think of it as how fast the arc is switching between being positive and negative.
What it does: It affects the arc shape, puddle fluidity, and directional control.
- Lower Frequency (e.g., 40-80 Hz): This results in a wider, softer arc. The puddle will be more fluid and harder to control, especially on thinner materials or in out-of-position welding. This setting can provide a good aesthetic bead with a classic rippled look.
- Higher Frequency (e.g., 100-250 Hz or higher): This creates a narrower, more focused, and more directional arc. This allows for better puddle control, faster travel speeds, and improved penetration. It’s particularly useful for welding thinner aluminum, out-of-position, or when you need a very precise weld.
Finding the Sweet Spot
Higher frequencies generally make aluminum TIG welding easier by concentrating the heat and stabilizing the arc. For most applications, a frequency between **100 Hz and 150 Hz** is a good starting point.
Practical Tip: If you’re struggling with puddle control on thin aluminum, try increasing the frequency. If you want a wider bead with a more traditional look, or if you’re welding thicker material where arc concentration isn’t as critical, you might decrease the frequency.
Example: For welding 0.060-inch thick aluminum sheet, you might set your frequency to 150 Hz or higher for a focused arc. For welding 1/4-inch thick aluminum plate, you might be comfortable at 100 Hz or even lower.
Amperage
While not directly a “polarity” setting, amperage is intrinsically linked. Amperage is the overall welding current, and it determines the heat input. For AC aluminum, you need enough amperage to melt the base metal and filler, but not so much that you burn through or warp the material excessively.
General Rule of Thumb: A common starting point for aluminum is approximately 1 amp per 0.001 inch of material thickness. So, for 1/8-inch (0.125 inches) thick material, you’d be looking around 125 amps. This is a very rough guideline and will vary based on the alloy, joint type, and your specific machine.
Practical Tip: Always perform test welds on scrap pieces of the same material to dial in your amperage, balance, and frequency settings. Observe the puddle, the bead width, and the penetration. Don’t be afraid to make adjustments.
Electrode Selection for AC Aluminum
The type of tungsten electrode you use significantly impacts your AC aluminum TIG welding.
Recommended Tungsten Types:
* Pure Tungsten (EWTh-1, Green Band): These are the traditional choice for AC aluminum welding. They have a natural balled tip that provides a stable arc. However, they can contaminate more easily than other types.
* Zirconiated Tungsten (EWZr-1, Brown Band): These offer excellent arc stability and are more resistant to contamination than pure tungsten. They are a very good alternative for AC aluminum.
Tungsten Shape for AC:
This is a crucial point where AC aluminum differs from DC welding.
* DC (for steel): You typically grind a sharp, pointed tip on your tungsten for a focused arc.
* AC (for aluminum): You generally want a slightly *balled* or *rounded* tip on your tungsten. The natural balled tip of pure tungsten is ideal. If you are using a different type, or if your tungsten has been contaminated, you might need to re-establish a rounded tip.
Why a balled tip? A sharp point on AC can break off, contaminating the weld and causing an unstable arc. The rounded tip helps to maintain a stable arc and prevent tungsten contamination. The AC current itself will tend to form a rounded end on the tungsten naturally.
Practical Tip: Start with a fresh tungsten electrode. If using pure tungsten, it will naturally ball up. If using a lanthanated or ceriated tungsten (which are often better for DC), try to keep it rounded or slightly balled for AC aluminum. Never grind a needle-sharp point for AC aluminum!
Filler Metal Selection for Aluminum
While this guide is focused on polarity, it’s worth a quick mention of filler metal. The most common filler metals for aluminum are:
* **4043:** This is the most widely used aluminum filler alloy. It has a lower melting point and is known for its crack resistance, making it forgiving for beginners. It’s good for general-purpose fabrication.
* **5356:** This alloy has higher tensile strength and is more ductile than 4043. It’s often preferred for structural applications or where a brighter, cleaner-looking weld is desired.
Always choose a filler metal that is compatible with your base aluminum alloy. Consult a welding chart if you are unsure.
Troubleshooting Common Aluminum TIG Welding Issues Related to Polarity
Understanding polarity helps you diagnose and fix common problems:
Problem: Tungsten Balling Up Excessively or Breaking Off
* Possible Cause: AC balance is too high (too much electrode positive). This is causing the tungsten to overheat and ball.
* Solution: Increase the percentage of electrode negative (EN) on your AC balance setting. You might also need to reduce amperage or increase AC frequency for a more focused arc. Ensure your tungsten is properly balled/rounded, not sharp.
Problem: Poor Cleaning Action / Oxide Inclusions
* Possible Cause: Insufficient cleaning action. This could be due to AC balance being too low (not enough electrode negative) or insufficient amperage.
* Solution: Increase the percentage of electrode negative (EN) on your AC balance setting. Ensure you are using enough amperage for the material thickness. Clean your base metal thoroughly *before* welding (wire brush, degreaser).
Problem: Unstable Arc / Wobbly Arc
* Possible Cause: Incorrect AC balance, wrong AC frequency, or wrong tungsten.
* Solution: Try adjusting the AC balance towards more EN. Increase the AC frequency for a more focused arc. Ensure you have a clean, slightly balled tungsten. Make sure your shielding gas flow is adequate and consistent.
Problem: Arc Won’t Penetrate Well
* Possible Cause: Not enough amperage, or AC balance is too high in EN (too much cleaning, not enough melting).
* Solution: Increase amperage. Decrease the EN percentage on your AC balance to favor electrode positive (more melting). Ensure your tungsten is in good condition and properly shaped.
Problem: Weld Puddle is Too Fluid and Hard to Control
* Possible Cause: Amperage is too high, or AC frequency is too low.
* Solution: Decrease amperage. Increase AC frequency. If welding out of position, focus on precise filler metal addition and controlling the torch angle.
Practical Tips for Success
* **Cleanliness is Paramount:** Aluminum must be meticulously clean. Use a dedicated stainless steel wire brush (never used on steel) and a degreaser to remove all oil, grease, and contaminants.
* **Preheating (Sometimes):** For thicker aluminum sections (1/4 inch and above), preheating to around 200-400°F (93-204°C) can improve fusion and reduce the risk of cracking.
* **Shielding Gas:** Use 100% Argon for aluminum TIG welding. The flow rate should typically be between 20-30 CFH, depending on your environment and nozzle size.
* **Torch Angle:** Maintain a consistent torch angle, usually around 10-15 degrees in the direction of travel.
* **Filler Rod Angle:** Hold the filler rod at a shallow angle, just touching the leading edge of the puddle.
* **Practice, Practice, Practice:** Aluminum TIG welding takes time and patience to master. Don’t get discouraged by early challenges. Keep practicing, and you’ll see improvement.
Conclusion
Mastering polarity for aluminum TIG welding is a fundamental step towards achieving strong, clean, and visually appealing welds. By understanding that AC is non-negotiable due to aluminum’s oxide layer, and by learning to control the AC balance and frequency, you gain significant power over your welding arc. Remember to select the right tungsten, maintain cleanliness, and practice consistently. With these principles in mind, you’re well on your way to becoming a proficient aluminum TIG welder. Happy welding!
