

No gas MIG welding uses flux-cored wire to create strong welds without shielding gas. This method is ideal for outdoor projects and beginners. It’s simple, portable, and effective for mild steel repairs and fabrication.
Key Takeaways
- No gas MIG welding uses flux-cored wire instead of solid wire and external gas, making it portable and wind-resistant.
- It works best on dirty or rusty metal because the flux cleans the weld area as it burns.
- You’ll need a MIG welder that supports flux-cored welding (FCAW)—most modern MIG machines do.
- Always wear proper safety gear, including a welding helmet, gloves, and flame-resistant clothing.
- Set your welder to DC electrode positive (DCEP) for optimal performance with flux-cored wire.
- Practice on scrap metal first to dial in voltage, wire speed, and technique before welding real projects.
- Clean your welds after cooling to remove slag and inspect for quality.
What Is No Gas MIG Welding?
No gas MIG welding—also known as flux-cored arc welding (FCAW) without shielding gas—is a welding process that uses a special hollow wire filled with flux. Unlike traditional MIG welding, which requires a tank of shielding gas (like argon or CO2) to protect the weld pool, this method relies on the flux inside the wire to create its own protective gas cloud when heated. This makes it perfect for outdoor use, where wind can blow away shielding gas, and for beginners who want a simpler setup.
This technique is commonly used for welding mild steel in automotive repair, farm equipment, fencing, and home DIY projects. It’s forgiving on dirty, rusty, or painted metal, which means you don’t always need to grind surfaces perfectly clean. While it produces more spatter and slag than gas-shielded MIG welding, it’s highly effective and much more convenient for many applications.
Why Choose No Gas MIG Welding?
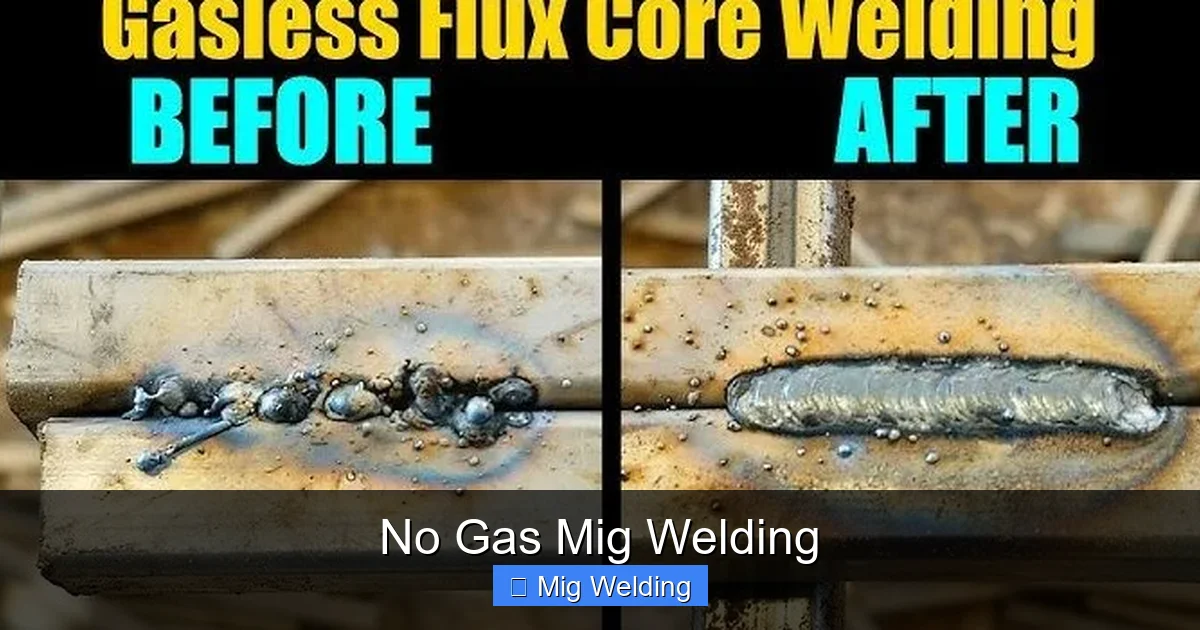
Visual guide about No Gas Mig Welding
Image source: perfectwelders.com
There are several reasons why no gas MIG welding is a popular choice:
- Portability: No gas tanks mean lighter, more mobile setups—ideal for job sites or garages with limited space.
- Wind resistance: Since there’s no external gas to blow away, you can weld outdoors even on breezy days.
- Less prep work: Flux-cored wire handles light rust, paint, and mill scale better than solid wire.
- Deep penetration: Great for thicker materials like structural steel or heavy machinery parts.
- Cost-effective: You save money on gas cylinders and regulators.
However, it’s not perfect. You’ll deal with more spatter and must chip away slag after welding. It’s also not ideal for thin metals or aluminum. But for most mild steel projects, it’s a reliable and efficient option.
Equipment You’ll Need
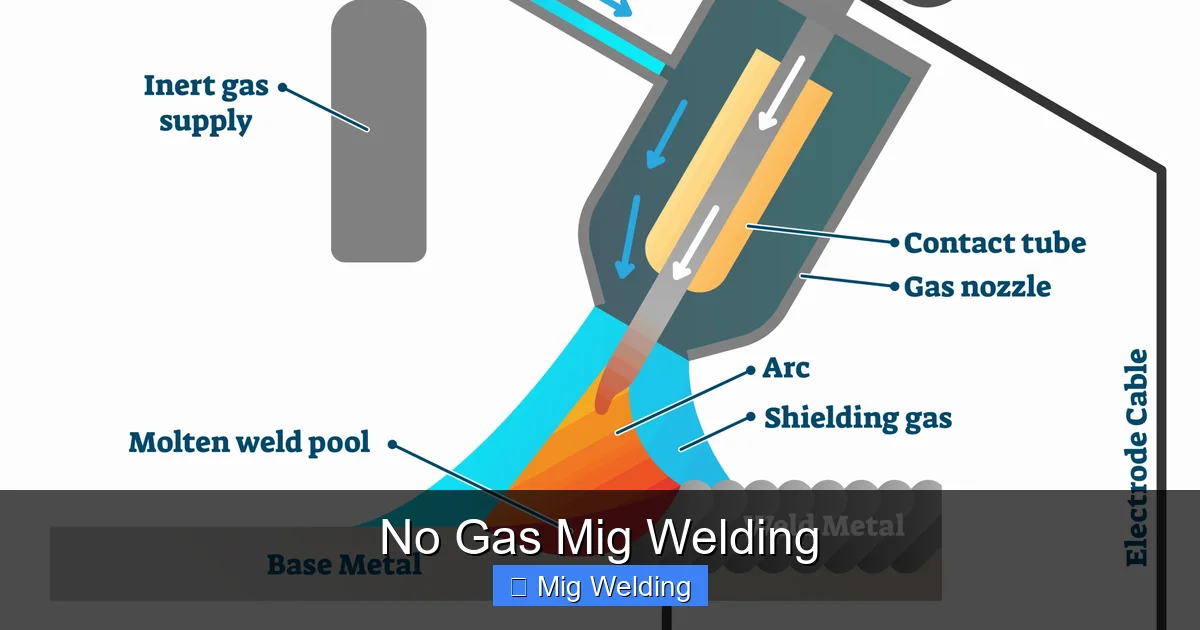
Visual guide about No Gas Mig Welding
Image source: technoxmachine.com
Before you start, make sure you have the right tools:
1. MIG Welder with Flux-Cored Capability
Most modern MIG welders can handle flux-cored wire, but check your machine’s manual. Look for models labeled “MIG/Flux-Cored” or “FCAW-ready.” Entry-level welders like the Hobart Handler 140 or Lincoln Electric Weld-Pack are great choices.
2. Flux-Cored Wire
Use E71T-GS or E71T-11 flux-cored wire (0.030″ or 0.035″ diameter) for mild steel. These are self-shielding and don’t require gas. Avoid dual-shield wires unless you plan to use gas later.
3. Welding Helmet
A auto-darkening helmet is best. It protects your eyes from UV rays and lets you see clearly before and during welding.
4. Safety Gear
Wear flame-resistant clothing (like a welding jacket), leather gloves, closed-toe shoes, and safety glasses under your helmet. Never wear synthetic fabrics—they can melt.
5. Wire Brush and Chipping Hammer
You’ll need these to clean slag off your welds after they cool.
6. Clamps and Work Table
Secure your workpiece to prevent movement. A sturdy, non-flammable surface is essential.
Setting Up Your Welder
Proper setup is key to successful no gas MIG welding.
1. Install the Flux-Cored Wire
Turn off the welder. Open the wire feeder cover and remove the spool. Insert the flux-cored wire spool (make sure it spins freely). Thread the wire through the guide tubes and into the drive roll. Use the correct groove size (usually marked on the roll). Close the feeder and tighten the tension knob—just enough to feed smoothly without crushing the wire.
2. Set Polarity to DCEP
Flux-cored welding requires DC electrode positive (DCEP). This means the welding lead (gun) is connected to the positive terminal, and the ground clamp to negative. Check your welder’s manual for polarity switch instructions.
3. Adjust Voltage and Wire Speed
Start with your welder’s recommended settings for your wire size and material thickness. For example:
- 1/8″ steel: 18–20 volts, wire speed 200–250 IPM
- 1/4″ steel: 20–22 volts, wire speed 250–300 IPM
These are starting points—fine-tune as needed.
4. Disable Gas Solenoid (If Applicable)
If your welder has a gas solenoid, make sure it’s turned off or disconnected. You don’t need gas for this process.
Preparing Your Workpiece
While flux-cored welding is forgiving, good prep improves results.
1. Clean the Surface
Remove heavy rust, paint, or grease with a wire brush, grinder, or sandpaper. Light surface rust is okay, but clean metal gives cleaner welds.
2. Fit-Up and Clamping
Ensure tight joints. Use clamps to hold pieces in place. Gaps wider than 1/16″ can cause burn-through or weak welds.
3. Position for Comfort
Weld in a flat (downhand) position when possible. It’s easier to control the puddle and reduces spatter.
How to Weld: Step-by-Step
Now it’s time to weld! Follow these steps for strong, consistent beads.
1. Put on Safety Gear
Double-check your helmet, gloves, and clothing before striking an arc.
2. Ground the Workpiece
Attach the ground clamp securely to the metal, close to the weld area. A poor ground causes erratic arcs and weak welds.
3. Hold the Gun Correctly
Hold the MIG gun at a 10–15 degree angle, pointing in the direction of travel. Keep the nozzle ½” to ¾” above the metal.
4. Start the Arc
Pull the trigger smoothly. The wire will feed and create an arc. You’ll hear a crackling sound and see a bright pool of molten metal.
5. Use the Right Travel Speed
Move the gun steadily along the joint. Too slow = burn-through. Too fast = weak, uneven welds. Aim for a consistent bead width.
6. Use a Push or Drag Technique
For flux-cored welding, drag technique (pulling the gun toward you) is best. It gives better visibility and deeper penetration.
7. Watch the Puddle
Keep the arc on the leading edge of the puddle. The molten metal should flow smoothly into the joint.
8. Finish the Weld
Release the trigger to stop the wire. The weld will cool and form a layer of slag on top.
Cleaning and Inspecting Your Weld
After the weld cools (wait at least 30 seconds), it’s time to clean up.
1. Chip Away the Slag
Use a chipping hammer to knock off the brittle slag covering the weld. Tap firmly but gently—don’t damage the weld.
2. Wire Brush the Surface
Scrub the weld with a stainless steel wire brush to remove any remaining slag and spatter.
3. Inspect for Quality
Look for:
- Even bead shape
- No cracks or holes
- Good fusion at the edges
- Minimal undercutting
If the weld looks uneven or porous, adjust your settings or technique.
Troubleshooting Common Problems
Even experienced welders run into issues. Here’s how to fix them:
Porosity (Holes in the Weld)
Caused by moisture, oil, or poor flux coverage. Clean the metal better and store wire in a dry place.
Excessive Spatter
Too high voltage or wire speed. Reduce settings slightly. Also, check wire feed tension.
Wire Not Feeding
Check for kinks, wrong drive roll, or incorrect tension. Re-thread the wire if needed.
Weak or Incomplete Fusion
Travel too fast or low voltage. Slow down and increase voltage.
Burn-Through
Too much heat on thin metal. Reduce voltage and wire speed. Use a backer bar if needed.
Safety Tips You Can’t Ignore
Welding is safe when done right—but dangerous if you cut corners.
- Always weld in a well-ventilated area. Flux fumes can be harmful—use a fume extractor or fan if indoors.
- Never look at the arc without a helmet. Even a brief glance can cause “welder’s flash.”
- Keep a fire extinguisher nearby. Sparks can ignite flammable materials.
- Let welds cool completely before touching. They can stay hot for minutes.
- Store wire in a dry, sealed container to prevent moisture absorption.
Conclusion
No gas MIG welding is a practical, beginner-friendly method for tackling mild steel projects without the hassle of gas tanks. With the right equipment, setup, and technique, you can produce strong, reliable welds—even outdoors or on less-than-perfect metal. Remember to prioritize safety, practice on scrap pieces, and clean your welds properly. Whether you’re fixing a trailer, building a fence, or repairing farm equipment, this skill will save you time and money. Start simple, stay consistent, and soon you’ll be welding like a pro—no gas required.