


Welding aluminum with a MIG welder is easier than you might think. In this guide, you’ll learn the essential steps, equipment setup, and best practices to produce strong, quality welds on aluminum. Whether you’re a beginner or looking to improve your skills, this comprehensive guide will help you get started with confidence.
Key Takeaways
- Use the right equipment: A MIG welder with spool gun capability is ideal for aluminum welding to prevent feeding issues.
- Choose the correct consumables: Use a 100% argon shielding gas and a specialized aluminum MIG wire for best results.
- Prepare your materials: Clean and remove oxidation from aluminum surfaces before welding to ensure good weld quality.
- Set proper welding parameters: Adjust voltage, wire feed speed, and shielding gas flow according to the thickness of the aluminum.
- Practice good technique: Use steady hand movements and maintain proper torch angle to produce even welds.
- Safety first: Always wear protective gear and work in a well-ventilated area when welding aluminum.
Introduction
If you’re interested in welding aluminum with a MIG welder, you’re in the right place. Aluminum is a popular metal for many projects because of its light weight, corrosion resistance, and versatility. However, welding aluminum does require some specific techniques and equipment adjustments. In this guide, you’ll learn how to set up your MIG welder, prepare your materials, and execute strong welds on aluminum. Whether you’re repairing an aluminum boat, fabricating parts, or just experimenting, this step-by-step approach will help you achieve professional results.
Understanding the Basics of MIG Welding Aluminum
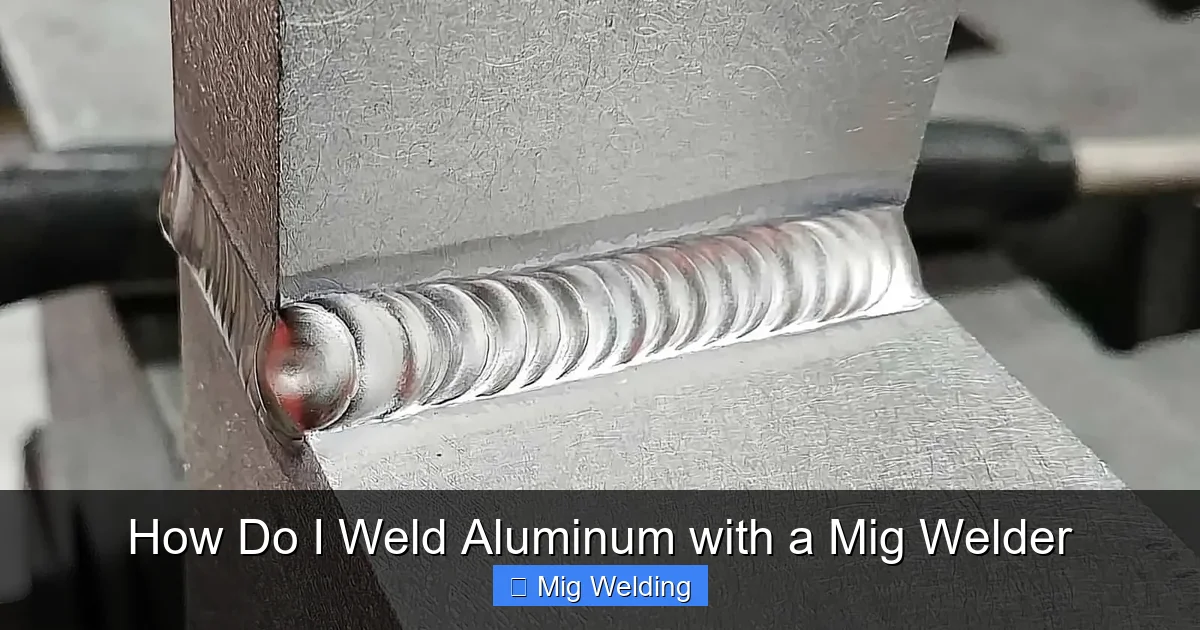
MIG welding, or Gas Metal Arc Welding (GMAW), uses a continuously fed wire electrode and a shielding gas to protect the weld from contamination. When welding aluminum, special considerations come into play due to its properties:
Visual guide about How Do I Weld Aluminum with a Mig Welder
Image source: tooliom.com
- High thermal conductivity, which disperses heat quickly
- Oxide layer that forms rapidly and must be cleaned off
- Soft and easily burn-through material, especially at high settings
Choosing the right equipment and technique is essential to produce strong, clean welds on aluminum.
Step 1: Gather the Right Equipment and Materials
1.1. MIG Welder with Spool Gun Capability
For aluminum welding, a MIG welder equipped with a spool gun is highly recommended. The spool gun feeds the soft aluminum wire more smoothly and reduces feeding jams. If you don’t have a spool gun, some welders support push-pull systems that work well too.
Visual guide about How Do I Weld Aluminum with a Mig Welder
Image source: weldguru.com
1.2. Aluminum Welding Wire
Use 100% aluminum MIG wire, typically with a diameter of 0.030″ or 0.035″. Common alloys include ER4043 and ER5356, each suited for different applications:
- ER4043: Easier to weld, good for general-purpose applications, produces a smoother bead
- ER5356: Stronger, more corrosion-resistant, but slightly more difficult to weld
1.3. Shielding Gas
Use pure argon (100%) for welding aluminum. Some setups may benefit from a mixture of argon and helium for better penetration and heat input.
1.4. Protective Gear
Wear a welding helmet with proper shade, gloves, protective clothing, and a respirator if needed. Aluminum fumes can be harmful.
Step 2: Prepare Your Aluminum Materials
2.1. Clean the Surface
Aluminum oxidizes quickly. Remove any oxidation, dirt, or grease from the surface using a stainless steel wire brush, flap disc, or chemical cleaner. Do this just before welding to prevent re-oxidation.
Visual guide about How Do I Weld Aluminum with a Mig Welder
Image source: weldguru.com
2.2. Clamp and Secure
Ensure your pieces are firmly clamped to prevent movement during welding. Proper fixturing helps produce cleaner, stronger welds.
Step 3: Set Up Your MIG Welder
3.1. Select the Right Wire and Gas
Install the appropriate aluminum wire spool and set your shielding gas to 100% argon. Double-check the wire feed settings—start with a low voltage setting and adjust as needed.
3.2. Adjust Welding Parameters
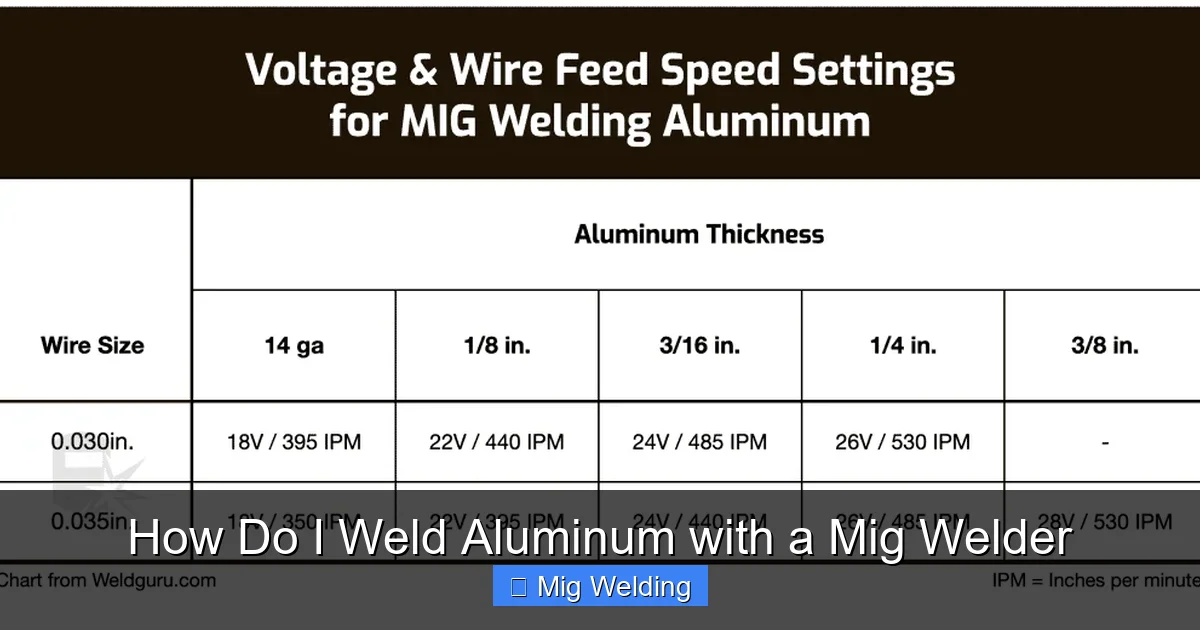
Set your wire feed speed according to the wire diameter and material thickness. Typical settings are:
- Voltage: 15-22 volts (depending on thickness)
- Wire feed: 200-400 inches per minute (ipm)
Refer to your welder’s manual or conduct test welds on scrap to fine-tune settings.
Step 4: Practice Your Technique
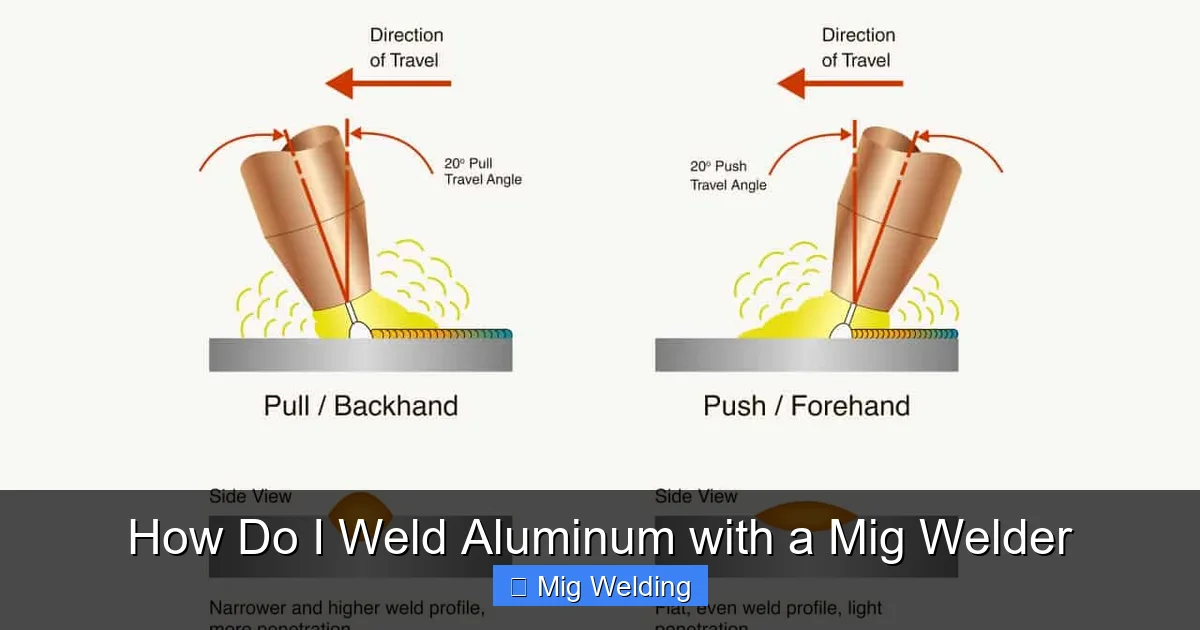
4.1. Maintain Proper Torch Angle
Hold the torch at about a 10-15 degree angle in the direction of travel. Keep a consistent distance (around 1/4 inch) from the workpiece.
4.2. Use Steady, Even Movements
Move smoothly along the joint, avoiding pauses or jerks. Practice steady hand movements on scrap pieces.
4.3. Control Heat Input
Adjust your travel speed and voltage to prevent burn-through or weak welds. Aluminum is soft and easily melts through if overheated.
Step 5: Welding Process
5.1. Tacking
Start by making small tack welds at intervals to hold the pieces in place. This prevents warping and shifts during welding.
5.2. Running the Bead
Begin welding along the joint, maintaining a steady torch angle and consistent travel speed. Keep the wire tip close to the surface without touching.
5.3. Overlap and Fill
If welding thicker material, make multiple passes or build up the weld in layers for strength.
Step 6: Finishing and Cleanup
Allow the weld to cool naturally. Remove any oxidation or discoloration with a stainless steel brush. Check the weld for defects such as porosity or cracks and address as needed.
Troubleshooting Common Issues
- Porosity in the weld: Ensure proper shielding gas coverage and clean surface thoroughly.
- Inconsistent welds: Check wire feed tension and steady movement.
- Burn-through: Lower voltage or increase travel speed.
- Weld sticking or lack of penetration: Adjust heat settings and ensure proper torch angle.
Conclusion
Welding aluminum with a MIG welder can be straightforward when you follow the right steps. Proper equipment setup, cleaning, and technique are key to achieving strong, clean welds. Practice on scrap pieces to develop your skills, and always prioritize safety. With patience and attention to detail, you’ll be able to weld aluminum confidently and successfully.
