

This guide walks you through MIG welding stainless steel with argon to achieve professional-quality results. You’ll learn the right equipment, settings, techniques, and safety tips to avoid common pitfalls and create strong, clean welds every time.
Key Takeaways
- Use the correct shielding gas: A tri-mix of argon, CO₂, and helium (e.g., 90% Ar / 7.5% He / 2.5% CO₂) prevents oxidation and improves arc stability.
- Choose the right wire: ER308L or ER316L stainless steel MIG wire matches most common stainless steels and ensures strong, corrosion-resistant welds.
- Cleanliness is critical: Remove oil, grease, and mill scale before welding to avoid contamination and porosity.
- Control heat input: Use lower voltage and wire speed to prevent warping and carbide precipitation in stainless steel.
- Maintain proper technique: Use a push angle (10–15°), steady travel speed, and consistent stick-out for smooth, even beads.
- Post-weld care matters: Clean the weld area with a stainless steel brush and consider passivation to restore corrosion resistance.
- Safety first: Wear proper PPE, ensure ventilation, and use a fume extractor when welding stainless steel.
Introduction
MIG welding stainless steel with argon might sound tricky, but with the right setup and technique, it’s totally doable—even for hobbyists. Stainless steel is popular in kitchens, automotive parts, and outdoor structures because it resists rust and looks great. But it’s also more sensitive than mild steel, so you can’t just grab your regular MIG welder and go.
In this guide, you’ll learn exactly how to MIG weld stainless steel using argon-based shielding gas. We’ll cover the equipment you need, step-by-step instructions, common mistakes to avoid, and tips for getting clean, strong welds every time. Whether you’re fixing a stainless sink or building a custom exhaust, this guide has you covered.
Why Use Argon for MIG Welding Stainless Steel?
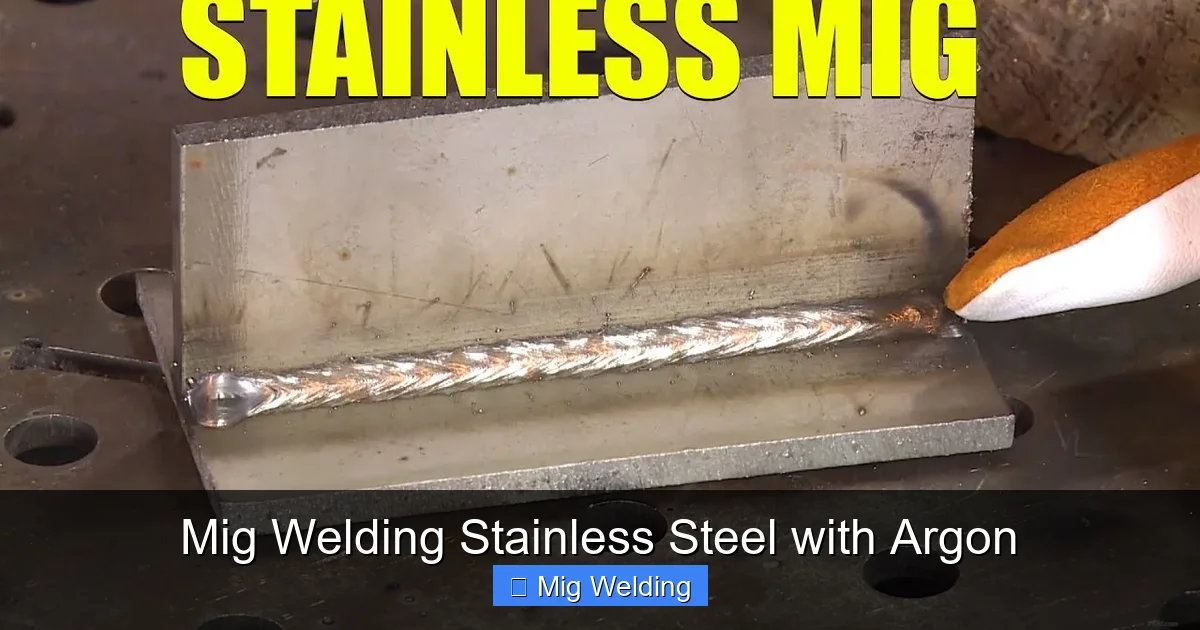
Visual guide about Mig Welding Stainless Steel with Argon
Image source: i.ytimg.com
Argon is a noble gas, which means it doesn’t react with other elements—perfect for protecting your weld pool from oxygen and nitrogen in the air. When welding stainless steel, exposure to these gases can cause oxidation, discoloration, and even weaken the metal’s corrosion resistance.
Pure argon isn’t ideal on its own because it can create an unstable arc and poor penetration. That’s why most welders use a tri-mix gas blend—typically 90% argon, 7.5% helium, and 2.5% carbon dioxide (CO₂). This mix gives you the best of all worlds:
– Argon stabilizes the arc and shields the weld.
– Helium increases heat input for better penetration.
– A small amount of CO₂ improves arc characteristics without excessive spatter.
This combination helps you achieve a smooth, consistent weld with minimal cleanup.
Equipment and Materials You’ll Need
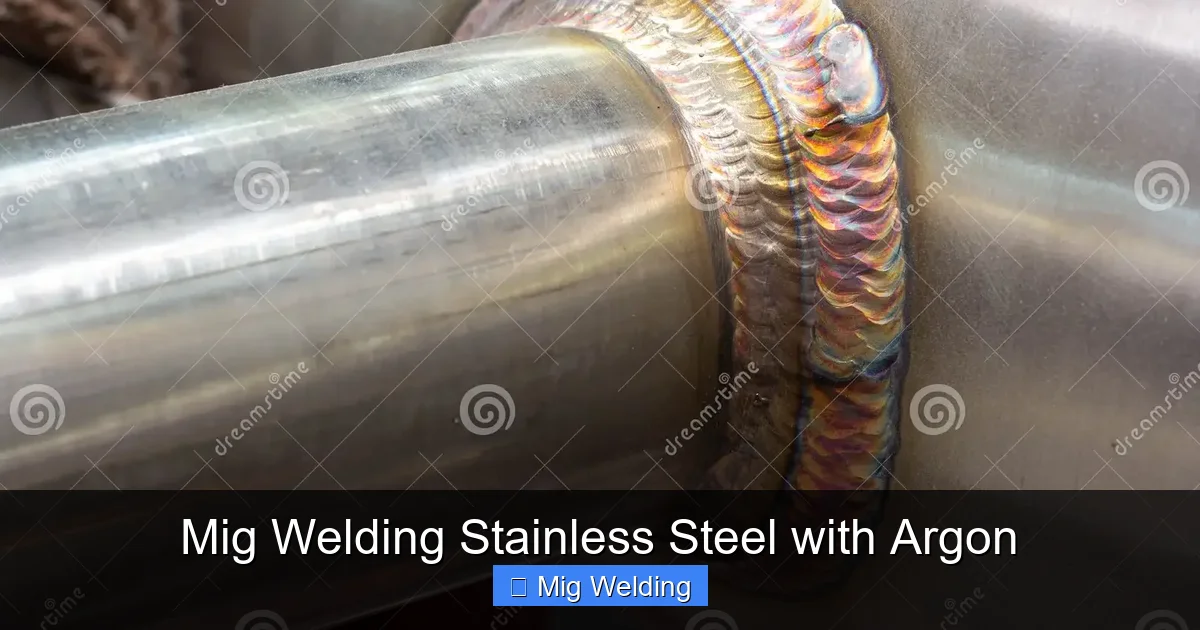
Visual guide about Mig Welding Stainless Steel with Argon
Image source: thumbs.dreamstime.com
Before you start, make sure you have the right tools. Here’s a checklist:
Welding Machine
Use a MIG welder with adjustable voltage and wire feed speed. A 110V or 220V machine works, but 220V gives more power for thicker stainless steel. Make sure it’s compatible with stainless steel wire.
MIG Wire
Choose a stainless steel MIG wire that matches your base metal:
– ER308L: Best for 304 and 304L stainless steel (most common).
– ER316L: Use for 316 and 316L stainless steel (marine or chemical environments).
Always use .030” or .035” diameter wire—larger wires can overheat thin stainless.
Shielding Gas
As mentioned, use a tri-mix gas (90% Ar / 7.5% He / 2.5% CO₂). You can find this at welding supply stores. Avoid pure CO₂—it causes too much spatter and can contaminate stainless.
Gun and Nozzle
Use a standard MIG gun, but make sure the liner is clean and compatible with stainless wire. Stainless wire is softer than steel, so a rough liner can cause feeding issues.
Cleaning Tools
You’ll need:
– Stainless steel wire brush (dedicated to stainless only—never use on mild steel!)
– Acetone or alcohol for degreasing
– Clean rags
Safety Gear
– Welding helmet with auto-darkening lens
– Flame-resistant gloves and jacket
– Safety glasses
– Fume extractor or good ventilation (stainless fumes can be harmful)
Step-by-Step Guide to MIG Welding Stainless Steel with Argon
Step 1: Prepare Your Workpiece
Cleanliness is everything with stainless steel. Any oil, grease, paint, or mill scale can cause porosity or weaken the weld.
– Wipe the joint area with acetone or alcohol.
– Use a stainless steel brush to scrub away surface contaminants.
– Avoid touching the cleaned area with bare hands—oils from your skin can contaminate the metal.
Step 2: Set Up Your Welder
Stainless steel requires lower heat than mild steel to avoid warping and carbide precipitation (which reduces corrosion resistance).
– Set your voltage between 16–20 volts (start low and adjust).
– Wire feed speed: 200–300 inches per minute (IPM) for .030” wire.
– Use DC electrode positive (DCEP) polarity—this is standard for MIG welding.
Tip: Do a test weld on a scrap piece to fine-tune your settings.
Step 3: Prepare the Joint
– Fit-up should be tight—gaps over 1/16” can cause burn-through.
– Use clamps or magnets to hold pieces in place.
– For butt joints, a slight gap (0.020”–0.040”) helps with penetration.
– Bevel thick materials (over 1/8”) at 30–45° for full penetration.
Step 4: Start Welding
– Hold the gun at a 10–15° push angle (pushing the weld pool, not dragging).
– Keep a consistent stick-out (1/2” to 3/4”)—too long causes erratic arcs.
– Use a steady, smooth travel speed. Too slow = burn-through; too fast = lack of fusion.
– Maintain a short arc length—just enough to see the puddle.
Step 5: Monitor and Adjust
Watch the weld pool:
– A shiny, fluid puddle means good gas coverage.
– If it looks dull or sparkly, you may have contamination or poor gas flow.
– Adjust voltage or wire speed if the weld is too flat (low heat) or too convex (high heat).
Step 6: Post-Weld Cleanup
– Let the weld cool naturally—don’t quench it.
– Use a stainless steel brush to remove any discoloration or oxide layer.
– For critical applications, consider passivation—a chemical treatment that restores the oxide layer and corrosion resistance.
Common Problems and Troubleshooting
Even experienced welders run into issues. Here’s how to fix the most common ones:
Porosity (Bubbles in the Weld)
Causes: Contaminated base metal, poor gas coverage, or wind.
Fix: Clean the metal thoroughly, check gas flow (15–20 CFH), and weld in a draft-free area.
Discoloration (Yellow, Blue, or Brown Hues)
Causes: Too much heat or insufficient shielding gas.
Fix: Reduce voltage, increase travel speed, and ensure full gas coverage. Use a trailing shield if needed.
Burn-Through
Causes: Too much heat or slow travel speed on thin material.
Fix: Lower voltage, increase travel speed, or use a heat sink (copper bar) behind the weld.
Poor Penetration
Causes: Low voltage, fast travel, or incorrect joint prep.
Fix: Increase voltage slightly, slow down, or bevel thick joints.
Wire Feeding Issues
Causes: Dirty liner, wrong drive rolls, or birdnesting.
Fix: Clean or replace the liner, use U-groove drive rolls for stainless wire, and check tension.
Pro Tips for Better Results
– Use a spool gun or push-pull gun for better wire feeding—stainless wire is softer and can kink in long liners.
– Preheat thick sections (above 1/4”) to 300–400°F to reduce cracking.
– Back purge with argon for critical welds (like tubing) to protect the root side.
– Keep your gas cylinder upright and secure—argon is heavier than air and can pool if leaked.
– Practice on scrap metal before welding your final project.
Conclusion
MIG welding stainless steel with argon isn’t magic—it’s just about using the right tools, settings, and techniques. By choosing the correct gas blend, wire, and cleanliness practices, you can produce strong, clean, and corrosion-resistant welds that look professional.
Remember: stainless steel is unforgiving when it comes to contamination and heat, so take your time with prep and settings. With practice, you’ll be welding stainless like a pro. Whether it’s a custom grill, motorcycle parts, or kitchen equipment, you’ve got the skills to make it last.
Now grab your gear, fire up the welder, and start building something amazing.