

Welding aluminum with a MIG welder typically requires aluminum-specific wire, but in some cases, steel wire can be used with careful technique. This guide explains when and how to attempt it, along with key precautions to avoid common pitfalls. While not ideal, this method can work for temporary fixes or non-critical joints when proper settings and prep are followed.
Key Takeaways
- Steel wire is not recommended for aluminum welding due to material incompatibility, but it can be used in emergencies with proper technique.
- Cleanliness is critical—aluminum oxidizes quickly, so thorough cleaning before welding is essential to prevent contamination.
- Use a spool gun or push-pull system to reduce birdnesting and feeding issues when using steel wire on aluminum.
- Adjust voltage and wire speed carefully—too much heat can burn through thin aluminum, while too little won’t penetrate.
- Expect weaker, less ductile welds compared to using aluminum wire, making this method suitable only for non-structural applications.
- Post-weld cleaning and inspection help identify cracks or porosity that may compromise weld integrity.
- Always prioritize safety—wear proper PPE, ensure ventilation, and use a welding helmet with appropriate shade.
Can You Really MIG Weld Aluminum with Steel Wire?
You might be wondering: *Can I use my regular steel MIG wire to weld aluminum?* The short answer is: **not really—but sometimes, in a pinch, you can make it work.**
Aluminum and steel have very different melting points, thermal conductivities, and chemical properties. Aluminum melts at around 1,220°F (660°C), while steel melts closer to 2,500°F (1,370°C). This means steel wire won’t fuse properly with aluminum base metal under normal MIG conditions. However, in emergency situations—like when you’re out of aluminum wire or working on a temporary repair—some welders have had limited success using steel wire on aluminum with careful adjustments.
This guide will walk you through the process, highlight the risks, and help you decide whether this method is right for your project. Remember: **this is not a recommended long-term solution**, but it can save the day when done correctly.
Why Steel Wire Isn’t Ideal for Aluminum
Before diving into the how-to, it’s important to understand why professionals avoid using steel wire on aluminum:
- Material Incompatibility: Steel and aluminum don’t metallurgically bond well. The weld may appear solid on the surface but lacks true fusion, leading to weak joints.
- Galvanic Corrosion: When steel and aluminum are in contact, especially in humid environments, they can create an electrochemical reaction that causes rapid corrosion.
- Thermal Expansion Differences: Aluminum expands and contracts more than steel when heated and cooled, which can cause cracking or warping over time.
- Poor Aesthetics and Strength: Welds made with steel wire on aluminum often look messy, with spatter, porosity, and lack of penetration.
That said, if you’re aware of these limitations and still want to proceed—perhaps for a quick fix on a trailer, lawn equipment, or non-load-bearing part—here’s how to do it safely.
Tools and Materials You’ll Need
To attempt MIG welding aluminum with steel wire, gather the following:
- MIG welder (preferably with adjustable voltage and wire feed speed)
- Steel MIG wire (typically ER70S-6, 0.030″ or 0.035″ diameter)
- Argon or C25 shielding gas (75% argon / 25% CO2 works in a pinch, but pure argon is better if available)
- Wire brush (stainless steel, dedicated to aluminum only)
- Acetone or aluminum cleaner
- Clamps and backing bar (to support thin aluminum)
- Welding gloves, helmet, and flame-resistant clothing
- Spool gun or push-pull system (optional but highly recommended)
Step-by-Step Guide: MIG Welding Aluminum with Steel Wire
Step 1: Clean the Aluminum Thoroughly
Aluminum forms a layer of oxide almost instantly when exposed to air. This oxide layer has a much higher melting point than the base metal and can prevent proper fusion.
- Use a stainless steel wire brush (never used on steel!) to scrub the surface until it shines.
- Wipe the area with acetone or a dedicated aluminum cleaner to remove oils, dirt, and residue.
- Work quickly—clean just before welding to minimize re-oxidation.
Step 2: Set Up Your Welder
Since steel wire behaves differently than aluminum wire, you’ll need to adjust your settings:
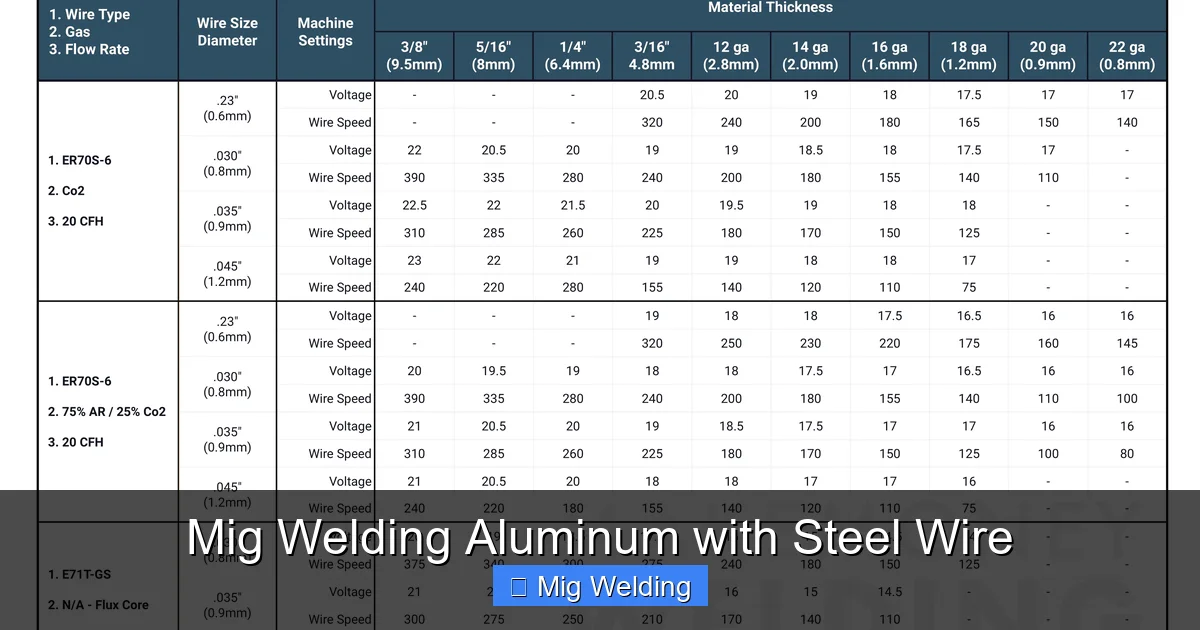
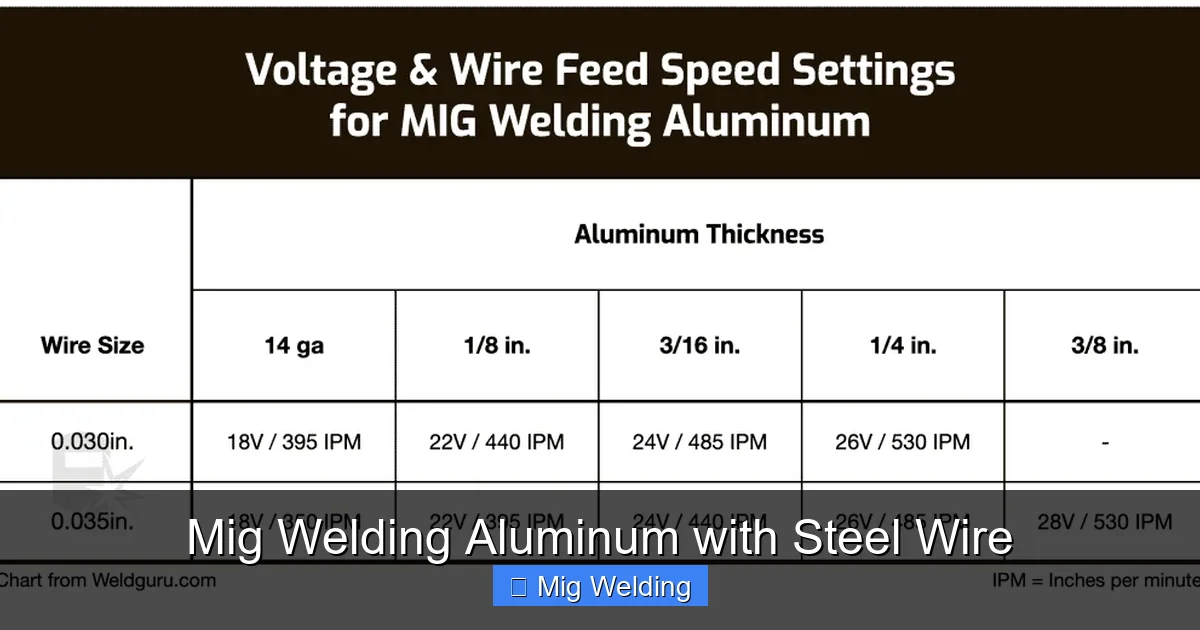
- Voltage: Start low—around 16–18 volts. Aluminum conducts heat quickly, so too much voltage can burn through.
- Wire Feed Speed: Begin at 200–250 inches per minute (IPM). You may need to increase slightly for penetration.
- Shielding Gas: Use 100% argon if possible. If you only have C25 (75/25), it can work but may increase spatter.
- Polarity: Ensure your welder is set to DCEP (direct current electrode positive), which is standard for MIG welding.
Step 3: Use the Right Technique
Your welding technique matters more than usual when using mismatched materials.
- Push the puddle: Unlike steel, where you might drag, push the gun at a 10–15 degree angle to help the shielding gas protect the molten pool.
- Travel speed: Move steadily but not too fast. Aluminum cools quickly, so slow enough to allow fusion but fast enough to avoid burn-through.
- Short arc length: Keep the contact tip close to the workpiece (about ½ inch) to maintain control and reduce spatter.
Step 4: Support Thin Aluminum
Aluminum is prone to warping and burn-through, especially in thin sheets (under 1/8 inch).
- Use a copper or aluminum backing bar behind the joint to absorb excess heat.
- Clamp the pieces firmly to prevent movement during welding.
- Consider tacking first, then welding in short segments with cooling time in between.
Step 5: Post-Weld Inspection and Cleaning
Once the weld cools:
- Inspect for cracks, porosity, or lack of fusion. These are common with steel-on-aluminum welds.
- Clean off any spatter with a wire brush or grinder.
- If the weld will be exposed to moisture, consider applying a corrosion-resistant coating or sealant.
Troubleshooting Common Issues
Porosity or Bubbles in the Weld
This usually means contamination or poor shielding gas coverage. Recheck your cleaning process and ensure your gas flow is steady (15–20 CFH). Avoid welding in drafty areas.
Visual guide about Mig Welding Aluminum with Steel Wire
Image source: makemoneywelding.com
Visual guide about Mig Welding Aluminum with Steel Wire
Image source: weldguru.com
Burn-Through or Warping
You’re using too much heat. Reduce voltage, increase travel speed, or use a heat sink (like a damp cloth or copper bar) nearby.
Wire Feeding Problems (Birdnesting)
Steel wire can be stiff and hard to feed through a standard liner. Use a Teflon or plastic liner, or better yet, a spool gun to reduce friction.
Weak or Cracked Welds
This is expected with steel-on-aluminum. The bond is mechanical, not metallurgical. Avoid using these welds for structural or safety-critical applications.
When to Avoid This Method
While this technique can work in a bind, it’s not suitable for:
- Structural components (frames, chassis, load-bearing parts)
- High-stress or dynamic applications (engine mounts, suspension parts)
- Projects requiring corrosion resistance or long-term durability
- Professional or code-compliant welding jobs
If you plan to weld aluminum regularly, invest in aluminum wire (like ER4043 or ER5356), a spool gun, and proper training. The results will be far superior.
Final Thoughts
MIG welding aluminum with steel wire is like using a screwdriver as a hammer—it might work in a pinch, but it’s not the right tool for the job. With careful preparation, adjusted settings, and realistic expectations, you can create a functional (though not ideal) weld for temporary or non-critical uses.
Always prioritize safety, cleanliness, and proper technique. And remember: when in doubt, switch to the correct materials. Your welds—and your projects—will thank you.