
MIG welding is a fast, easy-to-learn process that uses a wire electrode and shielding gas to join metals. This guide breaks down everything from setup to technique, making it ideal for DIYers and new welders.
Key Takeaways
- MIG welding stands for Metal Inert Gas welding and uses a continuous wire feed and shielding gas to create strong, clean welds.
- It’s beginner-friendly compared to other welding methods, with easier arc control and faster learning curves.
- Common gases used include argon, CO₂, or a mix—each affecting weld penetration, spatter, and finish.
- Proper setup is crucial: correct voltage, wire speed, and gas flow ensure consistent results.
- Maintenance matters: clean the gun nozzle, replace worn tips, and store wire properly to avoid issues.
- Practice on scrap metal first to master travel speed, angle, and technique before working on real projects.
- MIG welding works best on thin to medium-thick steel, stainless, and aluminum—avoid rusty or painted metals without prep.
What Is MIG Welding?
If you’re new to welding, you’ve probably heard the term “MIG welding” thrown around. But what exactly is it? MIG stands for Metal Inert Gas, though it’s now more accurately called GMAW (Gas Metal Arc Welding) by professionals. Despite the name change, most people still call it MIG welding—and for good reason. It’s one of the most popular, versatile, and beginner-friendly welding processes out there.
At its core, MIG welding uses a continuously fed wire electrode that melts as it passes through the welding gun. At the same time, a shielding gas (like argon or CO₂) flows around the weld area to protect the molten metal from contamination by oxygen and nitrogen in the air. The result? A clean, strong, and visually appealing weld with minimal cleanup.
Whether you’re fixing a car bumper, building a metal shelf, or crafting custom furniture, MIG welding can handle it—especially if you’re working with steel, stainless steel, or aluminum. It’s fast, efficient, and forgiving enough for beginners, yet powerful enough for professional use.
How MIG Welding Works: The Basics
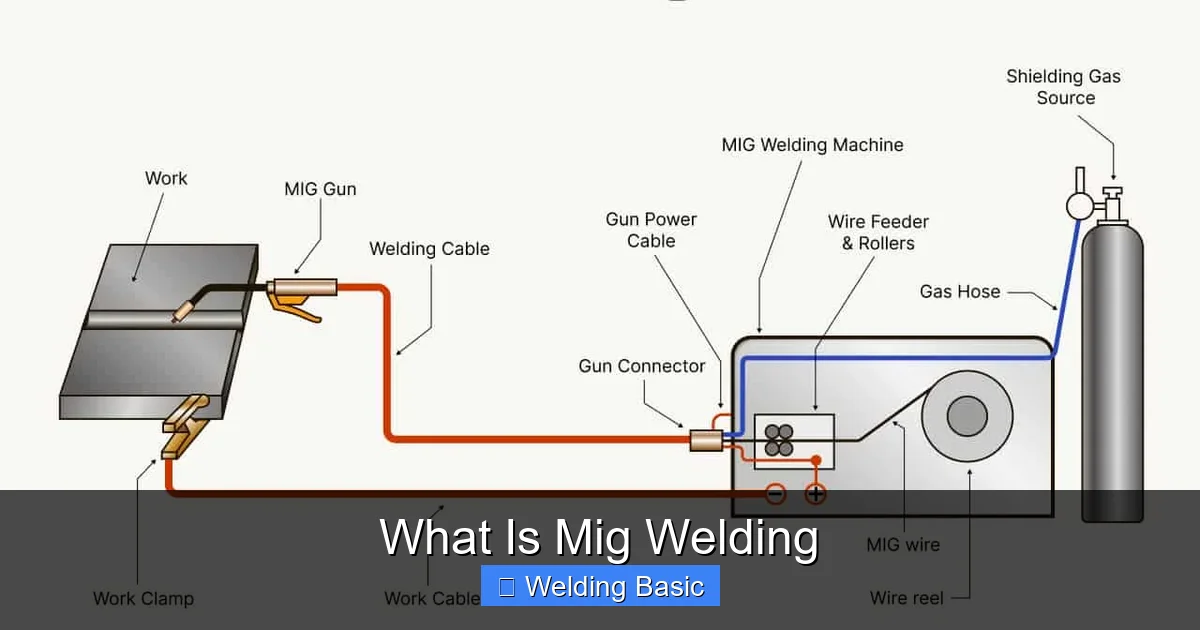
Visual guide about What Is Mig Welding
Image source: weldguru.com
Understanding how MIG welding works will help you get better results faster. Here’s a simple breakdown of the process:
The Power Source
MIG welders use a constant voltage (CV) power source. This means the voltage stays steady, and the machine automatically adjusts the current based on how fast the wire feeds. This makes it easier to control than other methods that require manual adjustments.
The Wire Electrode
A spool of solid wire (usually steel, stainless, or aluminum) feeds through a liner in the welding gun. The wire acts as both the electrode (carrying the current) and the filler metal (adding material to the joint). Common wire sizes range from 0.023″ to 0.045″, with thinner wires better for light materials and thicker ones for heavy-duty jobs.
The Shielding Gas
As the wire melts, it creates a pool of molten metal. Without protection, this pool reacts with air and becomes weak or porous. That’s where shielding gas comes in. It forms a protective “bubble” around the weld, keeping contaminants out. Common gas mixes include:
- 75% Argon / 25% CO₂ – Great for steel, low spatter, smooth welds.
- 100% CO₂ – Deeper penetration, more spatter, cheaper.
- 90% Argon / 10% CO₂ – Good for thin steel or stainless.
- Argon + Helium – Used for aluminum welding.
The Welding Gun and Ground Clamp
The gun delivers the wire and gas to the weld. It also conducts electricity to create the arc. The ground clamp connects to your workpiece, completing the electrical circuit. Both must be secure for a stable arc.
Setting Up Your MIG Welder
Visual guide about What Is Mig Welding
Image source: weldingproperty.com
Before you strike an arc, proper setup is key. Here’s how to get started:
Step 1: Choose the Right Wire and Gas
Match your wire and gas to the material you’re welding:
- Steel: Use ER70S-6 wire with 75/25 Argon/CO₂ mix.
- Stainless Steel: Use ER308L wire with tri-mix gas (Argon/CO₂/O₂) or 98% Argon/2% CO₂.
- Aluminum: Use ER4043 or ER5356 wire with 100% Argon gas.
Always check your welder’s manual for compatibility.
Step 2: Install the Wire Spool
Turn off the welder. Open the spool compartment and mount the wire spool so it unwinds smoothly. Thread the wire through the drive rolls and into the liner. Use the correct groove size on the drive rolls (match the wire diameter).
Step 3: Set Voltage and Wire Speed
Most MIG welders have a chart inside the door showing recommended settings based on material thickness and wire size. Start with those values. For example:
- 18-gauge steel (0.047″) → 16–18 volts, 150–180 IPM (inches per minute).
- 1/4″ steel → 20–22 volts, 250–300 IPM.
Adjust slightly based on sound and bead appearance.
Step 4: Connect the Gas Cylinder
Attach the regulator to your gas cylinder and connect the hose to the welder. Open the valve slowly and check for leaks with soapy water. Set the flow rate to 20–25 CFH (cubic feet per hour).
Step 5: Ground the Workpiece
Clamp the ground lead to a clean, unpainted spot on your metal. A poor ground causes erratic arcs and weak welds.
How to MIG Weld: Step-by-Step Technique
Now that your machine is set up, it’s time to weld. Follow these steps for consistent, strong welds:
Step 1: Prepare the Metal
Clean the surfaces with a wire brush or grinder. Remove rust, paint, oil, or grease. Even small contaminants can cause porosity or weak welds.
Step 2: Position the Gun
Hold the gun at a 10–15 degree angle to the workpiece. Keep the nozzle ½ to ¾ inch away from the metal. Use a steady, relaxed grip.
Step 3: Start the Arc
Press the trigger. The wire will feed, strike an arc, and begin melting. You’ll hear a steady “frying” sound—this means you’re in the sweet spot.
Step 4: Move at the Right Speed
Push or pull the gun along the joint at a steady pace. Too slow = burn-through. Too fast = weak, narrow welds. Aim for a bead that’s slightly convex and evenly spaced.
Step 5: Finish and Inspect
Release the trigger to stop the wire. Let the weld cool, then inspect it. A good MIG weld should be smooth, consistent, and free of holes or cracks.
Practical Tips for Better MIG Welds
Want to improve your results? Try these pro tips:
- Use a drag (pull) technique for deeper penetration—especially on thicker materials.
- Keep the gun nozzle clean—spatter buildup can block gas flow.
- Store wire in a dry place—moisture causes porosity.
- Practice on scrap metal—experiment with settings before welding real parts.
- Weld in a draft-free area—wind blows away shielding gas.
Troubleshooting Common MIG Welding Problems
Even experienced welders run into issues. Here’s how to fix the most common ones:
Porosity (Holes in the Weld)
Cause: Contaminated metal, low gas flow, or wind.
Fix: Clean the metal, check gas connections, and weld indoors or use a windscreen.
Excessive Spatter
Cause: Too high voltage, incorrect wire speed, or dirty metal.
Fix: Reduce voltage slightly, increase wire speed, or clean the surface.
Wire Doesn’t Feed
Cause: Tangled spool, wrong drive roll, or clogged liner.
Fix: Check spool tension, replace drive rolls, or clean the liner.
Weak or Inconsistent Welds
Cause: Poor ground, incorrect settings, or wrong gas.
Fix: Clean the ground clamp contact, double-check settings, and verify gas type.
Conclusion
MIG welding is a powerful, accessible, and versatile process that’s perfect for beginners and pros alike. With the right setup, technique, and a little practice, you can create strong, clean welds on a wide range of materials. Whether you’re repairing, building, or creating, MIG welding gives you the tools to get the job done fast and right. So grab your welder, fire up the gas, and start welding with confidence!