
Ultrasonic welding uses high-frequency vibrations to join materials without heat or adhesives. This guide explains the science, process, and practical tips for effective ultrasonic welding.
Key Takeaways
- Ultrasonic welding uses sound waves: High-frequency vibrations create friction and heat at the joint interface to fuse materials.
- No external heat or fasteners needed: It’s a clean, fast, and energy-efficient method ideal for plastics and some metals.
- Three main components: The ultrasonic stack includes a transducer, booster, and sonotrode (horn) that deliver vibrations.
- Works best on thermoplastics: Materials like ABS, polycarbonate, and nylon are commonly welded this way.
- Precise control is essential: Parameters like amplitude, pressure, and time must be optimized for strong, consistent welds.
- Common in automotive and medical fields: Used for dashboards, filters, IV sets, and sealed electronic housings.
- Maintenance matters: Regular cleaning and calibration ensure long-term performance and weld quality.
Introduction: What Is Ultrasonic Welding?
If you’ve ever wondered how plastic parts in your car, medical devices, or consumer electronics are joined so neatly and strongly—without glue, screws, or visible seams—you’re likely looking at the work of ultrasonic welding. This advanced joining technique uses high-frequency sound waves to create a solid bond between materials, especially thermoplastics.
In this guide, you’ll learn exactly how ultrasonic welding works, from the science behind it to the step-by-step process used in factories and workshops. Whether you’re a student, engineer, technician, or DIY enthusiast, understanding this method will help you appreciate its speed, precision, and efficiency. We’ll also cover practical tips, common applications, and troubleshooting advice to help you get the best results.
The Science Behind Ultrasonic Welding
Visual guide about How Does Ultrasonic Welding Work
Image source: theweldingmaster.com
At its core, ultrasonic welding relies on mechanical vibrations to generate heat through friction. Here’s how it works in simple terms:
When high-frequency sound waves (typically between 15 kHz and 70 kHz) are applied to two plastic parts under pressure, the vibrations cause the molecules at the contact surface to move rapidly. This movement creates friction, which produces localized heat. As the material reaches its melting point, the two surfaces soften and fuse together. Once the vibrations stop and the material cools under pressure, a strong, permanent bond forms.
This process happens in milliseconds to a few seconds, making it one of the fastest welding methods available. Importantly, the heat is generated only at the joint interface—not throughout the entire part—so surrounding areas remain cool and undamaged.
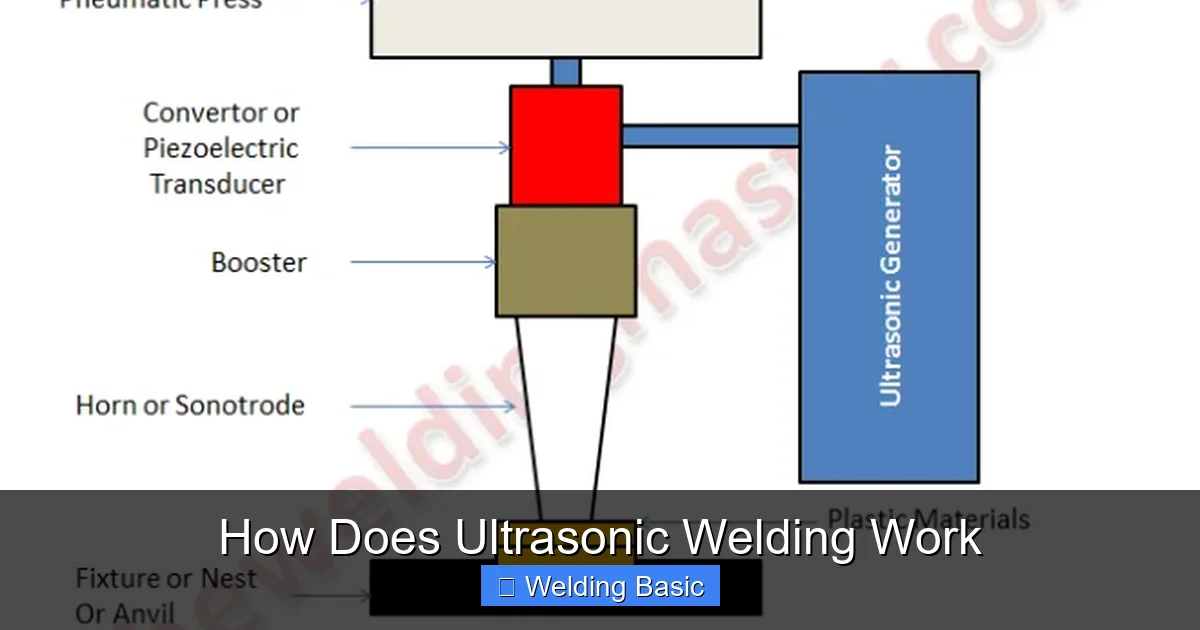
Key Components of an Ultrasonic Welding System
Visual guide about How Does Ultrasonic Welding Work
Image source: electricalworkbook.com
To understand how ultrasonic welding works, it helps to know the main parts of the system. Think of it like a chain: energy flows from one component to the next, each playing a vital role.
1. Power Supply (Ultrasonic Generator)
This converts standard electrical power (usually 120V or 240V AC) into high-frequency electrical energy. The generator produces the precise frequency needed—most commonly 20 kHz—for the welding process.
2. Transducer (Converter)
The transducer takes the high-frequency electrical signal and converts it into mechanical vibrations using piezoelectric crystals. When electricity is applied, these crystals expand and contract rapidly, creating the ultrasonic vibrations.
3. Booster
The booster is a metal component that amplifies the vibration amplitude. It also helps match the impedance between the transducer and the sonotrode, ensuring efficient energy transfer. Boosters come in different gain ratios (e.g., 1:1, 1:1.5, 1:2) depending on the application.
4. Sonotrode (Horn)
This is the part that directly contacts the workpiece. Made from titanium or hardened steel, the sonotrode transfers the vibrations to the plastic parts. Its shape is custom-designed to focus energy on the weld area and ensure even distribution.
5. Anvil (Support Fixture)
The anvil holds the parts in place during welding. It must be rigid and precisely aligned to support the joint and prevent movement. Custom fixtures are often used to match the part geometry.
6. Pneumatic or Servo Press
This applies consistent downward pressure during the weld. Modern systems use servo-driven actuators for precise control over force and position, improving repeatability and quality.
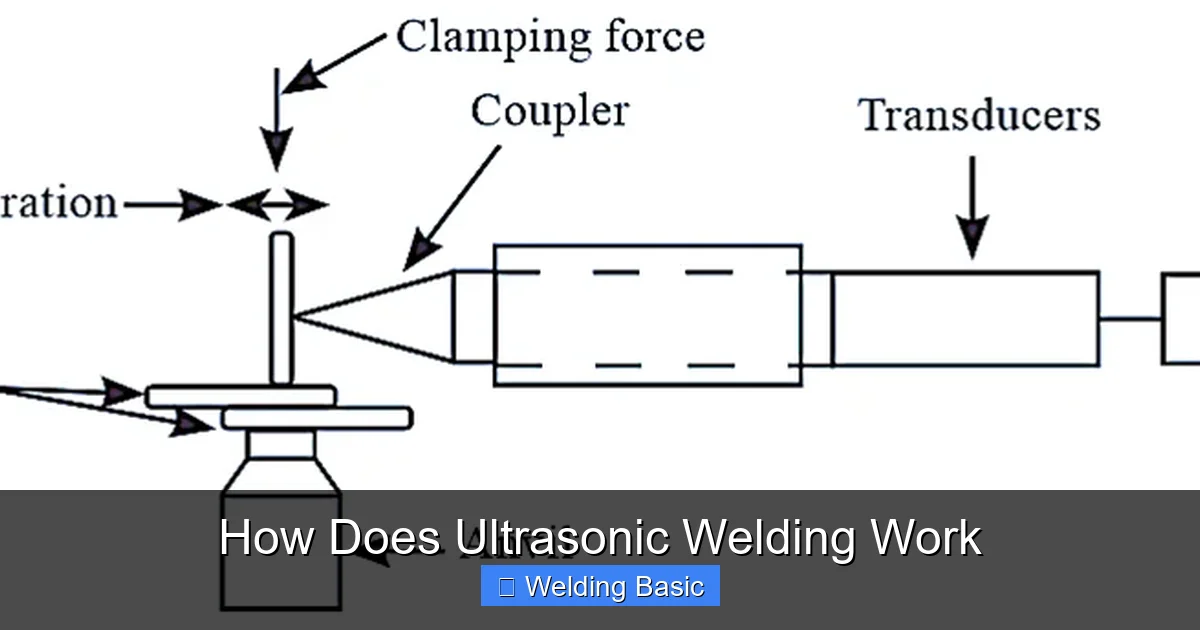
Step-by-Step: How Ultrasonic Welding Works
Now that you know the components, let’s walk through the welding process step by step.
Step 1: Part Placement
The two plastic parts are placed together in the fixture (anvil), with the joint area aligned under the sonotrode. Proper alignment is critical—misaligned parts can lead to weak or incomplete welds.
Step 2: Application of Pressure
The sonotrode lowers and applies a controlled force to clamp the parts together. This pressure ensures good contact and helps contain the molten material during welding.
Step 3: Ultrasonic Vibration
The generator sends high-frequency electricity to the transducer, which converts it into mechanical vibrations. These vibrations travel through the booster and into the sonotrode, which then vibrates against the top part.
Step 4: Heat Generation and Melting
The vibrations create friction at the interface of the two parts, generating heat. Within seconds, the plastic melts and flows slightly, allowing the materials to intermix.
Step 5: Hold Time (Cooling Under Pressure)
Once the vibrations stop, the sonotrode remains in place, applying pressure while the molten plastic cools and solidifies. This “hold time” is crucial—it prevents the parts from separating before the bond sets.
Step 6: Release and Ejection
After cooling, the sonotrode retracts, and the welded part is removed from the fixture. The entire cycle typically takes 0.5 to 3 seconds, depending on material and part size.
Materials Suitable for Ultrasonic Welding
Ultrasonic welding is most effective on thermoplastics—plastics that soften when heated and harden when cooled. Common examples include:
- ABS (Acrylonitrile Butadiene Styrene)
- Polycarbonate (PC)
- Acrylic (PMMA)
- Nylon (PA)
- Polypropylene (PP)
- Polyethylene (PE)
- Polystyrene (PS)
These materials respond well to the rapid heating and cooling cycle. However, materials with high moisture content or fillers (like glass or carbon fiber) may require adjustments in welding parameters.
While ultrasonic welding is primarily used for plastics, it can also join certain thin metals—such as aluminum, copper, and nickel—especially in battery tabs or wire splicing. However, metal welding requires higher frequencies and more precise control.
Advantages of Ultrasonic Welding
Why choose ultrasonic welding over other methods? Here are the key benefits:
- Speed: Welds in seconds, ideal for high-volume production.
- Clean process: No adhesives, solvents, or consumables needed.
- Energy efficient: Uses less power than traditional heating methods.
- Precise and repeatable: Automated systems ensure consistent results.
- Aesthetic finish: No visible marks or damage to surrounding areas.
- Strong bonds: Creates molecular-level fusion for durable joints.
Common Applications
Ultrasonic welding is used across many industries:
- Automotive: Dashboard assemblies, door panels, fluid reservoirs, and sensors.
- Medical: IV sets, filters, surgical masks, and diagnostic cartridges.
- Electronics: Sealed housings, connectors, and battery packs.
- Consumer goods: Toys, appliances, and packaging.
- Textiles: Welding non-woven fabrics for hygiene products.
Its ability to create airtight, watertight, and strong seals makes it ideal for critical applications.
Practical Tips for Successful Welding
To get the best results, keep these tips in mind:
- Design for welding: Use energy directors (small triangular ridges) on one part to focus heat at the joint.
- Match material compatibility: Similar plastics weld best; dissimilar materials may require testing.
- Optimize parameters: Adjust amplitude, pressure, time, and hold duration based on material thickness and part size.
- Use proper fixtures: Custom anvils prevent part movement and ensure even pressure.
- Maintain equipment: Clean the sonotrode regularly and check for wear or cracks.
- Test and validate: Perform peel or shear tests to confirm weld strength.
Troubleshooting Common Issues
Even with the best setup, problems can occur. Here’s how to fix common issues:
- Weak or incomplete welds: Increase amplitude or weld time; check for poor part fit or contamination.
- Part surface damage: Reduce amplitude or pressure; ensure the sonotrode is clean and properly shaped.
- Excessive flash (melted material squeeze-out): Decrease energy or use a shorter weld time.
- Inconsistent results: Calibrate the machine; verify fixture alignment and material consistency.
- Sonotrode overheating: Check for excessive duty cycle or poor coupling; allow cooling between cycles.
Conclusion
Ultrasonic welding is a powerful, efficient, and clean method for joining plastic parts. By using high-frequency vibrations to generate localized heat, it creates strong, precise bonds without the need for adhesives or external heat sources. From medical devices to car interiors, this technology plays a vital role in modern manufacturing.
Understanding how ultrasonic welding works—from the components involved to the step-by-step process—helps you appreciate its advantages and apply it effectively. With proper setup, material selection, and parameter control, you can achieve reliable, high-quality welds every time.
Whether you’re designing parts, operating a machine, or simply curious about how things are made, ultrasonic welding is a fascinating and practical process worth knowing.