

This guide compares MIG vs Flux Core welding, helping you choose the right technique for your needs. You’ll learn setup steps, pros and cons, and practical tips to weld like a pro.
Key Takeaways
- MIG welding uses a shielding gas and solid wire, making it ideal for clean, indoor projects on thin to medium metals.
- Flux Core welding uses a self-shielding wire with flux inside, allowing it to work outdoors and on rusty or dirty metal without gas.
- MIG offers cleaner welds with less spatter, while Flux Core is more portable and forgiving in windy conditions.
- Both processes use similar equipment, but Flux Core can be used with or without gas, offering more flexibility.
- Beginners often start with MIG for its ease of use, while Flux Core is great for heavy-duty or outdoor repairs.
- Choose MIG for precision and appearance; choose Flux Core for speed, portability, and tough conditions.
- Always wear proper safety gear—welding helmet, gloves, and protective clothing—no matter which method you use.
Introduction: MIG vs Flux Core Welding – What’s the Difference?
So, you’re ready to start welding, but you’re stuck choosing between MIG and Flux Core? You’re not alone. These two popular welding methods look similar but work in very different ways. Understanding the MIG vs Flux Core welding debate is key to picking the right tool for your project.
In this guide, you’ll learn how each process works, when to use one over the other, and how to set up your machine for success. Whether you’re fixing a fence, building a car part, or tackling a DIY project, this guide will help you weld with confidence.
What Is MIG Welding?
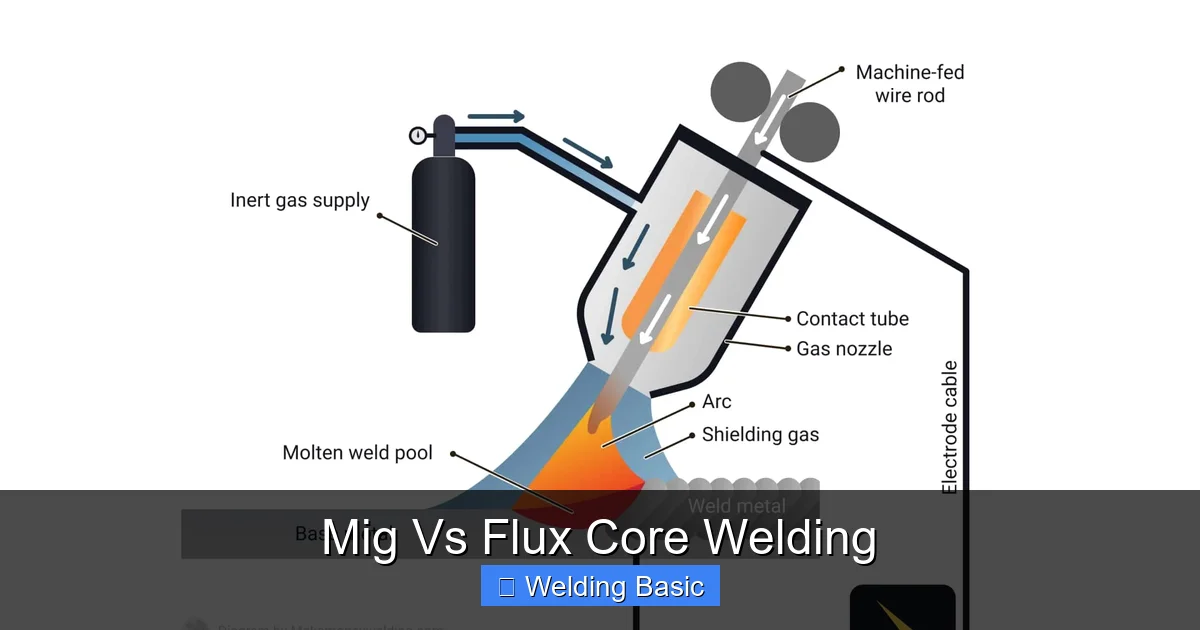
MIG stands for Metal Inert Gas welding, though it’s technically called Gas Metal Arc Welding (GMAW). It uses a continuous solid wire electrode fed through a welding gun. At the same time, a shielding gas—usually a mix of argon and CO₂—flows out to protect the weld pool from contaminants in the air.
Visual guide about Mig Vs Flux Core Welding
Image source: makemoneywelding.com
How MIG Welding Works
When you pull the trigger on the MIG gun, the wire feeds automatically, electricity flows, and an arc forms between the wire and the metal. The heat melts both the wire and the base metal, creating a strong bond. The shielding gas keeps oxygen and nitrogen out, so the weld stays clean and strong.
Best Uses for MIG Welding
- Automotive repair and fabrication
- Home DIY projects (shelving, furniture)
- Thin to medium-thickness steel and aluminum
- Indoor welding where wind won’t blow away the gas
MIG is known for producing smooth, clean welds with minimal cleanup. It’s great for beginners because it’s easy to control and learn.
What Is Flux Core Welding?
Flux Core welding, or Flux-Cored Arc Welding (FCAW), also uses a continuous wire feed, but the wire is hollow and filled with flux. This flux creates its own shielding gas when heated, so you don’t always need an external gas supply.
Visual guide about Mig Vs Flux Core Welding
Image source: makemoneywelding.com
How Flux Core Welding Works
When the arc forms, the flux inside the wire melts and releases gases that protect the weld pool. It also forms a slag layer that covers the weld as it cools. This slag must be chipped off after welding, but it helps stabilize the arc and protects the weld from contamination.
Best Uses for Flux Core Welding
- Outdoor welding (wind doesn’t affect the flux shielding)
- Rusty, dirty, or painted metal
- Thick materials like structural steel
- Farm equipment repair, trailers, and fences
Flux Core is tougher and more forgiving in rough conditions. It’s a favorite for field repairs and heavy-duty work.
MIG vs Flux Core: Side-by-Side Comparison
Let’s break down the key differences to help you decide which method fits your needs.
Shielding Method
MIG requires an external gas cylinder (usually argon/CO₂ mix). Without gas, the weld will be porous and weak.
Flux Core uses flux inside the wire to generate its own shielding gas. Some setups can also use external gas (called dual shield), but it’s not required.
Portability
Flux Core wins here. No gas tank means you can weld anywhere—no need to haul a heavy cylinder. This makes it ideal for remote job sites or backyard projects.
MIG is less portable due to the gas tank and hose. Great for a fixed workshop, but a hassle on the go.
Weld Quality and Appearance
MIG produces cleaner, smoother welds with less spatter. The finished look is more professional, making it better for visible projects.
Flux Core tends to have more spatter and requires slag cleanup. The welds are strong but rougher in appearance.
Material and Thickness
MIG works best on thinner metals (18-gauge and up). It’s precise but can burn through very thin sheets if you’re not careful.
Flux Core handles thicker materials better and can penetrate deeper. It’s also more forgiving on dirty or rusty metal.
Ease of Use for Beginners
MIG is generally easier to learn. The process is more stable, and there’s no slag to chip off. Most beginners start with MIG for this reason.
Flux Core has a steeper learning curve due to spatter and slag, but it’s still manageable with practice.
How to Set Up for MIG Welding
Ready to try MIG? Follow these steps for a smooth start.
Step 1: Gather Your Equipment
- MIG welder
- Gas cylinder (argon/CO₂ mix)
- Solid MIG wire (typically ER70S-6 for steel)
- Welding helmet, gloves, and protective clothing
- Wire brush or grinder for cleaning metal
Step 2: Prepare the Metal
Clean the surface with a wire brush or grinder. Remove rust, paint, or oil. MIG needs clean metal for a strong weld.
Step 3: Load the Wire and Connect Gas
Feed the wire through the liner and into the drive roll. Set the tension correctly—too tight can deform the wire; too loose causes feeding issues. Connect the gas hose and open the valve slowly.
Step 4: Adjust Settings
Set voltage and wire speed based on your material thickness. Most machines have a chart inside the door. Start low and increase until the arc sounds smooth and steady.
Step 5: Test and Weld
Do a test weld on scrap metal. Look for a consistent bead with minimal spatter. Adjust as needed, then begin your project.
How to Set Up for Flux Core Welding
Flux Core is a bit different, but just as effective when set up right.
Step 1: Choose the Right Wire
Use a flux-cored wire (E71T-1 or similar). Make sure it’s rated for the metal you’re welding.
Step 2: Load the Wire
Feed the wire into the machine just like MIG, but reverse the polarity. Flux Core uses DC electrode negative (DCEN), while MIG uses DC electrode positive (DCEP). Check your machine’s manual to switch the cables.
Step 3: No Gas Needed (Usually)
Unless you’re using dual shield, you don’t need a gas tank. Just make sure the gas solenoid is off or disconnected.
Step 4: Adjust Voltage and Wire Speed
Start with the recommended settings for your wire and material. Flux Core runs hotter, so you may need slightly higher voltage than MIG.
Step 5: Weld and Clean
Weld as usual, but expect more spatter. After welding, use a chipping hammer and wire brush to remove the slag. The weld will look rough at first, but it’s strong underneath.
Tips for Better Welds
No matter which method you use, these tips will improve your results:
- Keep your gun at a 10–15 degree angle and push (not pull) the weld puddle for better visibility and penetration.
- Maintain a steady travel speed—too slow causes burn-through; too fast gives weak fusion.
- Use a consistent stick-out (the length of wire sticking out of the gun). About ½ inch is ideal.
- Practice on scrap metal before starting your real project.
- Store wire properly—keep it dry and sealed to prevent rust or moisture damage.
Troubleshooting Common Issues
Even pros run into problems. Here’s how to fix the most common ones.
Porosity (Holes in the Weld)
MIG: Usually caused by dirty metal or low gas flow. Clean the metal and check for leaks in the gas line.
Flux Core: Can happen if the flux is contaminated or the arc is too long. Shorten your arc and use fresh wire.
Excessive Spatter
This is common with Flux Core. Reduce voltage slightly or increase wire feed speed. Also, make sure your ground clamp is secure.
Wire Feeding Problems
If the wire won’t feed or jams, check for kinks, dirty drive rolls, or incorrect tension. Clean the liner and replace worn parts.
Weak or Incomplete Fusion
You’re likely moving too fast or using too low voltage. Slow down and increase power. Also, ensure proper joint fit-up.
Which Should You Choose?
So, MIG or Flux Core? Here’s a quick decision guide:
- Choose MIG if: You’re welding indoors, working with clean metal, want clean welds, and don’t mind the gas tank.
- Choose Flux Core if: You’re outdoors, dealing with rust or thick metal, need portability, or don’t want to manage gas.
Many welders own machines that can do both—just switch the wire and polarity. This gives you the best of both worlds.
Conclusion: Mastering MIG vs Flux Core Welding
Both MIG and Flux Core welding have their place in your workshop. MIG vs Flux Core welding isn’t about which is better—it’s about which is right for the job. MIG offers precision and cleanliness, while Flux Core delivers power and portability.
Start with the method that matches your project and environment. Practice regularly, follow safety rules, and don’t be afraid to experiment. With time, you’ll develop the skills to handle any welding challenge—whether it’s a sleek automotive repair or a rugged outdoor fix.
Now grab your helmet, fire up your welder, and start building something amazing.