

Stick welding, also known as Shielded Metal Arc Welding (SMAW), is a versatile and widely used method for joining metals. This guide explains how it works, the equipment needed, step-by-step techniques, and common troubleshooting tips to help you get started safely and effectively.
Key Takeaways
- Stick welding uses an electric arc to melt metal and a flux-coated electrode to create a strong bond.
- It works on dirty or rusty metal, making it ideal for outdoor and industrial use.
- You need basic equipment: a welding machine, electrodes, clamps, and safety gear.
- Proper electrode angle and travel speed are crucial for clean, strong welds.
- Practice and consistency improve weld quality and control over time.
- Common issues like porosity or sticking can be fixed with technique and setup adjustments.
- Safety is essential—always wear protective gear and work in a ventilated area.
What Is Stick Welding and How Does It Work?
Stick welding, officially known as Shielded Metal Arc Welding (SMAW), is one of the oldest and most reliable welding methods. It’s called “stick” because it uses a solid metal rod, or electrode, that looks like a stick. This process creates an electric arc between the electrode and the metal you’re welding. The arc generates intense heat—over 6,000°F—which melts both the electrode and the base metal, fusing them together.
What makes stick welding unique is the flux coating on the electrode. As the electrode melts, the flux turns into gas and forms a protective shield around the weld pool. This shield keeps oxygen and other contaminants out, preventing weak or porous welds. Once the weld cools, the flux leaves behind a slag layer that can be chipped off.
Stick welding is popular because it’s simple, portable, and works well in tough conditions. You can use it on dirty, rusty, or painted metal, and it doesn’t require external gas tanks. That’s why it’s a favorite for construction, repair work, and field welding.
Essential Equipment for Stick Welding
Before you start, you’ll need the right tools. Here’s a breakdown of the basic equipment:
Welding Machine (Stick Welder)
This is the power source. It converts electricity into the right current for welding. Most home and workshop welders use 110V or 220V outlets. Look for a machine with adjustable amperage so you can match it to your electrode and metal thickness.
Electrodes (Rods)
These come in different types, such as 6010, 6011, 6013, 7018, and 7024. Each type has specific uses:
- 6010: Deep penetration, great for root passes and dirty metal.
- 6011: Similar to 6010 but works on AC or DC power.
- 6013: Easy to use, good for thin metal and beginners.
- 7018: Strong, low-hydrogen electrode for structural welding.
Choose the right electrode based on your project and metal type.
Ground Clamp
This clamps onto your workpiece and completes the electrical circuit. A strong, clean connection is essential for a stable arc.
Electrode Holder
This tool holds the electrode securely while you weld. It should feel comfortable in your hand and have a good grip.
Safety Gear
Never skip safety:
- Welding helmet with auto-darkening lens
- Flame-resistant gloves and jacket
- Welding boots and long sleeves
- Respirator or ventilation to avoid fumes
Step-by-Step: How to Stick Weld
Now that you have your gear, let’s walk through the process.
Step 1: Prepare Your Work Area
Clear the space of flammable materials. Make sure your workpiece is secure—use clamps or a vise. Clean the metal surface as much as possible. While stick welding tolerates some rust or paint, removing loose debris helps create a stronger weld.
Step 2: Set Up the Welder
Plug in your machine and set the amperage. A general rule: use about 30–40 amps per 1/32 inch of electrode diameter. For example, a 1/8-inch (3.2mm) electrode needs 90–130 amps. Check your electrode packaging for exact recommendations.
Choose DC or AC power:
- DC+ (electrode positive): Better penetration, smoother arc.
- DC- (electrode negative): Less penetration, cooler weld.
- AC: Used for certain metals like aluminum or when using 6011 rods.
Most beginners start with DC+.
Step 3: Insert the Electrode
Open the electrode holder and insert the rod. Make sure it’s tight and straight. Wear gloves to avoid burns.
Step 4: Strike the Arc
There are two ways to start the arc:
- Scratch start: Gently scratch the electrode on the metal like a match.
- Tap start: Tap the electrode down quickly and lift slightly.
Once the arc starts, hold the electrode about 1/8 to 1/4 inch above the metal. If it sticks, twist the holder gently to free it.
Step 5: Maintain the Arc and Weld
Keep a steady arc length—about the same as the electrode diameter. Move the electrode in a straight line or use a slight side-to-side motion for wider beads. The key is consistency:
- Too fast: Weak, narrow weld.
- Too slow: Excess buildup, possible burn-through.
Aim for a smooth, even bead with good fusion on both sides.
Step 6: Finish and Clean
When done, break the arc by quickly lifting the electrode. Let the weld cool, then use a wire brush or chipping hammer to remove the slag. Inspect the weld for cracks, holes, or unevenness.
Tips for Better Stick Welds
Even small adjustments can improve your results:
- Practice on scrap metal before working on real projects.
- Keep your hands steady—use your body for support, not just your arms.
- Adjust amperage if the arc is too loud (too hot) or too quiet (too cold).
- Use the right angle: Hold the electrode at 15–20 degrees from vertical, pointing in the direction of travel.
- Watch the puddle: A shiny, fluid pool means good heat. A dull, bubbling pool may mean contamination.
Troubleshooting Common Stick Welding Problems
Even experienced welders run into issues. Here’s how to fix the most common ones:
Problem: Electrode Sticks to the Metal
This happens when the arc is too short or the amperage is too low. Solution: Increase amperage slightly and keep the electrode 1/8 inch above the metal. If it sticks, twist the holder to break it free—don’t pull straight out.
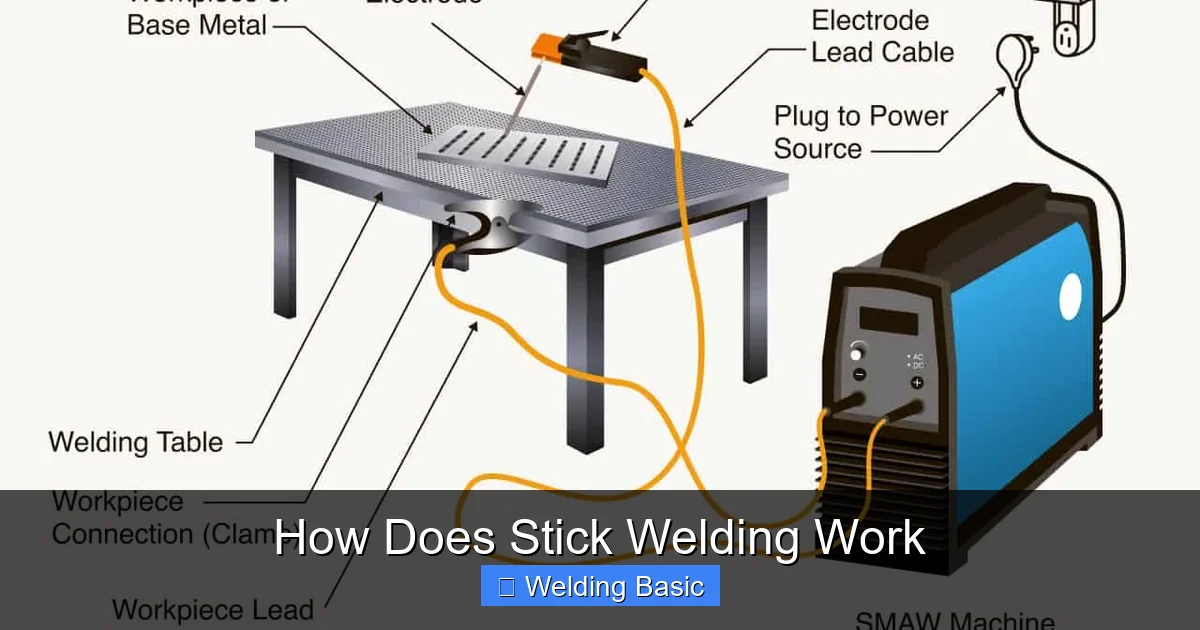
Visual guide about How Does Stick Welding Work
Image source: weldguru.com
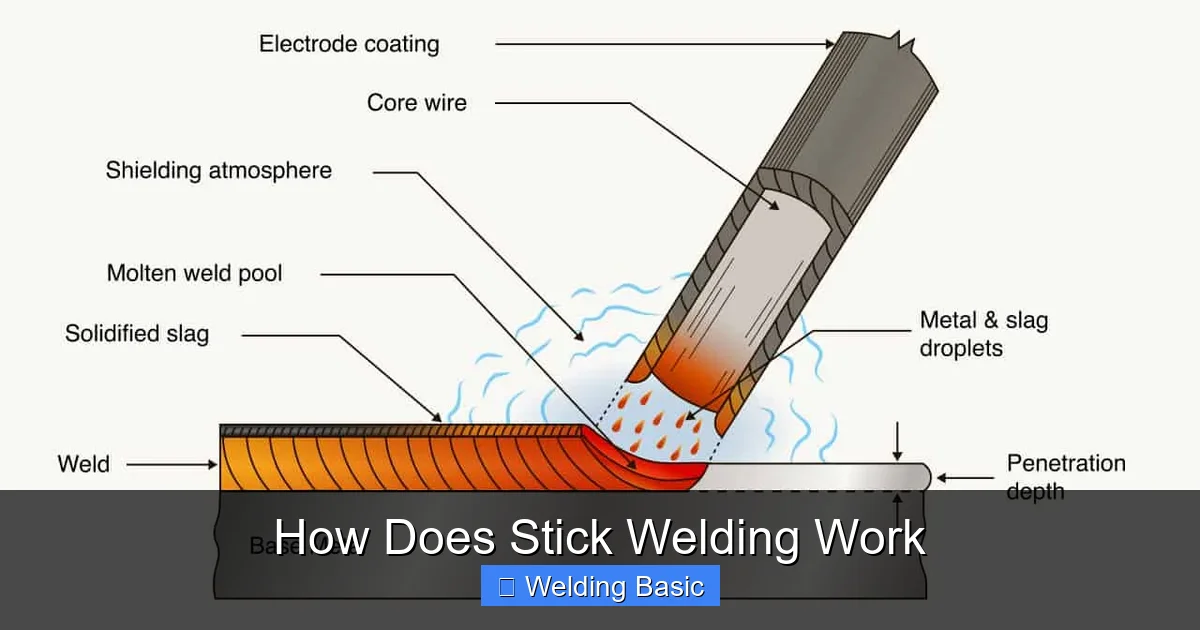
Visual guide about How Does Stick Welding Work
Image source: weldguru.com
Problem: Porosity (Holes in the Weld)
Porosity occurs when gas gets trapped. Causes: Dirty metal, wind, or incorrect electrode angle. Solution: Clean the metal, shield the weld from wind, and maintain a consistent travel speed.
Problem: Undercut (Grooves Along the Weld Edge)
This happens when too much heat melts the base metal. Solution: Reduce amperage, slow your travel speed, or use a shorter arc.
Problem: Excessive Spatter
Spatter is molten metal that sprays out. Causes: High amperage, long arc, or damp electrodes. Solution: Dry your electrodes in a rod oven if possible, shorten the arc, and adjust settings.
Problem: Weak or Incomplete Fusion
The weld doesn’t bond properly to the base metal. Solution: Increase amperage, clean the metal thoroughly, and ensure proper electrode angle and travel speed.
Safety First: Welding Safely with Stick
Welding involves heat, light, sparks, and fumes—so safety is non-negotiable.
- Always wear a welding helmet with the right shade (usually #10–#13).
- Use flame-resistant clothing—no synthetic fabrics that can melt.
- Work in a well-ventilated area or use a fume extractor.
- Keep a fire extinguisher nearby and remove flammable materials.
- Inspect cables and connections before each use to prevent shocks.
Remember: a safe weld is a strong weld.
Conclusion
Stick welding may seem tricky at first, but with practice, it becomes one of the most reliable and versatile welding methods. It works by creating an electric arc that melts a flux-coated electrode and the base metal, forming a strong joint protected by a gas shield and slag. You don’t need fancy equipment—just a welder, the right rods, and good technique.
Whether you’re fixing a fence, building a trailer, or learning a new skill, stick welding gives you the power to work in almost any condition. Start slow, focus on consistency, and always prioritize safety. With time and practice, you’ll create clean, strong welds that last.
So grab your gear, strike that arc, and start welding with confidence.