

A welding torch is a vital tool used to generate high-temperature flames or electric arcs for joining metals. This guide explains its components, types, operation, and safety practices to help beginners understand and use it effectively.
Key Takeaways
- Welding torches produce heat through gas combustion or electric arcs to melt and fuse metals.
- There are two main types: gas welding torches (like oxy-acetylene) and electric arc welding torches (like TIG and MIG).
- Each torch has key parts including a handle, nozzle, mixing chamber, and gas or electrode supply lines.
- Proper setup and safety gear—such as gloves, goggles, and ventilation—are essential for safe operation.
- Choosing the right torch depends on the material, thickness, and welding technique you plan to use.
- Regular maintenance like cleaning nozzles and checking hoses prevents malfunctions and extends tool life.
- Understanding flame or arc control helps achieve clean, strong welds with minimal spatter or defects.
What Is a Welding Torch?
A welding torch is a handheld tool designed to produce intense heat—either through a gas flame or an electric arc—to melt and join metal pieces together. It’s one of the most essential tools in welding, acting as the “delivery system” for the heat source that makes fusion possible. Whether you’re fixing a fence, building a custom motorcycle frame, or working in industrial fabrication, the welding torch is your direct connection to the welding process.
In simple terms, think of the welding torch as the “pen” that draws molten metal into seams, creating strong, permanent bonds. But unlike a pen, it operates at extremely high temperatures—often exceeding 6,000°F (3,315°C)—so understanding how it works, how to use it safely, and how to maintain it is crucial.
This guide will walk you through everything you need to know about welding torches: what they are, how they work, the different types available, how to set them up, and best practices for safe and effective use. By the end, you’ll have a solid foundation to start welding confidently.
How Does a Welding Torch Work?
The core function of a welding torch is to generate and direct a concentrated heat source onto metal. But the method of heat generation depends on the type of torch. There are two primary categories: gas welding torches and electric arc welding torches.
Visual guide about What Is a Welding Torch
Image source: st4.depositphotos.com
Gas Welding Torches (Oxy-Fuel)
Gas welding torches, most commonly oxy-acetylene torches, use a mixture of fuel gas (like acetylene) and oxygen to create a high-temperature flame. Here’s how it works:
- The torch has two separate hoses—one for oxygen and one for acetylene—that connect to gas cylinders.
- Inside the torch handle, the gases mix in a mixing chamber.
- When ignited at the nozzle, the mixed gases burn, producing a clean, focused flame.
- The flame heats the base metal to its melting point, and a filler rod is often added to form the weld pool.
This method is great for welding thin metals, brazing, and cutting, and it offers excellent control over the heat input.
Electric Arc Welding Torches
Electric arc welding torches use electricity to create an arc between an electrode and the workpiece. The arc generates intense heat that melts the metal. Common types include:
- MIG (Metal Inert Gas) Torches: Use a continuous wire electrode fed through the torch. Shielding gas (like argon) protects the weld from contamination.
- TIG (Tungsten Inert Gas) Torches: Use a non-consumable tungsten electrode and require a separate filler rod. Also uses shielding gas for clean, precise welds.
- Stick (SMAW) Torches: Use a consumable electrode coated in flux. The flux creates a protective gas shield as it burns.
These torches plug into a welding machine that controls voltage, current, and wire feed speed (in MIG). The arc is struck by touching the electrode to the metal or using high-frequency starts (in TIG).
Key Components of a Welding Torch
While designs vary by type, most welding torches share common components that work together to deliver heat safely and efficiently.
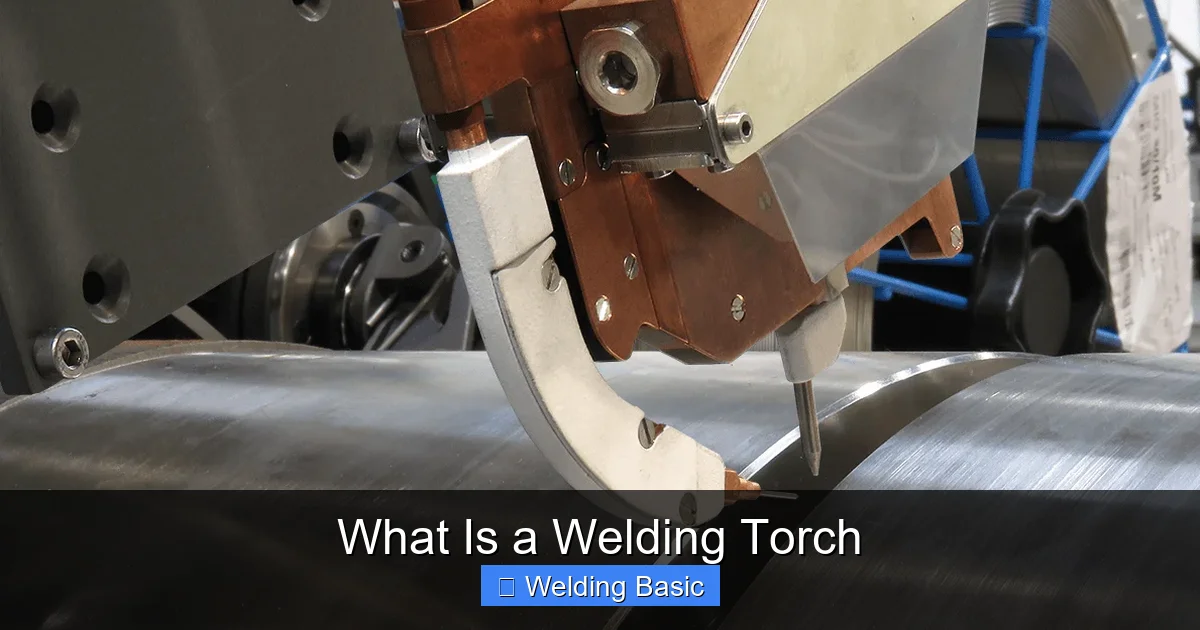
Visual guide about What Is a Welding Torch
Image source: polysoude.com
Torch Handle
The handle is the part you grip. It’s usually made of heat-resistant material and designed for comfort and control. In gas torches, it houses the gas mixing chamber; in electric torches, it contains the electrical connections and gas/wire pathways.
Nozzle or Contact Tip
The nozzle directs the flame or arc to the workpiece. In MIG torches, it’s called a contact tip and guides the wire. In TIG torches, the nozzle focuses the shielding gas around the tungsten electrode. A clean, properly sized nozzle ensures consistent performance.
Electrode or Filler Wire
In arc welding, the electrode (tungsten in TIG, wire in MIG) carries the current and often becomes part of the weld. In gas welding, a separate filler rod is manually fed into the flame.
Gas Supply Lines
These hoses deliver oxygen, acetylene, or shielding gas from cylinders or regulators to the torch. They must be in good condition—no cracks or leaks—to ensure safety and performance.
Cooling System (in Some Torches)
High-amperage TIG and MIG torches may use water cooling to prevent overheating. These have additional hoses for coolant circulation, especially in industrial settings.
Types of Welding Torches and Their Uses
Choosing the right torch depends on your project. Here’s a quick breakdown of the most common types and their best applications.
Oxy-Acetylene Torch
Best for: Brazing, soldering, cutting, and welding thin metals (like sheet metal or copper pipes).
Pros: Portable, versatile, doesn’t require electricity.
Cons: Slower than arc welding, less effective on thick materials.
MIG Torch
Best for: Automotive repair, fabrication, and beginners.
Pros: Fast, easy to learn, great for thick materials.
Cons: Sensitive to wind (outdoor use requires windbreaks).
TIG Torch
Best for: Precision work, stainless steel, aluminum, and thin materials.
Pros: Clean, high-quality welds, excellent control.
Cons: Slower, more skill required.
Stick Torch (Electrode Holder)
Best for: Outdoor welding, heavy-duty repairs, and rusty metals.
Pros: Durable, works in windy conditions, inexpensive.
Cons: More spatter, harder to master.
How to Set Up and Use a Welding Torch
Proper setup ensures safety and weld quality. Follow these steps whether you’re using a gas or electric torch.
Step 1: Gather Your Equipment
- Welding torch
- Gas cylinders (for oxy-fuel) or welding machine (for arc)
- Regulators and hoses
- Filler rods or wire
- Safety gear: gloves, helmet, goggles, flame-resistant clothing
Step 2: Inspect All Components
Check hoses for cracks, leaks, or wear. Ensure connections are tight and regulators are functioning. For electric torches, inspect the electrode and contact tip.
Step 3: Connect and Pressurize
For gas torches: Attach oxygen and acetylene cylinders, open valves slowly, and set pressures according to manufacturer specs (typically 5–15 psi for acetylene, 30–40 psi for oxygen).
For electric torches: Plug into the welder, load wire (MIG), or insert tungsten (TIG), and set voltage/amperage.
Step 4: Light the Torch (Gas Only)
Open the acetylene valve slightly, ignite with a striker, then slowly open the oxygen valve to adjust flame type (neutral, carburizing, or oxidizing).
Step 5: Begin Welding
Hold the torch at the correct angle (usually 15–30 degrees), maintain a steady distance (1/4 to 1/2 inch), and move at a consistent speed. Watch the weld pool and adjust as needed.
Step 6: Shut Down Safely
Turn off gas valves in the correct order (acetylene first, then oxygen), release pressure from regulators, and coil hoses neatly. For electric torches, turn off the machine and disconnect.
Safety Tips for Using a Welding Torch
Welding involves extreme heat, UV radiation, sparks, and flammable gases. Safety is non-negotiable.
- Always wear a welding helmet with proper shade lens (shade 10–14 depending on amperage).
- Use flame-resistant gloves, apron, and clothing—no synthetic fabrics.
- Work in a well-ventilated area or use fume extraction to avoid inhaling toxic gases.
- Keep a fire extinguisher nearby and remove flammable materials from the workspace.
- Never point the torch at people, clothing, or fuel sources.
- Inspect gas cylinders for damage and secure them upright to prevent tipping.
Troubleshooting Common Welding Torch Problems
Even experienced welders face issues. Here’s how to fix common problems:
Weak or Unstable Flame (Gas Torch)
Cause: Low gas pressure, clogged nozzle, or air leaks.
Fix: Check regulator settings, clean the nozzle with a proper tool, and inspect hoses for leaks.
Excessive Spatter (MIG/TIG)
Cause: Incorrect voltage, dirty metal, or wrong wire/gas.
Fix: Adjust settings, clean the workpiece, and ensure you’re using the right consumables.
Torch Overheating
Cause: High amperage without cooling or blocked airflow.
Fix: Use a water-cooled torch for high-duty cycles, or take breaks to let it cool.
Arc Won’t Start (TIG/MIG)
Cause: Loose connections, wrong polarity, or contaminated tungsten.
Fix: Check machine settings, clean the electrode, and ensure proper grounding.
Maintenance and Care
A well-maintained torch lasts longer and performs better. Follow these tips:
- Clean the nozzle regularly with a nozzle cleaning tool or compressed air.
- Replace worn contact tips (MIG) or cracked ceramic cups (TIG).
- Store hoses coiled, not kinked, and protect from oil, heat, and UV exposure.
- Drain water-cooling systems if not used in freezing temperatures.
- Keep electrodes dry and in sealed containers to prevent moisture absorption.
Conclusion
A welding torch is more than just a tool—it’s the heart of the welding process. Whether you’re using a classic oxy-acetylene flame or a modern TIG arc, understanding how your torch works, how to set it up, and how to use it safely makes all the difference in your welding success. With the right knowledge and care, your torch will deliver strong, clean welds for years to come.
Now that you know what a welding torch is and how to use it, you’re ready to take on your first project. Start small, practice often, and always prioritize safety. Happy welding!